
Microsoft Project 2010 - Module 1
© Watsonia Publishing Page 1 Microsoft Project Basics
CHAPTER 1 MICROSOFT PROJECT BASICS
Project management software is arguably one of the most difficult to
learn, not only because you need to study how to use the software,
but because you also need to know a little about project
management theory.
Nevertheless, you need to start somewhere. This is a roll up your
sleeves session where you will be introduced to the basic operating
philosophy of Microsoft Project.
In this session you will:
gain an understanding of Microsoft Project's operating
philosophy
learn how to start Microsoft Project
gain an understanding of the main Microsoft Project
screen elements
gain an understanding of how Microsoft Project works
learn how to use the Ribbon
gain an understanding of Backstage View in Microsoft
Project
gain an understanding of the work area and project views
learn how to change the view of your project
learn how to split the project work area horizontally
gain an understanding of tables in Microsoft Project
learn how to change the Table View
gain an understanding of the special Gantt Chart view
learn how to work with the Gantt Chart view
learn how to add a command to the Quick Access
Toolbar
learn how to work with existing Microsoft Project files
learn how to exit from Microsoft Project.
INFOCUS
WPL_J400
Microsoft Project 2010 - Module 1
© Watsonia Publishing Page 2 Microsoft Project Basics
HOW MICROSOFT PROJECT WORKS
Microsoft Project is really a computer database
that uses two main tables of data to keep track of
your project. Project uses one table to store
information about the tasks of your project and
the other for resource information. By using the
many views available in Project, you can display
your project data from these tables in many
different ways.
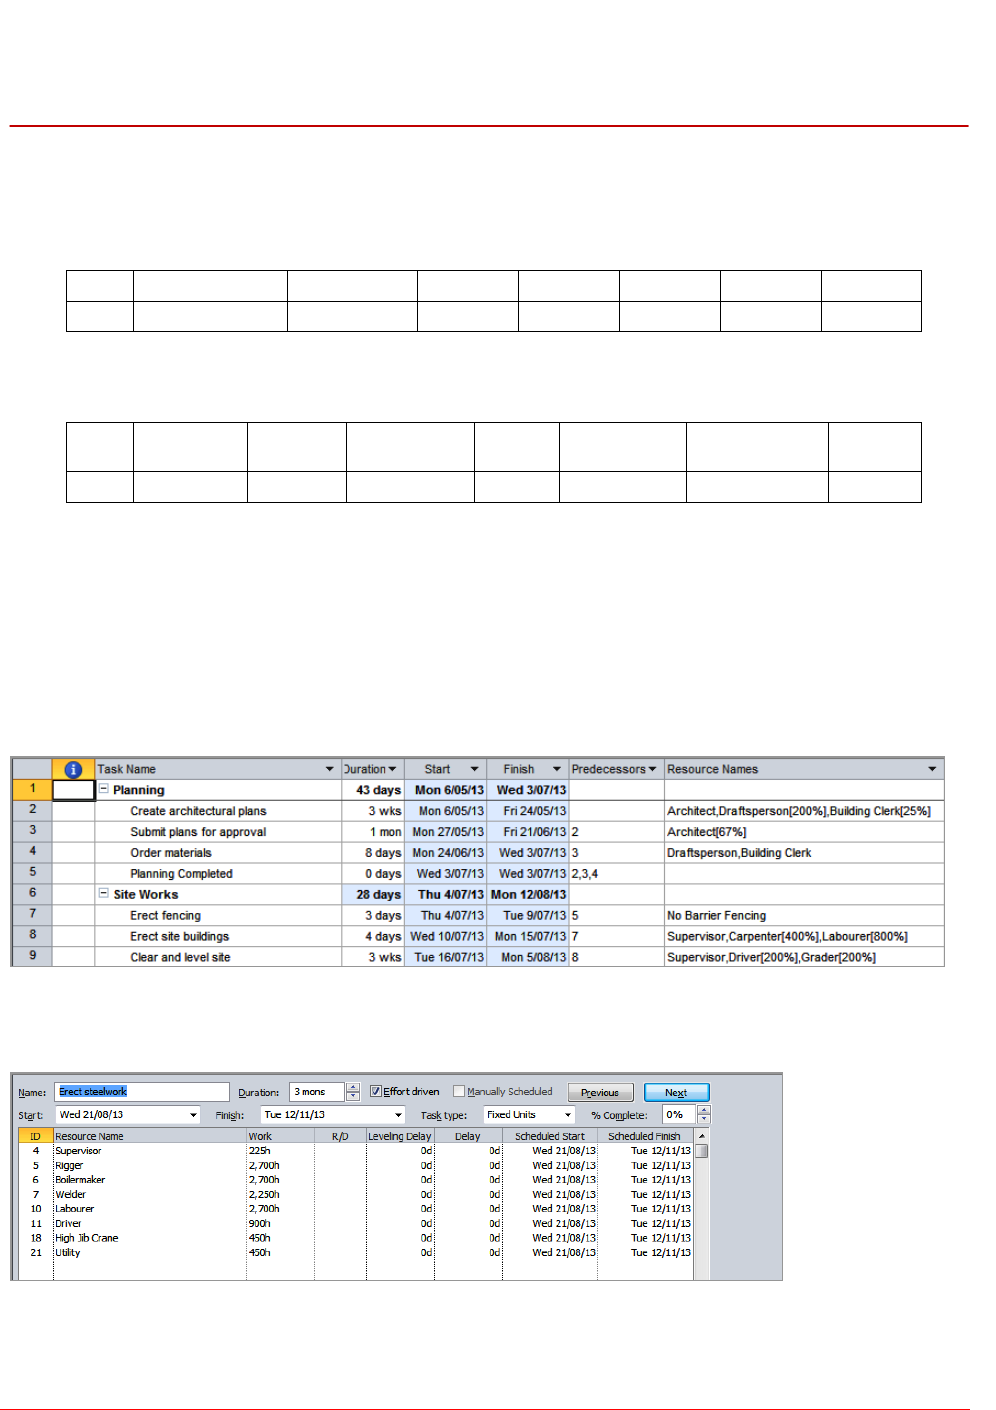
Tasks
This table is comprised of over 240 columns (or fields) which contain all sorts of information about the
tasks such as scheduled start, scheduled finish, name, duration, cost, and the like. Some of these
fields require you to enter data, while others are calculated and filled by Microsoft Project for you.
ID
Name
Duration
Start
Finish
Fixed
Cost
etc...
8
Erect fencing
2 days
1/2/2013
3/2/2013
No
$500
Resources
This table contains over 200 fields (or columns).
ID
Name
Initials
Group
Max
Units
Standard
Rate
Overtime Rate
etc...
3
Builder
FG
Contractor
4
$55.00/h
$75.00/h
The two tables are joined together by assigning resources to tasks.
Views
To help you see, or view, your data, Microsoft Project adopts techniques used in spreadsheets,
databases, and graphics packages.
For example you can see your task or resource table in sheets on the screen. Sheets are similar to
spreadsheet programs where data is presented in rows and columns. In fact, many of the operations
used in spreadsheets, such as widening columns, deleting data, selecting cells, and the like, are also
found in Microsoft Project.
You can also see, or view, your data in forms. These forms are similar to a form view that you receive
for data entry screens in database programs. Forms allow you to add or edit data and you can usually
cycle through the cards as you would in a normal database.
If you wish to see your data graphically you can view it as a Gantt Chart or Network Diagram.
In addition you have a variety of other graphs for displaying resources.
Microsoft Project 2010 - Module 1
© Watsonia Publishing Page 3 Microsoft Project Basics
STARTING MICROSOFT PROJECT
Try This Yourself:
Before you begin, ensure that
your computer is switched on and
that the Windows desktop is
displayed on your screen…
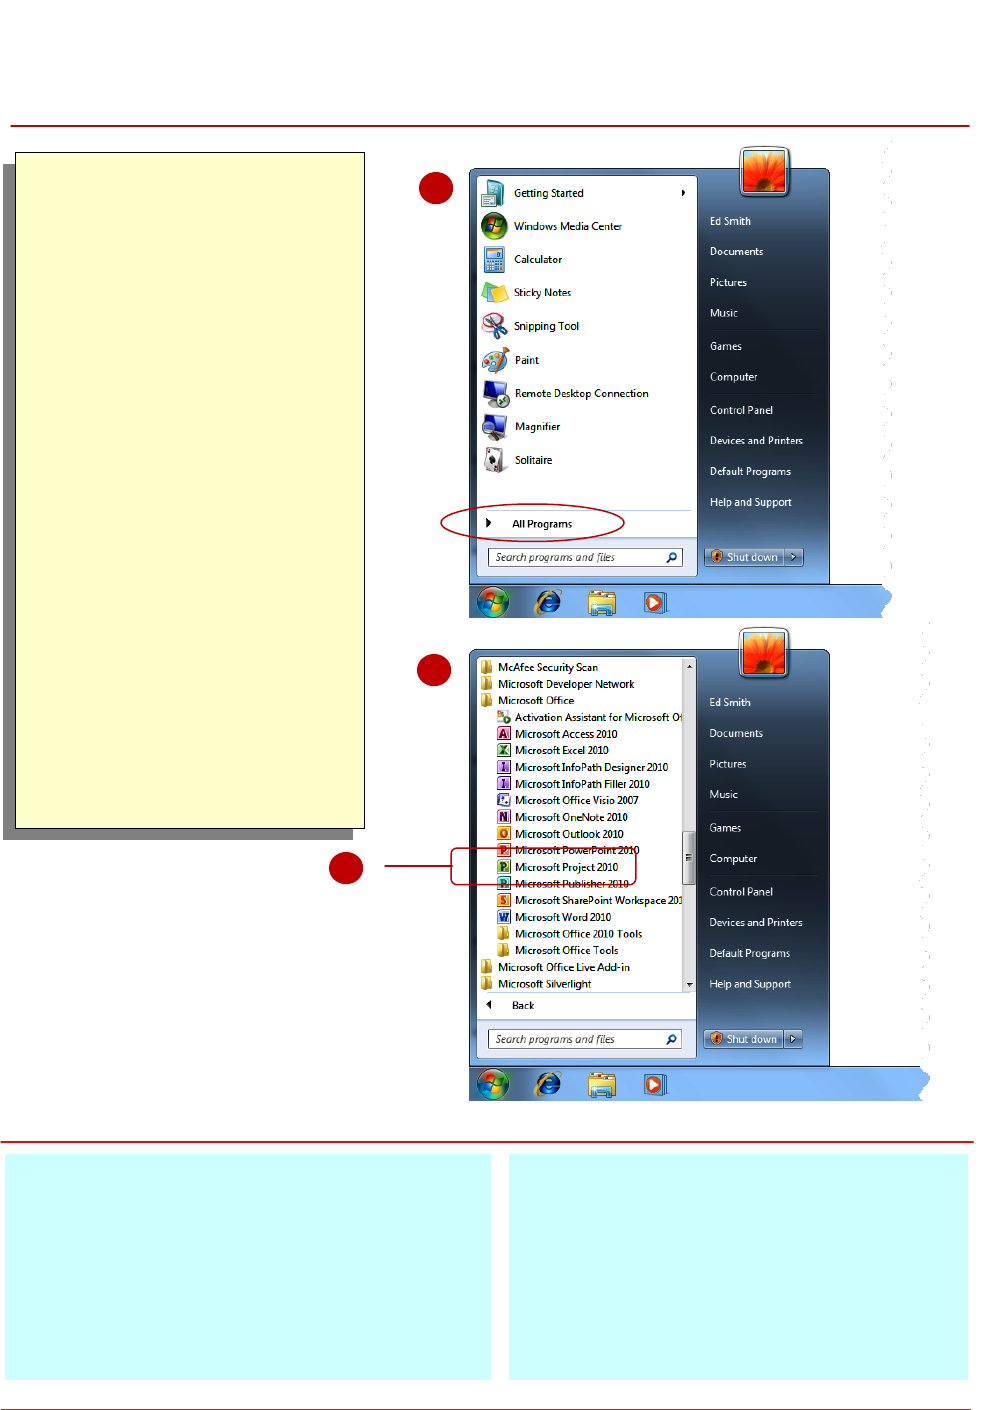
Click on the Windows Start
button (it’s a round button
with a Windows logo on it)
at the bottom left-hand
corner of the screen to
display the menu
Click on All Programs
Click on Microsoft Office
to expand the menu and
see all of the Microsoft
Office applications installed
on your computer
Click on Microsoft Project
2010
After a few moments of
huffing and puffing Project
will start with a blank
“project” on the screen
For Your Reference…
To start Microsoft Project:
1. Click on the Windows Start button
2. Click on All Programs
3. Click on Microsoft Office
4. Click on Microsoft Project 2010
Handy to Know…
After you have accessed Microsoft Project
several times it should appear in the first part
of the Start menu – this means you won’t
need to continue to the All Programs menu.
1
2
To create a new project, or edit an existing one,
the first thing that you need to do is to start
Microsoft Project. As a standard software
application, how Microsoft Project is started is
largely determined by Windows. For example, it
can be started from the Windows Start menu, from
a shortcut, or from Windows Explorer by
accessing a file that was created in Project.
4
Microsoft Project 2010 - Module 1
© Watsonia Publishing Page 4 Microsoft Project Basics
THE MICROSOFT PROJECT SCREEN
The Microsoft Project screen will vary depending
upon the view, table, and filter that is currently
active. However, you will need to become familiar
with the basic components of the screen as
shown below. Understanding the layout of the
screen, and its components and terminology will
help you in using Microsoft Project.
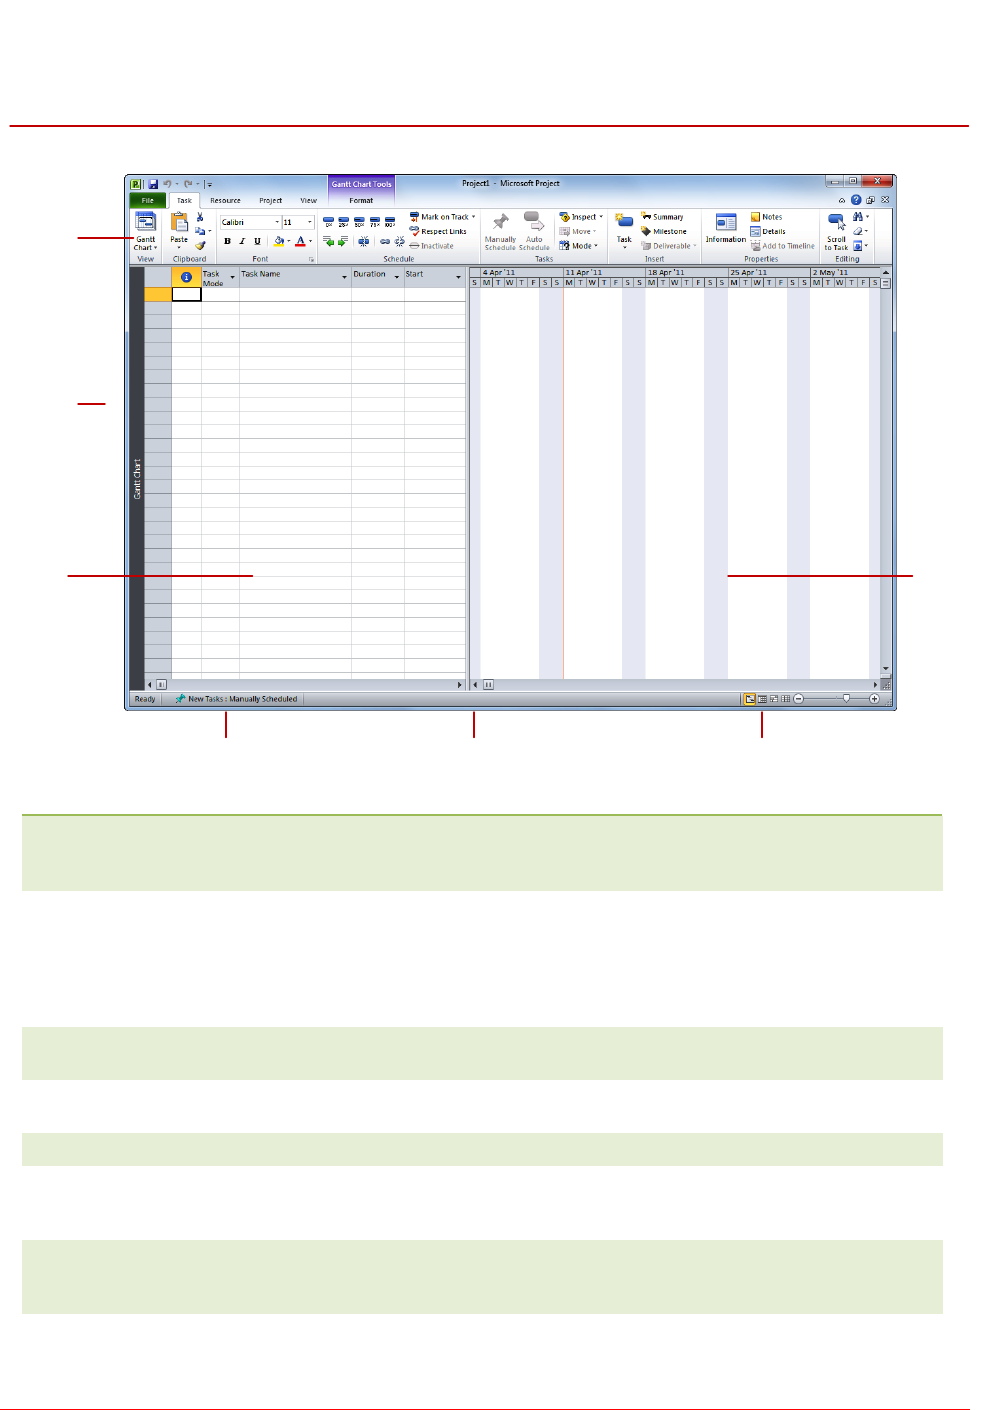
Ribbon
The Ribbon displays the commands required to use Microsoft Project. It is made up of
tabs (File, Task, Resource, etc) which each contain groups of commands organised into
logical order.
Active pane
indicator
The active pane indicator is a vertical bar with a dark colouring that runs down the left
side of a screen (or a view). The one above contains the words Gantt Chart so that you
know you have a Gantt Chart as the active view. You can actually have two different
views open by splitting the screen – only one view, however, can be active because
things like the commands on the Ribbon are controlled by what you are viewing. The
indicator shows which view is currently active.
Sheet view
Your project’s tasks and resources can be seen as a table, much like a spreadsheet. In
Microsoft Project this is referred to as a sheet view.
Scheduling mode
Your project can be scheduled manually (the default) or automatically. This (very
important) indicator tells you which mode is currently applicable.
Status bar
Watch this space – it tells you what Microsoft Project is currently up to.
Quick view buttons
There are many ways to change the view of the screen. These four buttons provide
quick access to the four most common views saving you the hassle of locating the
commands to do this on the Ribbon.
Gantt chart
The Gantt Chart is the world’s most favourite view of a project. It shows your project’s
tasks as a series of timelines. It is the default view of Microsoft Project when it is first
started and, in reality, will most likely be the one you use most.
Ribbon
Active
pane
indicator
Sheet
view
Gantt
chart
Quick view buttons
Status bar
Scheduling mode
Microsoft Project 2010 - Module 1
© Watsonia Publishing Page 5 Microsoft Project Basics
HOW MICROSOFT PROJECT 2010 WORKS
For a novice user the Microsoft Project 2010
screen can seem intimidating. However, you’ll
soon see that it is made up of only three key
areas. The data you type is placed in the work
area. The data here can be manipulated and
changed using commands on the Ribbon. The
data is saved in a project file which is controlled
through commands on the Backstage.
The Work Area
The work area occupies the
largest part of the screen and
contains the data associated
with your project. The key
point to remember is that a
project is made up of tasks
and resources and the work
area allows you to view your
task and resource data in a
number of different ways. The
work area may show your data
in a sheet view, or maybe a
chart view like a Gantt chart or
maybe even both!
The Ribbon
When you need to do something with the data in the work area, such as format it, colour it, analyse it,
move it, copy it, change the view of it and much more, you’ll find all of the relevant commands on the
Ribbon. The Ribbon has commands organised thematically using a series of tabs across the top.
Commands on each tab are further organised into groups of like-commands. It’s not too hard to get the
hang of where a command can be found. Remember, a project is simply a view of task and resource data
– hey, have a look at the Ribbon and you’ll find a Tasks and a Resources tab! So whatever you need to
do with tasks can be found on the Tasks tab, and anything you want to do with resources can be found
on the Resources tab.
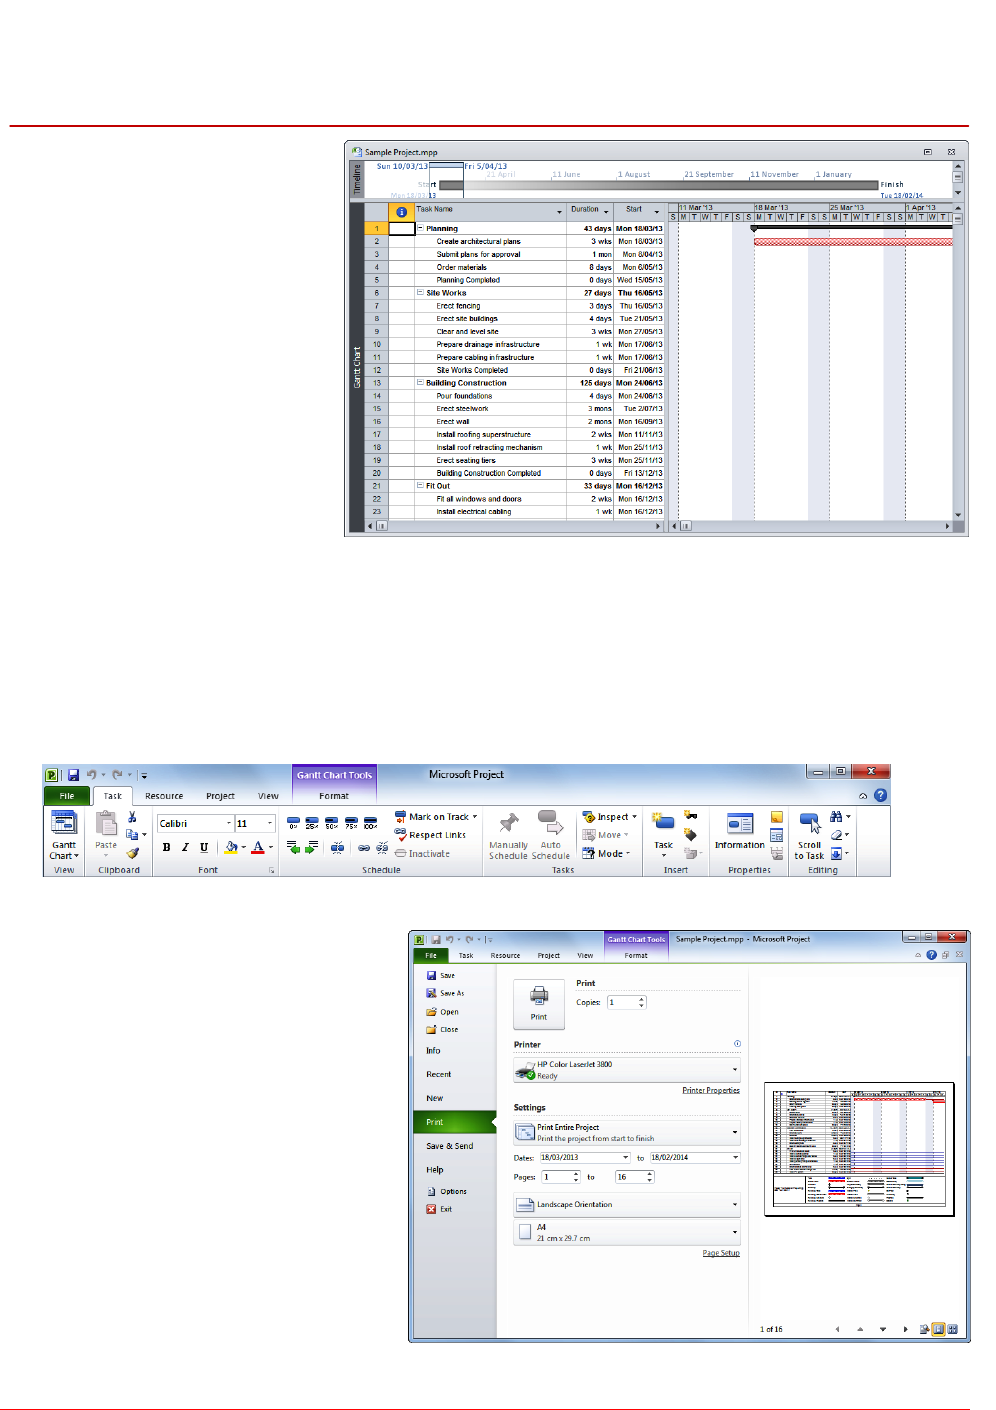
Backstage
When you want to do something with
the data in your work area, such as
save it so that you can access it again
later, print it, share it with a colleague,
send it to your boss, protect it from
prying eyes, or whatever, you will
need to access the Microsoft Office
Backstage area of Microsoft Project.
The Backstage is accessed using the
File tab on the Ribbon. Rather than
offering you commands on a Ribbon,
Backstage occupies the entire screen
and has a series of options down the
left side. Here the Print option is
active, and that is why you can see a
preview of the work area and a series
of print-related options on the right
side of the Backstage.
Microsoft Project 2010 - Module 1
© Watsonia Publishing Page 6 Microsoft Project Basics
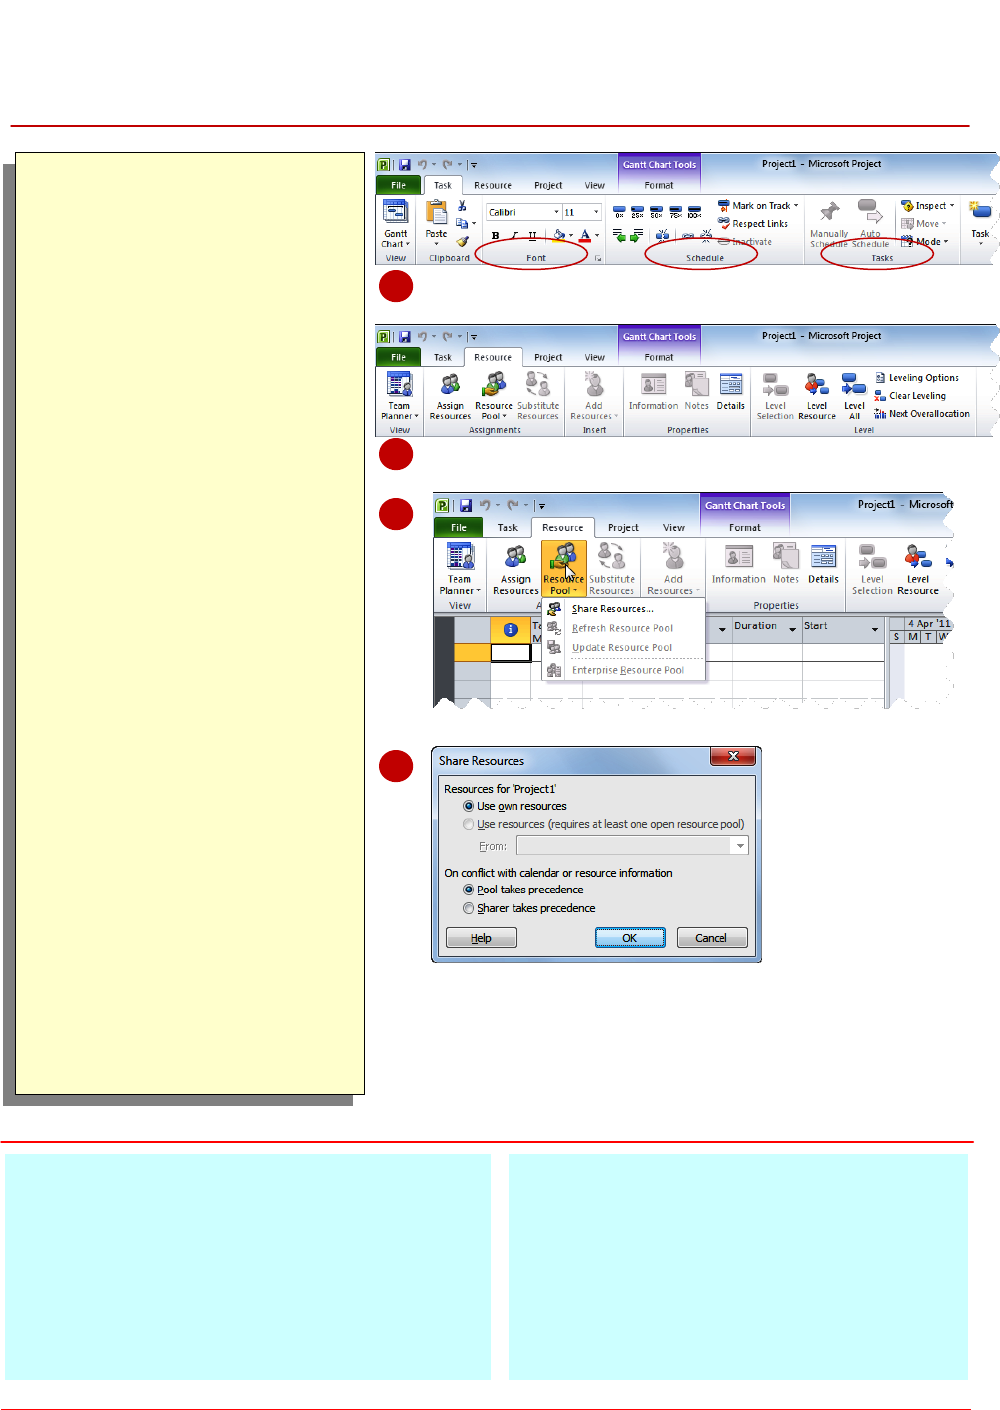
USING THE RIBBON
Try This Yourself:
Before starting this exercise
ensure that Project has
started...
Examine the various
groups on the Task tab
The group names appear at
the bottom of the Ribbon…
Click on the Resource tab
The commands on this tab
are used to work with
resources. Many will not be
available because there are
no resources in the blank
project on the screen. You
can never be too sure what
you’ll get when you click on
a command…
Click on Resource Pool in
the Assignments group to
display a menu
Click on Share Resources
to display the Share
Resources dialog box
Click on [Cancel] to pop
the box away
Click on the other tabs and
spend some time
examining the groups and
commands they contain
Click on the Task tab
For Your Reference…
To use the Ribbon:
1. Click on a tab to display the commands
2. Click on a button to activate a command,
display a gallery, or display a dialog box
Handy to Know…
Additional tabs known as Contextual tabs
appear in specific circumstances. For
example, if you insert a picture, the Picture
Tools: Format tab will appear. This provides
quick access to all of the tools you may need
to modify and work with the picture.
1
2
The Ribbon is the command centre for Microsoft
Project. It provides a series of commands
organised into groups and placed on relevant
tabs. Tabs are activated by clicking on their
name to display the command groups. Commands
are activated by clicking on a button, tool or gallery
option. Everything you could possibly want to do in
Project will be found somewhere on this Ribbon.
3
4
Microsoft Project 2010 - Module 1
© Watsonia Publishing Page 7 Microsoft Project Basics
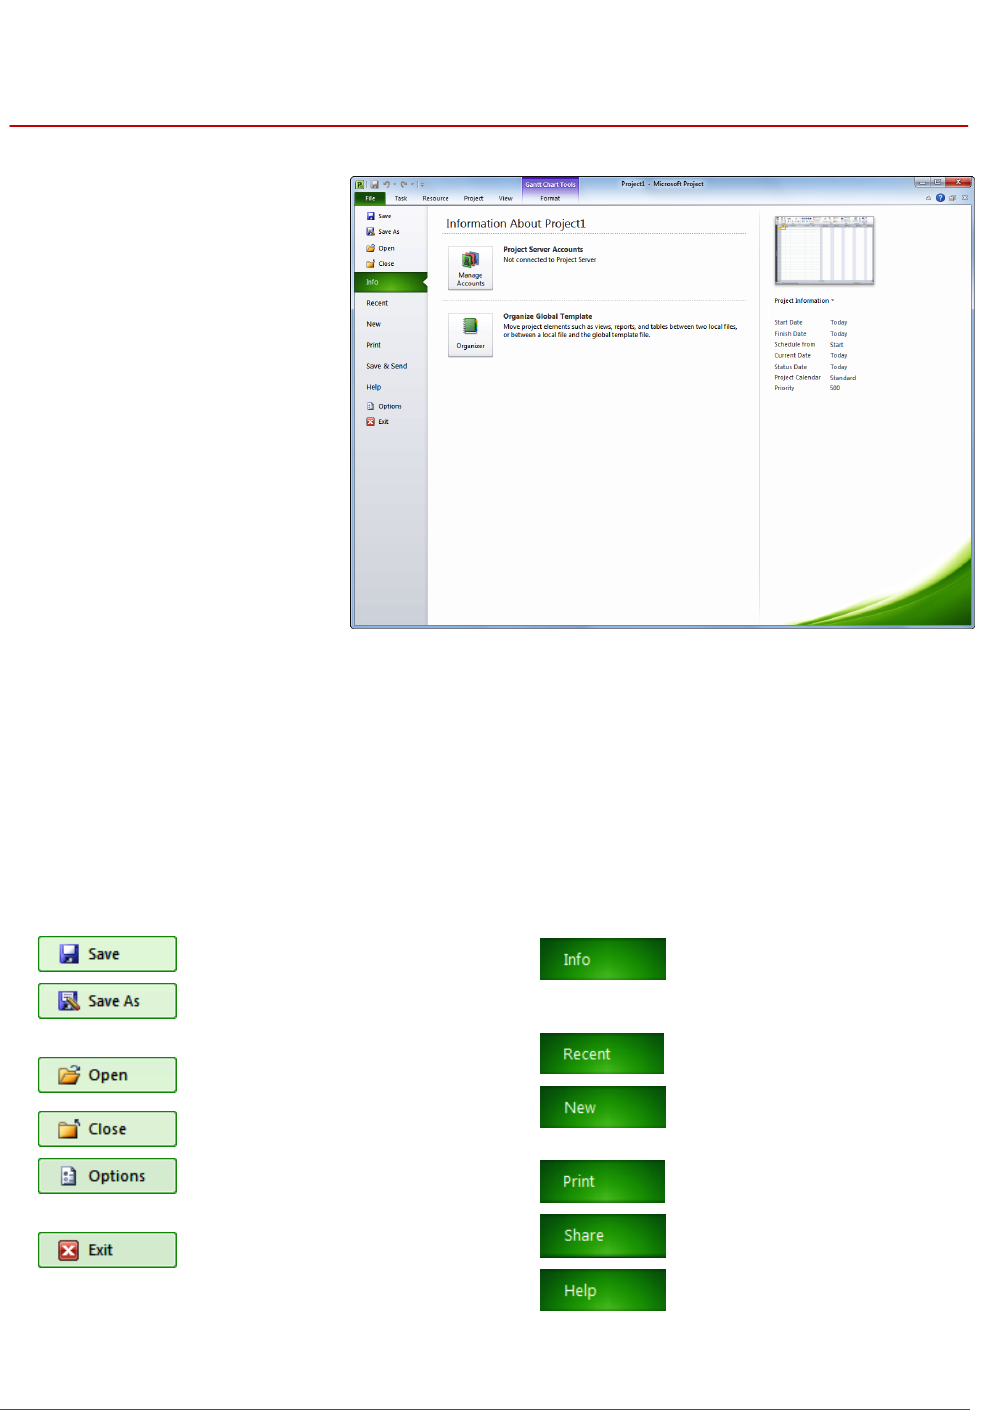
UNDERSTANDING THE BACKSTAGE VIEW
The Ribbon allows you work on the content in a
worksheet – you can add more content, colour it,
chart it, analyse it, copy it, and much more. The
Backstage, which is accessed using the File tab,
allows you to do something with the content you
create. You can save it for reuse later, print it on
paper, send it via email, and more using the
options found in Backstage view.
The Backstage Screen
The File tab on the Ribbon is
not a normal tab – as you can
tell by the fact that it is coloured.
Clicking on the File tab launches
a mini-program within Microsoft
Project known as Backstage
View. Backstage, as it’s known
for short, occupies the entire
screen although the tabs from
the Ribbon still remain visible at
the top.
At the left of the Backstage is a
navigation pane which is made
up of Quick commands,
smallish buttons which will
perform an operation
immediately, and largish tabs
which display more options and
information to the right of the
screen.
The whole underlying purpose of
the Backstage is to allow you to
protect your data, to share it with
others, and to provide you with
valuable information both about
your data and the status of
Microsoft Project.
Backstage Tabs
The Backstage tabs provide more options for
working with a project
Provides status information about
the current project, and allows you
to manage versions and
permissions
Provides a list of recently saved
projects
Allows you to create a new project
and provides access to a huge
gallery of templates
Allows you to print the current
project and also previews it
Allows you to share your project
with other people
Provides access to Microsoft’s
help network and also provides
licensing information about your
software
Quick Commands
The Quick commands provide immediate access
to an operation.
Saves the current project
Allows you to save the current
project under a different name
or location
Opens a previously saved
project
Closes the current project
Provides access to options
that allow you to control how
Project looks and works
Allows you to close and exit
from Microsoft Project
Microsoft Project 2010 - Module 1
© Watsonia Publishing Page 8 Microsoft Project Basics
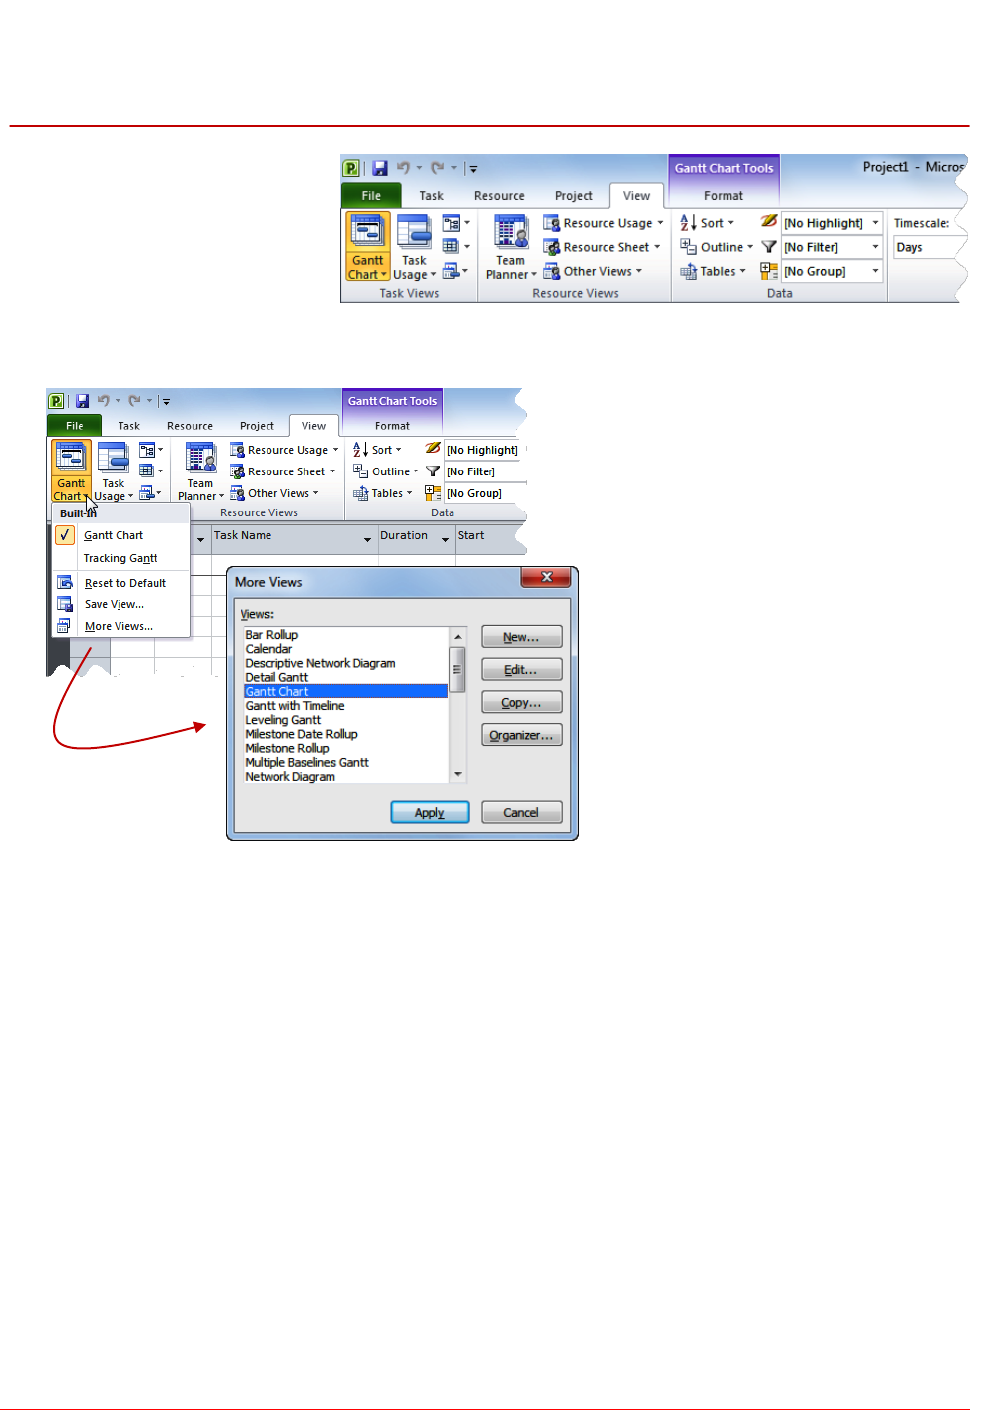
THE PROJECT WORK AREA
The main part of the Microsoft Project screen is
made up of the work area where your project
data is displayed. Remember, Project is really
just two tables of data – tasks and resources.
The work area shows you different aspects and
sometimes combined views of this data. For
example you can view your tasks and the
resources assigned to them.
Built-In Project Views
Microsoft Project contains 27 different built-in views for you. Seven of these views are available from
the Task Views and Resource Views groupings on the View tab, while the full 27 are available from
the More Views dialog box. Here’s a list of the 27 views – the ones marked with a (T) or (R) are
accessible directly from the View tab of the Ribbon.
Bar Rollup
Multiple Baselines Gantt
Task Details Form
Calendar (T)
Network Diagram (T)
Task Entry
Descriptive Network Diagram
Relationship Diagram
Task Form
Detail Gantt
Resource Allocation
Task Name Form
Gantt Chart (T)
Resource Form
Task Sheet
Gantt with Timeline
Resource Graph
Task Usage (T)
Levelling Gantt
Resource Name Form
Team Planner (R)
Milestone Date Rollup
Resource Sheet (R)
Timeline
Milestone Rollup
Resource Usage (R)
Tracking Gantt
The View Tab
The View tab on the Ribbon
provides you with access to
the views for your project’s
data.
Notice, there is a Task
Views grouping and a
Resource Views grouping
here!
When you click on the arrow for one of
the View commands you’ll receive a
menu of further views available to you.
All of the menus feature the More
Views command which displays the
More Views dialog box which lists all
of the standard views available to you
in Microsoft Project.
Microsoft Project 2010 - Module 1
© Watsonia Publishing Page 9 Microsoft Project Basics
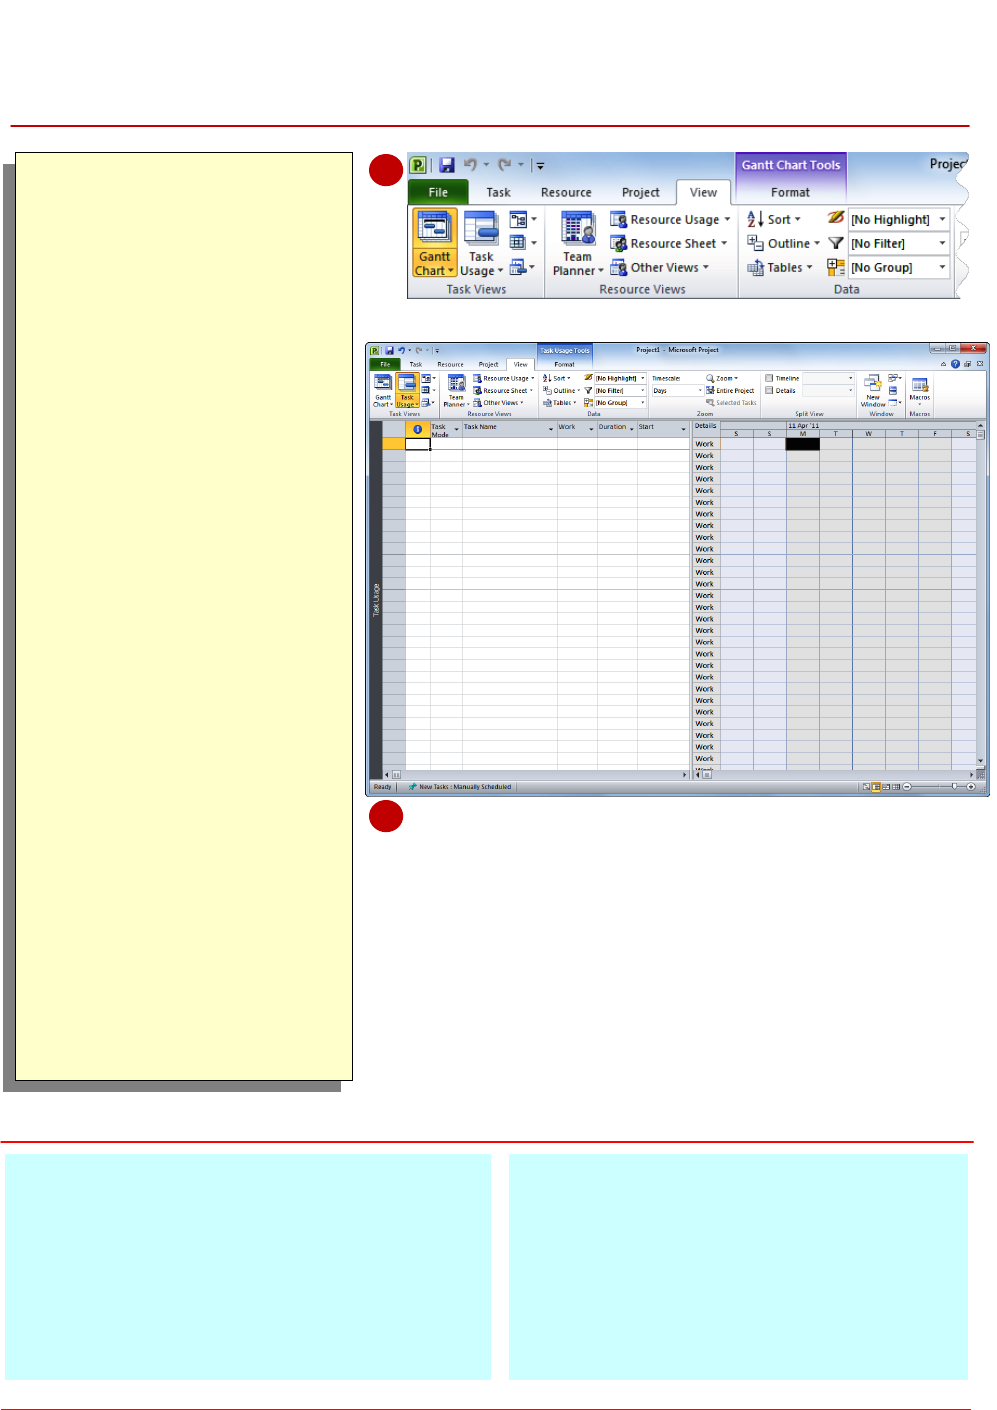
WORKING WITH VIEWS
Try This Yourself:
Before starting this
exercise ensure that
Microsoft Project has
started...
Click on the View tab and
spend a few moments
studying the options in the
Task Views and
Resource Views
groupings
Click on Task Usage in
Task Views to see the
work allocations on the
screen
Click on Calendar in
Task Views to see the
screen laid out as a
calendar
Click on Other Views in
Task Views to display a
menu and click on Task
Form
Click on Resource Sheet
in Resource Views to
see a spreadsheet-like
view of the resources
Click on Gantt Chart in
Task Views to return to
the Gantt Chart view
For Your Reference…
To display different views:
1. Click on a command on the View tab
or
Click on the arrow of a command and click
on More Views to display a list of all
available views
Handy to Know…
The Gantt Chart, Task Usage, Team
Planner, and Resource Sheet views appear
as buttons at the bottom right of the screen.
1
2
A view is the way we look at the project and the
data it contains. In order to work with your project
successfully, you will need to learn how to
operate and manipulate the many different views.
The main way to change the view of your project is
through the commands on the View tab or through
the Quick Views buttons at the bottom right of the
screen.
There is an obvious lack of data presented on this screen! Don’t
worry too much at this stage about what the view is all about. All
we are doing at this stage is examining the View commands to
see how they work and what they offer.
Microsoft Project 2010 - Module 1
© Watsonia Publishing Page 10 Microsoft Project Basics
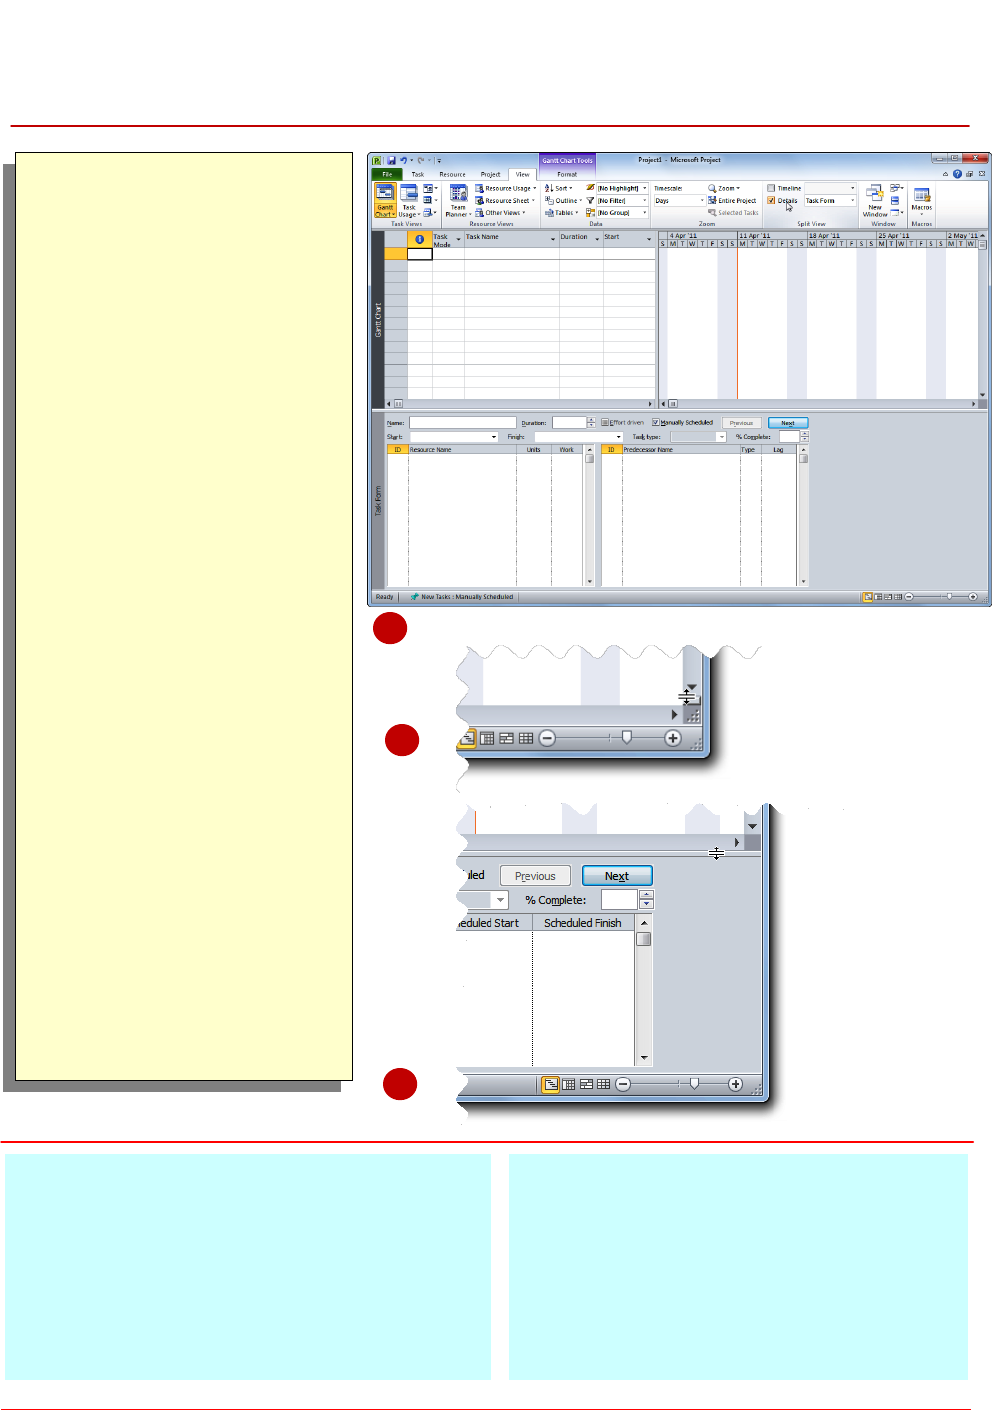
WORKING WITH SPLIT SCREENS
Try This Yourself:
Before starting this
exercise ensure that
Microsoft Project has
started...
Click on the View tab of
the Ribbon and click on
Details in Split View to
see the Task Form in the
bottom half of the screen
Click on the drop arrow to
see the different views
you can have
Click on Resource Form
to see it in the lower area
Click on Details in Split
View to return to the
Gantt Chart view
Move the mouse pointer
to the split screen button
at the bottom right of the
screen
Hold down the left mouse
button and drag the
button up about one third
of the screen to create a
custom split
Double click on the button
(which now runs the full
width of the screen) to
return to a single view
For Your Reference…
To display a spit view:
1. Click on Details in the Spilt View group on
the View tab
2. Optionally, click on the drop arrow for
Details and choose the desired view
Handy to Know…
There is also a Timeline view in the Split
View group. This shows a timeline which
embraces the start to end of the project. It’s a
useful view for quickly moving to specific
times in your project.
1
5
Sometimes in Microsoft Project one view of your
data is not enough! Project, therefore, allows you
to split your screen horizontally into two views.
For example, you might want to see tasks at the
top and their resources at the bottom. One of these
views is deemed to be the active view – as
indicated by the active pane indicator at the left of
the screen.
6
Microsoft Project 2010 - Module 1
© Watsonia Publishing Page 11 Microsoft Project Basics
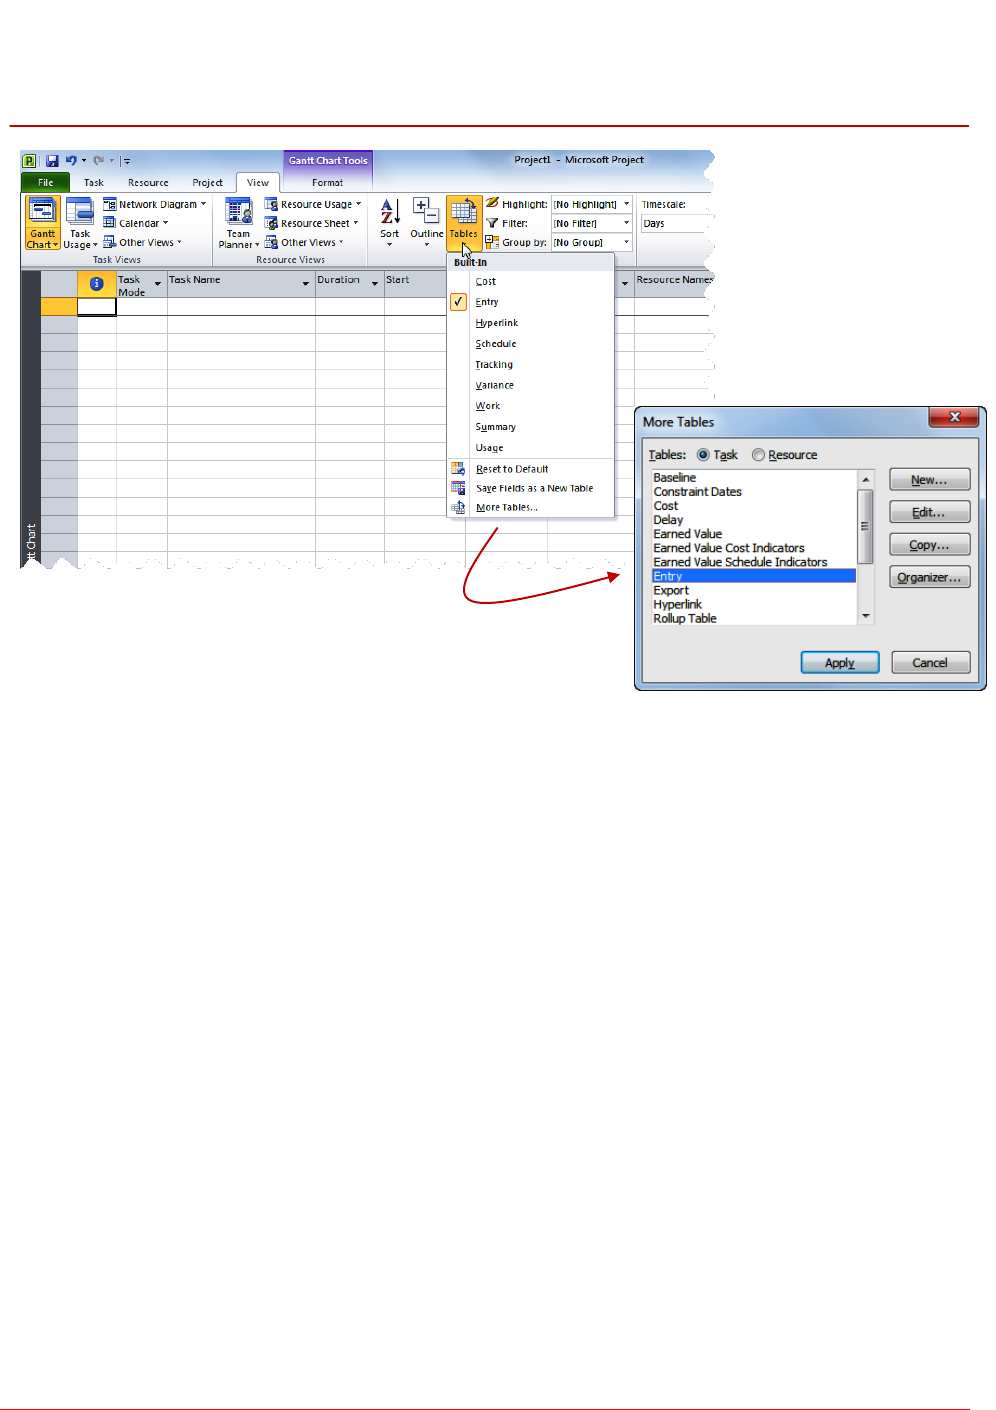
UNDERSTANDING SHEET VIEWS
Sheet views of data are common to database
and spreadsheet applications. Microsoft Project
also uses sheet views where data is presented
in rows and columns. In Project there are literally
dozens of columns (called fields) for tasks and
similarly for resources. To make it easier to work
with these columns, oops fields, they have been
organised into tables.
About Tables
Since there are literally dozens of fields for both Tasks and Resources, Microsoft Project organises
these in specialised groupings into tables. For example, fields for tasks associated with costs are
organised into a Cost table, fields that are commonly used for data entry are organised into an
Entry table, and so on.
Task Tables
There are 17 pre-defined tables for tasks as follows:
Baseline
Earned Value
Export
Summary
Constraint Dates
Earned Value Cost Indicators
Hyperlink
Tracking
Cost
Earned Value Schedule Indicators
Rollup Table
Usage
Delay
Entry
Schedule
Variance
Work
Resource Tables
There are 10 pre-defined tables for resources as follows:
Cost
Entry – Material Resources
Hyperlink
Usage
Earned Value
Entry – Work Resources
Summary
Work
Entry
Export
The Tables command on
the View tab provides
access to the tables in
Microsoft Project. The
menu presents a few of
the more commonly used
tables but all of the tables
are obtained using the
More Tables command.
Microsoft Project 2010 - Module 1
© Watsonia Publishing Page 12 Microsoft Project Basics
WORKING WITH TABLES
Try This Yourself:
Before starting this
exercise ensure that
Microsoft Project has
started...
Click on the View tab on
the Ribbon, click on
Other Views in the
Task Views group and
click on Task Sheet to
see tasks presented in a
sheet view
Click on Tables in the
Data group and click on
Cost to see Cost
columns
Click on Tables again
and click on More
Tables to display the
More Tables dialog box
Click on Delay and click
on [Apply]
Click on Gantt Chart in
Task Views to see the
Gantt Chart view again
– together with the
Entry table
Click on Tables in the
Data group and click on
Cost to see the Cost
table with the Gantt
Chart view
Click on Tables again
and click on Entry
For Your Reference…
To change the tables in view:
1. Click on Tables in the Data group on the
View tab and click on the desired table or
click on More Tables
2. If you are using the More Tables box click
on the desired table and click on [Apply]
Handy to Know…
To quickly see the name of the current table
view, move your mouse pointer to the All
Cells box. This is located in the top left hand
corner of the table, where the rows and
columns intersect. A ToolTip will be
displayed containing the table view name.
1
Microsoft Project consists of two databases:
tasks which contains over 240 columns of data,
and resources which contains over 200 columns
of data. Tables display information from these
columns (or fields) into organised and logical
groupings. Once a Sheet view has been chosen
you can change the table of fields that are
presented.
5
6
2

Microsoft Project 2010 - Module 1
© Watsonia Publishing Page 13 Microsoft Project Basics
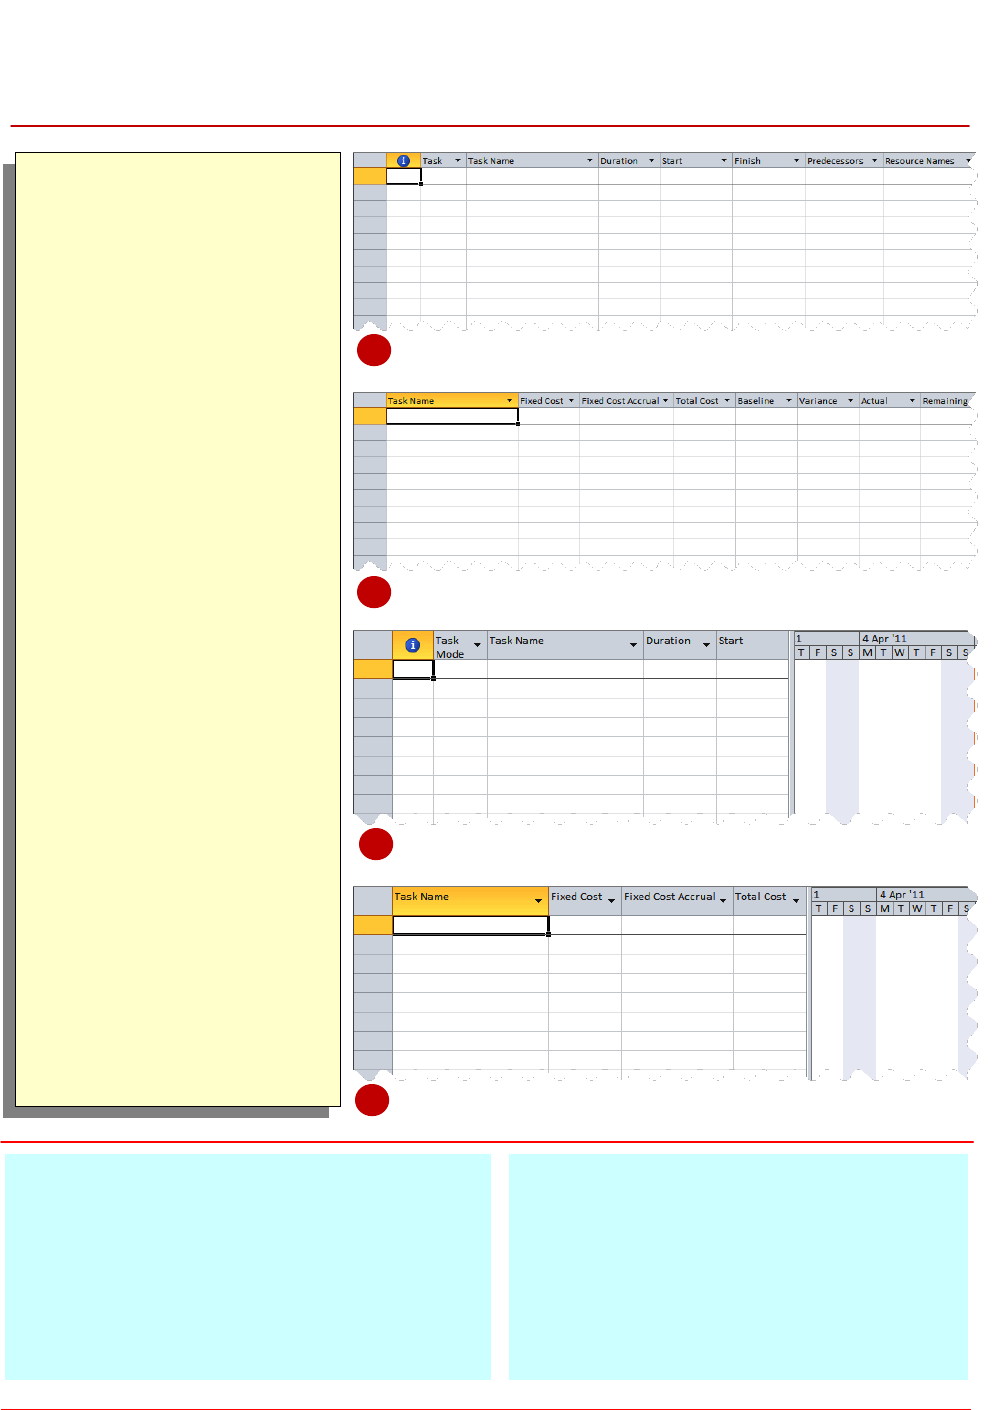
GANTT CHART VIEW
There is one view in Microsoft Project that acts
kind of like home base – and that is the Gantt
Chart view. This view contains all of the
elements that are usually required to obtain a
quick visual snapshot of a project. At the left the
Gantt Chart view displays tasks in a sheet view. At
the right the tasks are displayed in a timeline so
that a quick visual overview can be obtained.
Understanding the Gantt Chart View
The Gantt Chart view is a split view of sorts – rather than being split horizontally it is split vertically
so that there is a sheet representation on the left and a timeline, or more visual, representation on
the right.
These views are overlapping. In its default mode the sheet shown on the left is the Task Entry table.
This table has quite a number of columns, yet only a handful are seen on the screen. It is possible
therefore to scroll this sheet view to see more columns – that is why there is a scroll bar at the
bottom of the sheet view.
Similarly the Gantt Chart on the right can be scrolled if the timescale goes out beyond the physical
limits of the screen. Again a scroll bar is displayed at the bottom of the chart to facilitate the
scrolling operation.
In addition to scrolling, though, the Gantt Chart on the right can also be zoomed in or out, thereby
making it larger or smaller on the screen.
Sheet view
scroll bar
Chart view
scroll bar
Zooming slider tool –
slide left to zoom out,
slide right to zoom in
Microsoft Project 2010 - Module 1
© Watsonia Publishing Page 14 Microsoft Project Basics
WORKING THE GANTT CHART VIEW
Try This Yourself:
Before starting this
exercise ensure that
Microsoft Project has
started...
Click on the right arrow
of the horizontal scroll bar
in the left pane to scroll
the sheet view and see
different columns
Click on the left arrow
until the first field is back
in view
Click on the right arrow
of the horizontal scroll bar
in the right pane and
notice how the timeline
scrolls
Click and hold the mouse
pointer on the grey button
on the right scroll bar to
reveal the date that the
timeline is currently
viewing
Hold down the left mouse
button on the line that
divides the table on the
left from the timescale on
the right and drag it to the
right to see more of the
sheet view
Double-click on the
vertical line to precisely
align it to the nearest field
For Your Reference…
To work with a Gantt Chart:
1. Click on the horizontal scroll buttons in the
left pane to scroll the sheet and the right
pane to scroll the timeline
2. Drag the elevator button on the right pane
to a specific point in time
Handy to Know…
Press +
to jump to the first task.
Press +
to see the start of the Gantt
bar for the selected task.
Press
to jump to the start of a task row.
Press
to jump to the end of a task row.
4
The Gantt Chart view is used to display tasks
and durations as bars plotted on a time scale.
It provides an overview of the project, plus the
capacity to enter or edit task information.
It is the default view in Microsoft Project and the
most common view. It also contains a few useful
features for displaying your data.
5
1

Microsoft Project 2010 - Module 1
© Watsonia Publishing Page 15 Microsoft Project Basics
WORKING WITH THE QAT
Try This Yourself:
Before starting this
exercise ensure that
Microsoft Project has
started...
Click on the Project tab
on the Ribbon
Right click on Project
Information in the
Properties group to see
a shortcut menu
Click on Add to Quick
Access Toolbar to
display the command as
a small icon on the QAT
Click on the Project
Information icon on
the QAT to display the
Project Information
dialog box just as it
would if you’d used the
command on the
Ribbon
Click on [Cancel] to
close the dialog box
without doing anything
Right click on the
Project Information
icon on the QAT and
click on Remove from
Quick Access Toolbar
to remove the icon
For Your Reference…
To display a command on the QAT:
1. Right click on the command in the Ribbon
2. Click on Add to Quick Access Toolbar
Handy to Know…
Changes you make to the QAT are global in
scope – this means that they stay in
Microsoft Project for every project you
create.
2
3
The Quick Access Toolbar (QAT), which
appears at the very top left hand corner of the
screen, is a handy location to place commands
from the Ribbon that you use frequently. This is
done by choosing the Add to Quick Access
Toolbar option which appears when you right click
on the command when it is in the Ribbon. The
command appears as an icon in the QAT.
4
Microsoft Project 2010 - Module 1
© Watsonia Publishing Page 16 Microsoft Project Basics
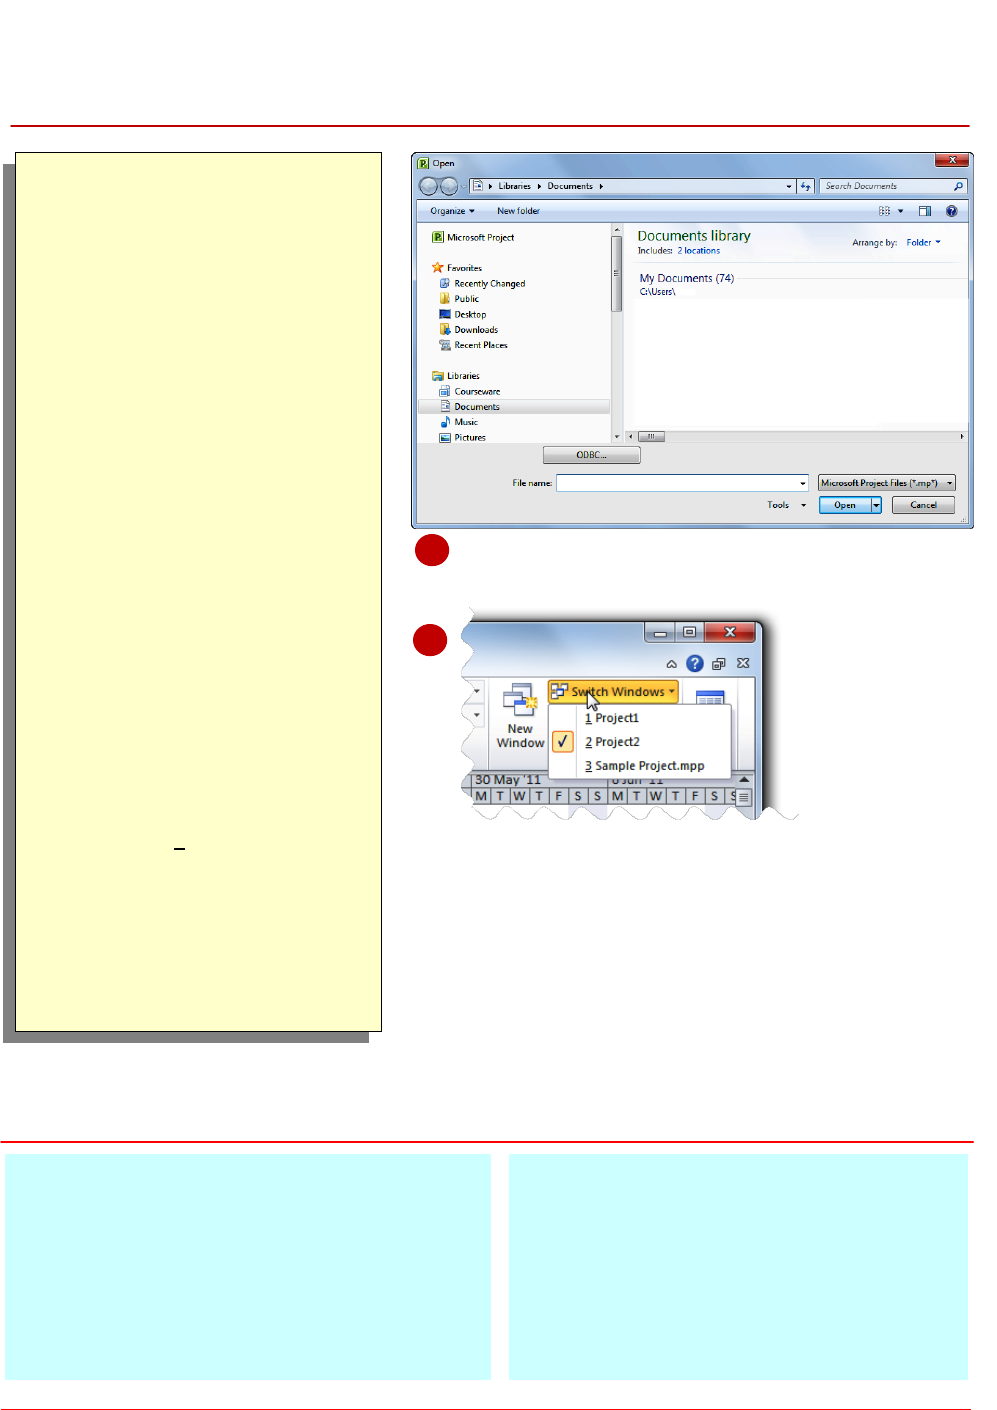
WORKING WITH PROJECT FILES
Try This Yourself:
Before starting this exercise
ensure that Microsoft Project
has started...
Click on the File tab on the
Ribbon and click on the
Open command to display
the Open dialog box
Change the location path to
the one containing the
student files (C:\Course Files
for Project 2010) and double
click on Sample
Project.mpp
Click on the File tab again
and click on New
Double click on Blank
Project to display a new
project
Click on the View tab and
click on the Switch
Windows command in the
Window group to see a
menu of open projects
Click on 3 Sample
Project.mpp
Click on the Arrange All
command in the window to
see all open projects
For Your Reference…
To open an existing project file:
1. Click on File and click on Open
2. Locate the drive and folder where the file is
stored
3. Select the name of the project file and click
on the [Open] button
Handy to Know…
If you attempt to close a project file that has
been changed since it was opened Microsoft
Project will prompt you and ask you to save
the file before it is closed. You therefore have
some protection against losing data.
1
When you first start Microsoft Project it appears
with a new, empty project. This allows you to
enter details and create a new project. However,
you will often want to work with a project that you
have worked with before. To open an existing
project file, to save changes you have made in a
project, or to close a project file you will need to
access the Backstage commands.
5
Microsoft Project 2010 - Module 1
© Watsonia Publishing Page 17 Microsoft Project Basics
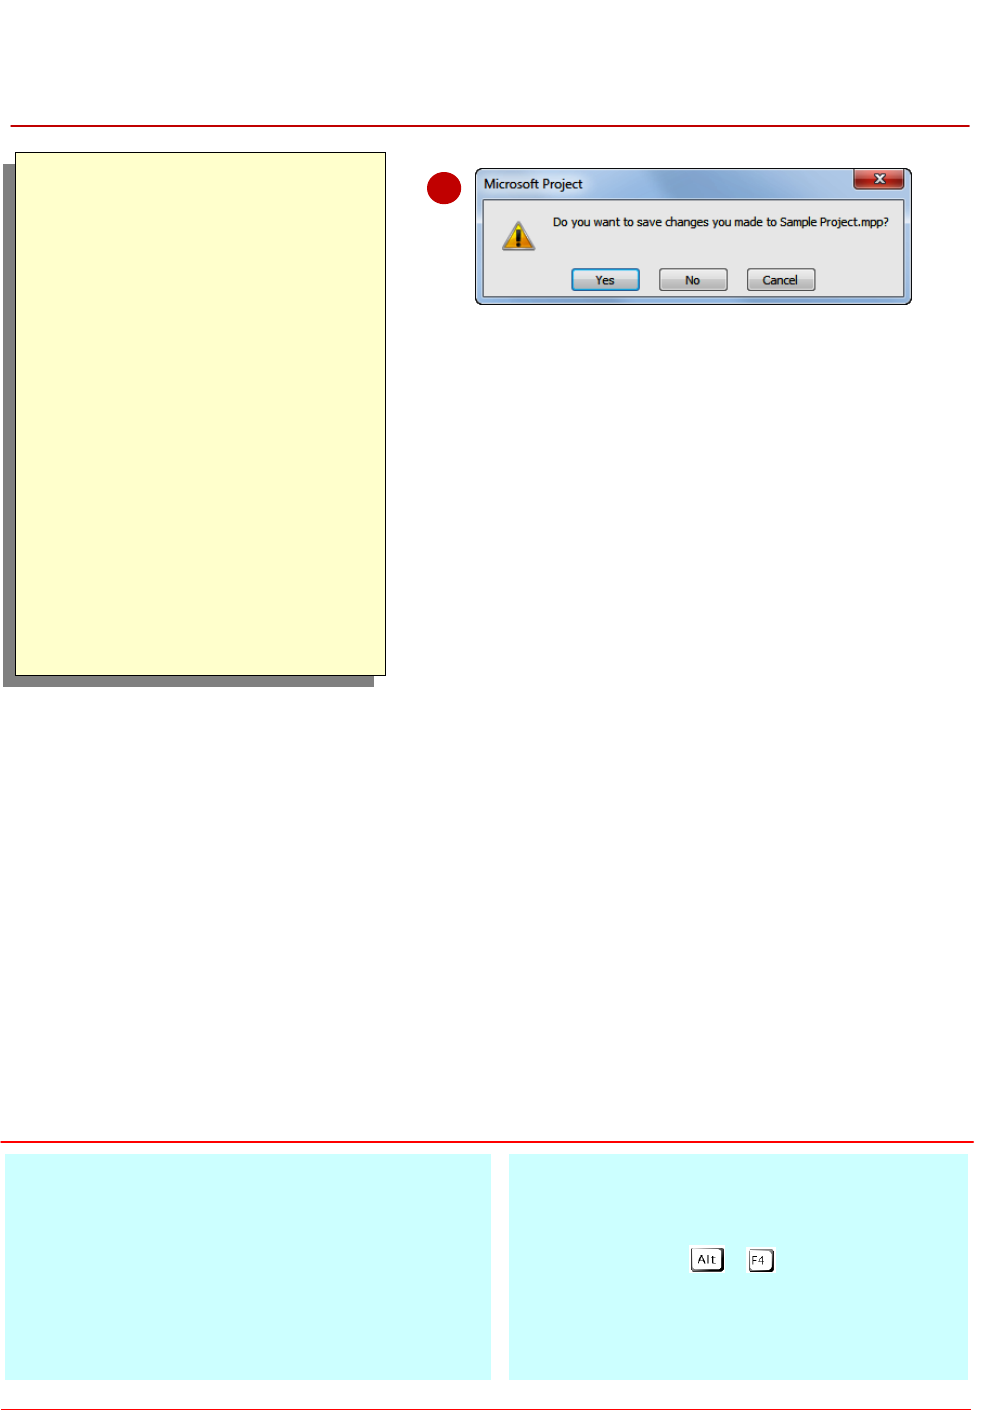
EXITING FROM MICROSOFT PROJECT
Try This Yourself:
Before starting this exercise
ensure Microsoft Project has
started...
Click on the File tab on the
Ribbon to access the
Backstage
Click on Exit
You may be prompted to
save changes made to the
project. We haven’t made
any changes worth keeping
so we can ignore this
message…
If the prompt to save the
project appears click on [No]
For Your Reference…
To exit from Microsoft Project:
1. Click on the File tab on the Ribbon to
access the Backstage
2. Click on Exit
Handy to Know…
The keyboard shortcut for exiting Microsoft
Project (and most other Windows
applications) is
+ .
2
Although several methods exist, the best way to
leave Microsoft Project is through the Exit
command on the Backstage menu. If you have
made changes to the current project file since
you started Microsoft Project you will be prompted
to save these changes. You may be prompted to
save even though you have only changed the
views of a project.
Microsoft Project 2010 - Module 1
© Watsonia Publishing Page 18 Microsoft Project Basics
NOTES:
1
4
