
DEGREE WORKS USER’S GUIDE
Office of the Registrar Edition
Office of the Registrar
Missouri State University
For Degree Works Version 5.0.6.1-Revised January 2022

1 | P a g e
Contents
Section 1: How To Use The Degree Audit ..................................................................................................... 6
Degree Audit Access Locations ................................................................................................................. 6
Students ................................................................................................................................................ 6
Advisors ................................................................................................................................................. 6
Registrar Direct Link .............................................................................................................................. 6
Degree Audit Opening Navigation ............................................................................................................ 6
Degree Audit Top Audit Functionality....................................................................................................... 7
Print Icon (Printing an Audit/Saving Audit as PDF) ............................................................................... 7
Email Icon .............................................................................................................................................. 8
Ellipse Icon ............................................................................................................................................ 8
Information Block Display ..................................................................................................................... 9
Degree Audit Legend............................................................................................................................... 10
Degree Audit Block Structure and Type .................................................................................................. 11
Degree Audit CourseLink ........................................................................................................................ 12
Degree Audit Transfer Equivalency Information .................................................................................... 12
Degree Audit Exceptions ......................................................................................................................... 13
Degree Audits-Limitations Due to Administrative Process Dependence ............................................... 13
Degree Audit Links .................................................................................................................................. 14
Section 2: How To Use The What-If Degree Audit ...................................................................................... 14
Section 3: How To Use the Student Educational Planner (SEP) .................................................................. 16
SEP Initial Plan Creation from a Template (Preferred Method) ............................................................. 16
SEP Initial Plan Creation from Scratch .................................................................................................... 17
SEP Term Editing ..................................................................................................................................... 18
Adding a Term ..................................................................................................................................... 18
Deleting a Term ................................................................................................................................... 19
Reassign a Term .................................................................................................................................. 19
SEP Requirement Types .......................................................................................................................... 20
Course ................................................................................................................................................. 20
Choice .................................................................................................................................................. 21
Placeholder ......................................................................................................................................... 22
Test Score ............................................................................................................................................ 23
SEP Navigation and Editing ..................................................................................................................... 24

2 | P a g e
Semester Transition ............................................................................................................................ 24
Course Editing Options........................................................................................................................ 24
SEP Degree Audit .................................................................................................................................... 27
SEP Still Needed ...................................................................................................................................... 27
SEP Courses ............................................................................................................................................. 28
SEP Plan Activation and Locking ............................................................................................................. 28
SEP Plan Deletion .................................................................................................................................... 29
Section 4: Exception Processing .................................................................................................................. 29
Exception Access ..................................................................................................................................... 29
Adding Exception Processing Access................................................................................................... 30
Deleting Exception Processing Access ................................................................................................ 31
Re-establishing Missing Exception Access .......................................................................................... 33
Exception Application Rules ................................................................................................................ 34
Exception Processing-Adding an Exception ............................................................................................ 34
Exception Processing-Deleting an Exception .......................................................................................... 37
Exception Types ...................................................................................................................................... 38
Also Allow ............................................................................................................................................ 38
Apply Here........................................................................................................................................... 39
Force Complete ................................................................................................................................... 39
Substitute ............................................................................................................................................ 40
Remove Course and/or Change the Limit ........................................................................................... 41
Exception Filtering .................................................................................................................................. 42
Filtering by Term ................................................................................................................................. 42
Filtering by Grade ................................................................................................................................ 42
Filtering by Credits .............................................................................................................................. 42
Filtering by Section .............................................................................................................................. 42
Filtering by Originating Transfer Course Prefix and Number .............................................................. 43
Filter by Course Title ........................................................................................................................... 43
Exception Management/Reporting ........................................................................................................ 43
Show Exception Details ....................................................................................................................... 44
Show Requirement Block Counts ........................................................................................................ 45
Section 5: Student Educational Planner (SEP) Template Management...................................................... 45
Template Management Access Location ................................................................................................ 45

3 | P a g e
Template Management Authorization ................................................................................................... 45
Current SEP Template Holdings .............................................................................................................. 45
SEP Template Management Pre-Edit Preparation .................................................................................. 46
SEP Template Naming Convention ......................................................................................................... 47
SEP Template Management Browse Template Columns ....................................................................... 47
How to Open an SEP Template ............................................................................................................... 48
How to Revise an Existing SEP Template ................................................................................................ 48
How to Create a New Program Template by Copying from an Existing Template ................................. 50
SEP Template Term Schemes .................................................................................................................. 51
SEP Template Requirements and Notes ................................................................................................. 53
Template Deactivation ............................................................................................................................ 55
Section 6: Transit Functions ........................................................................................................................ 55
Loading a Former Student into Degree Works ....................................................................................... 56
Finding Course Usage Within Degree Audit Scribe Programming .......................................................... 57
Finding Text Usage Within Degree Audit Scribe Programming .............................................................. 59
Running a DAPRESTART and WEBRESTART ............................................................................................ 60
Section 7: Controller Functions ................................................................................................................... 61
Authorization-Users ................................................................................................................................ 61
Students (STU)..................................................................................................................................... 63
Student Workers/Graduate Assistants (STUW) .................................................................................. 63
Advisor without Exceptions (ADVX) .................................................................................................... 63
Advisor (ADV) ...................................................................................................................................... 63
Registrar (REG) .................................................................................................................................... 64
Authorization-Groups ............................................................................................................................. 64
Configuration .......................................................................................................................................... 66
Semester Transition Configuration Updates ....................................................................................... 66
Other Configuration Tables ................................................................................................................. 67
Shephard (SHP) Settings ..................................................................................................................... 75
Properties ................................................................................................................................................ 76
Section 8: Curricular Processing ................................................................................................................. 77
Course-Level Changes ............................................................................................................................. 77
New Course (including new discipline/prefix) .................................................................................... 77
Changed Course-Course Number or Discipline Change ...................................................................... 78

4 | P a g e
Changed Course-Course Title Change ................................................................................................. 80
Changed Course- “Identical with” or “Can only receive credit for 1” Statements ............................. 81
Changed Course- “Pass/Not Pass” Only Statements .......................................................................... 81
Changed Course- Other Changes ........................................................................................................ 81
Deleted Course .................................................................................................................................... 81
Program-Level Changes .......................................................................................................................... 82
New Degree......................................................................................................................................... 82
New Major, Graduate Program or Certificate .................................................................................... 83
New Minor .......................................................................................................................................... 88
Changed Major, Minor, Graduate Program, or Certificate-Program Name Change or
Comprehensive/Non-Comprehensive Change ................................................................................... 91
Changed Major, Minor, Graduate Program, or Certificate-Catalog Program Changes ...................... 91
Deleted Major, Graduate Program, or Certificate .............................................................................. 93
Deleted Minor ..................................................................................................................................... 96
Other Table Changes ............................................................................................................................... 98
Department Code or Assignment Changes ......................................................................................... 98
New College ........................................................................................................................................ 98
New Grade .......................................................................................................................................... 99
Currrule Extract for New Majors, Graduate Programs, Certificates, and Minors ................................... 99
Curricular Program Changes Spreadsheet Usage ................................................................................... 99
Test Code Programming........................................................................................................................ 100
Individualized Majors ............................................................................................................................ 102
Personalized Minors ............................................................................................................................. 108
Changing a Personalized Minor to a Different Degree Type ............................................................ 110
Section 9: Additional Degree Works Tools................................................................................................ 112
Ellucian Customer Center ..................................................................................................................... 112
Degree Works Documentation ......................................................................................................... 112
Community ........................................................................................................................................ 113
Ideas .................................................................................................................................................. 114
Action Line Cases .............................................................................................................................. 114
Degree Works Website ......................................................................................................................... 115
Administrative Audit ............................................................................................................................. 115
Purpose of the Administrative Audit ................................................................................................ 115

5 | P a g e
120 Credit Count Review .................................................................................................................. 115
40 Hour Upper Division Review ........................................................................................................ 116
Core 42 Versus General Education Comparison ............................................................................... 116
How to Generate an Administrative Audit ....................................................................................... 116
Degree Works Downtime Manager ...................................................................................................... 117
Degree Works Direct Links .................................................................................................................... 117
6 | P a g e
Degree Works 5.0.6.1 User’s Guide-Registrar
Edition
Degree Works is the University’s degree audit (what classes to take) and course planning (when to take
these classes) software. This user’s guide will assist the user in performing the basic functions associated
with their role using this software. For additional resources related to Degree Works including user
documentation, updates, and an FAQ, please visit the University’s Degree Works homepage at
https://www.missouristate.edu/registrar/degreeworks.htm.
Section 1: How To Use The Degree Audit
Degree Audit Access Locations
Students
My Missouri State>Student tab>My Graduation Path channel>Degree Audit and Student Educational
Planner link OR My Missouri State>Registration tab>My Student Records channel>Degree Audit and
Student Educational Planner link
Advisors
My Missouri State>Teaching and Advising tab>Advisor Services channel> Degree Audit and Student
Educational Planner link
Registrar Direct Link
https://degreeworks.missouristate.edu/mobile
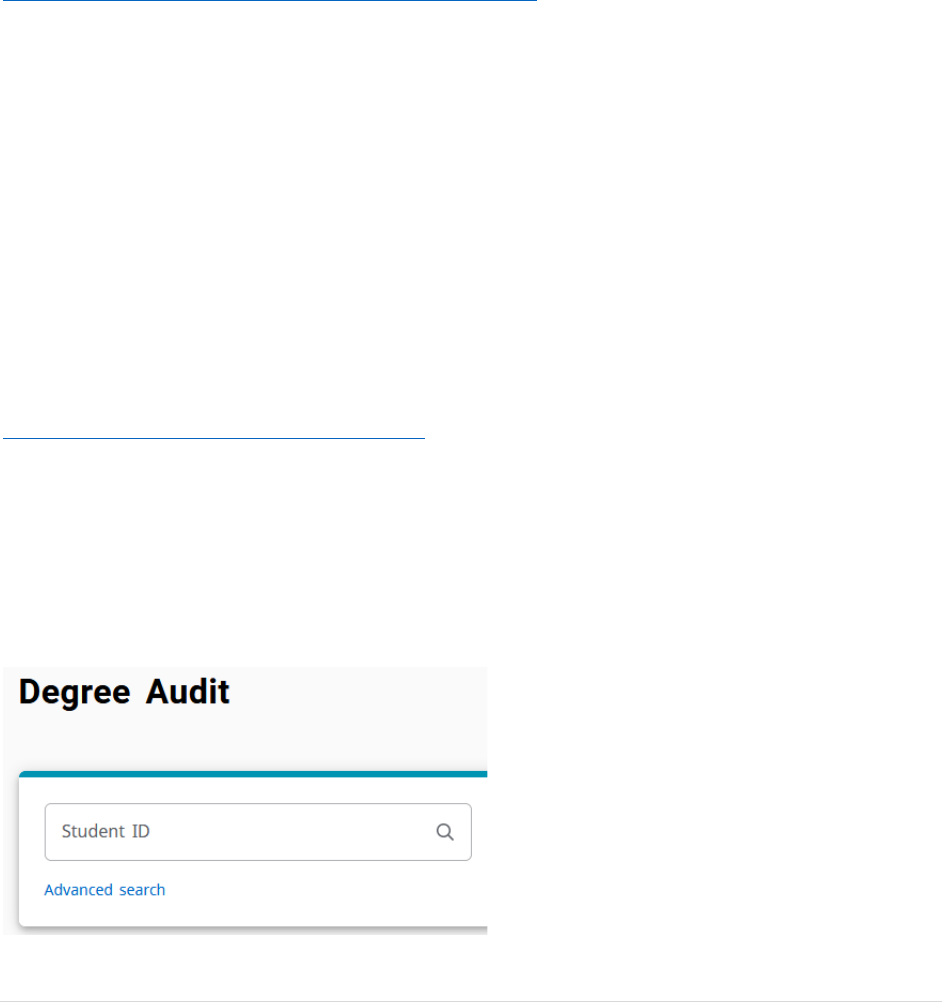
Degree Audit Opening Navigation
Students will go directly to their degree audit. Advisors will go to the below landing page labeled Degree
Audit if they have no personal MSU coursework Users who were formerly a student may initially have
their own information pre-populated instead. From this screen, advisors can either enter the student’s
BearPass number directly in the Student ID box or can click on the Advanced Search link below the
Student ID box to search for students by a variety of filters.
7 | P a g e
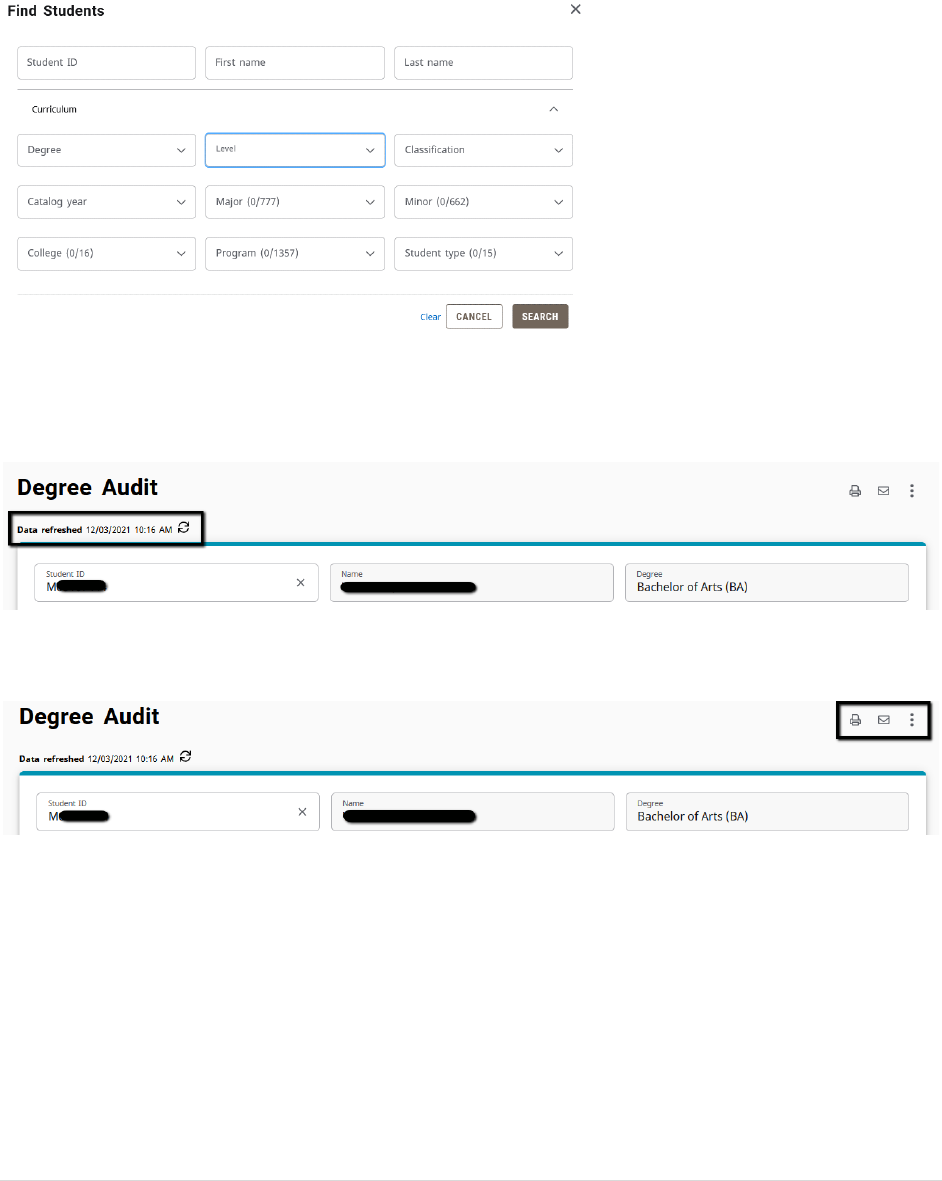
In the Advanced Search, users can search for students using filters such as name, program, major, minor,
college, degree, level, and classification. To use this feature, you click in the corresponding filter box,
click the value(s) you wish to select within the respective filter box, and scroll down to the bottom of the
Find Students box to click the “Search” box.
Degree Audit Top Audit Functionality
The last date and time that the audit was refreshed can be found in the upper left on top of the first
block. Registrar users will have a refresh icon to prompt a data refresh. Other users will not.
On the right side (across from the data refreshed information), you will find a printer icon, email icon,
and ellipse icon.
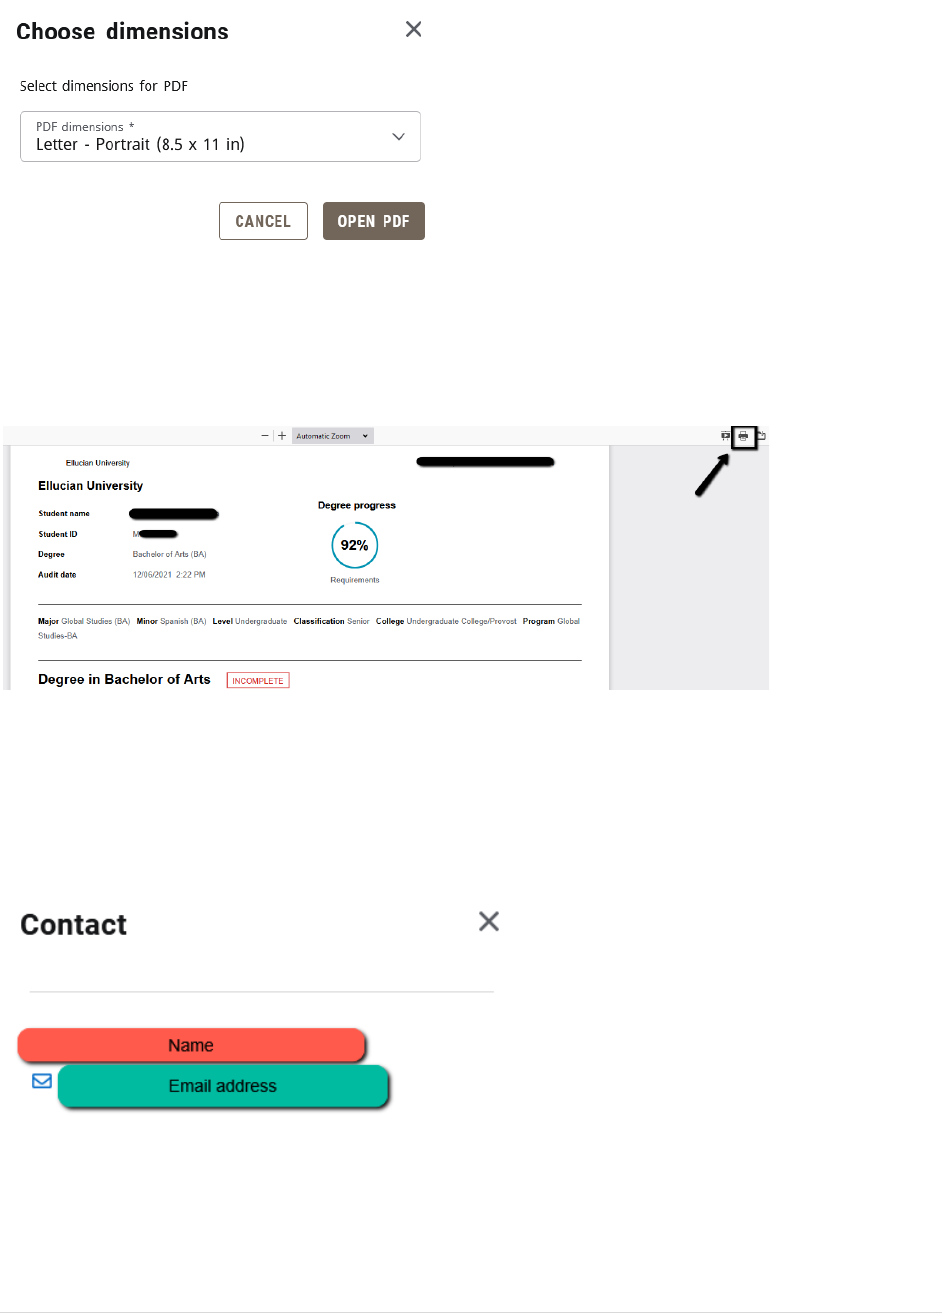
Print Icon (Printing an Audit/Saving Audit as PDF)
The print icon is what allows you to print and/or save the audit as a .pdf. The only way to reliably print a
degree audit is to print it from .pdf view. To do so, click the printer icon. This will open a Choose
Dimensions selection box. The default is letter size, portrait orientation, but other options are available.
Select your preferred .pdf dimensions and click “Open PDF.”
8 | P a g e
The PDF version of the degree audit has a slightly different format than the web version, but contains
the same graduation requirements. To print it, click the print icon, which is typically found in the upper-
right portion of the browser window, and then select your desired physical printer. To save the PDF,
instead of selecting a physical printer, select Microsoft Print to PDF or Save to PDF as your browser
allows, and save the document to your desired location.
Email Icon
The email icon allows a Registrar, Department Head, or Advisor level user to email the student. The
email icon allows a student to email their academic advisor. After clicking the email icon, it will open a
Contact box that shows the corresponding contact information.
Ellipse Icon
The ellipse icon allows the user to view the student’s class history. This is similar to an unofficial
transcript, although it displays no GPA information and no repeat codes. It is simply a chronological list
of coursework completed by the student. It will only display coursework that matches the level of the
9 | P a g e
audit, so as an example, only undergraduate courses would show on a class history accessed from an
undergraduate audit. Graduate coursework would not.
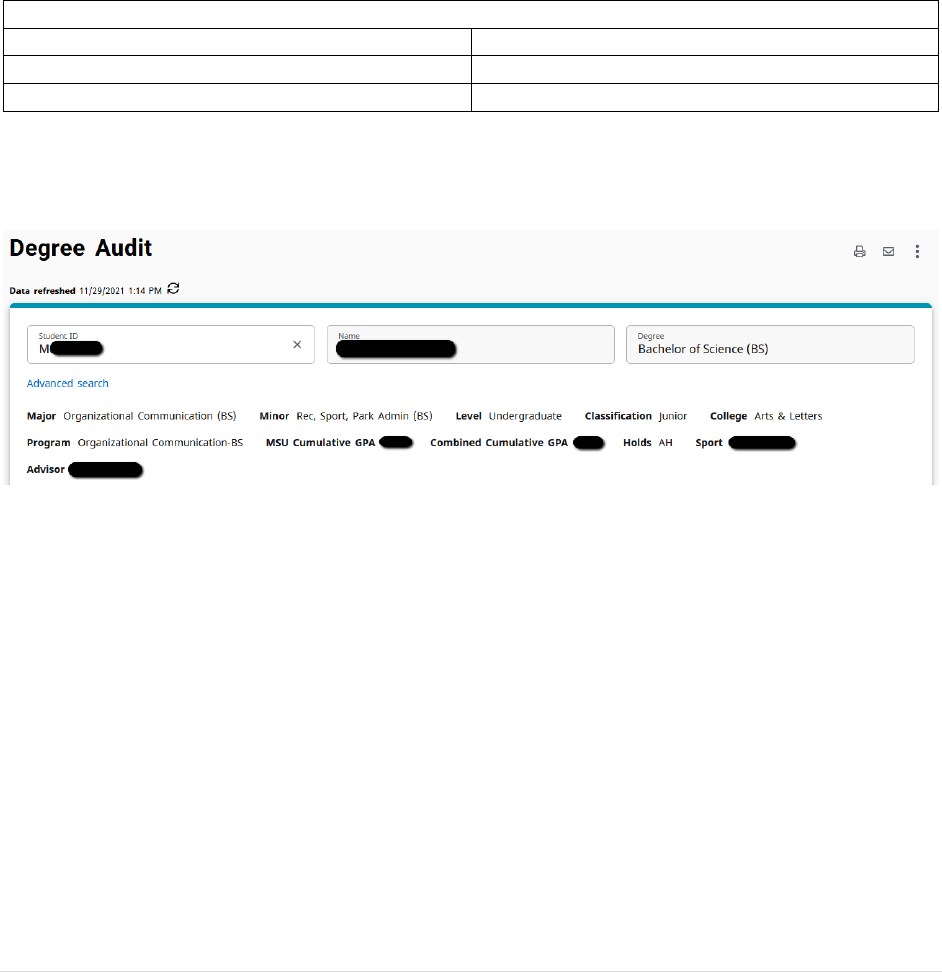
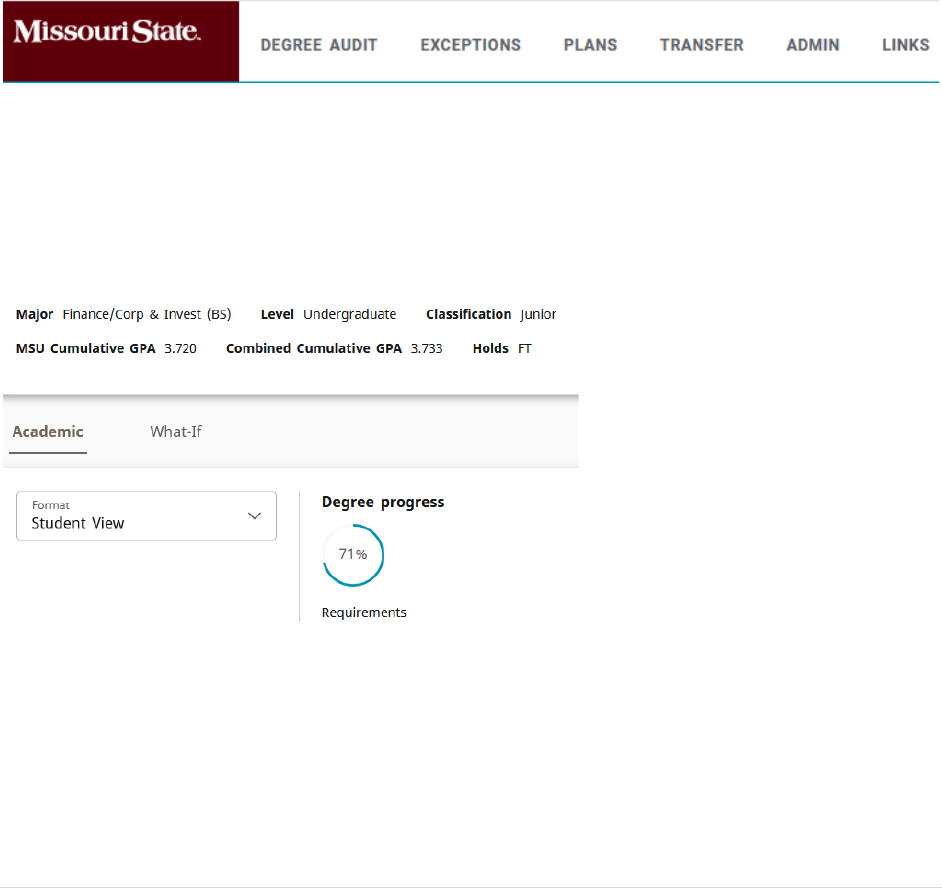
Information Block Display
In the first block, you will find the student’s BearPass number and name. The Degree drop-down box is
where you can toggle between degrees and certificates if the student is working on more than one
degree and/or certificate. The student’s curriculum information, level, classification, sport for student
athletes, and current semester advisor assignment are found in the upper block as well. For the sport,
this will only be visible if the student is a student-athlete. Otherwise, the sport field will not display.
For advisor, each advisor will appear with the advisor type in parenthesis following the advisor’s name.
There will be an asterisk beside the primary advisor. The advisor types you may see are as follows:
Advisor Types
Major (MAJR)
Success Coach-Grant (SCSG)
Success Coach-Athletics (SCSA)
Success Coach (SCSN)
Success Coach-Bears Lead (SCSB)
Secondary-Minor, Certificate, Other (SECN)
Additionally, MSU and combined cumulative GPAs are displayed here as well as any holds the student
may have. If the student has no applicable hold, the holds field will not display.
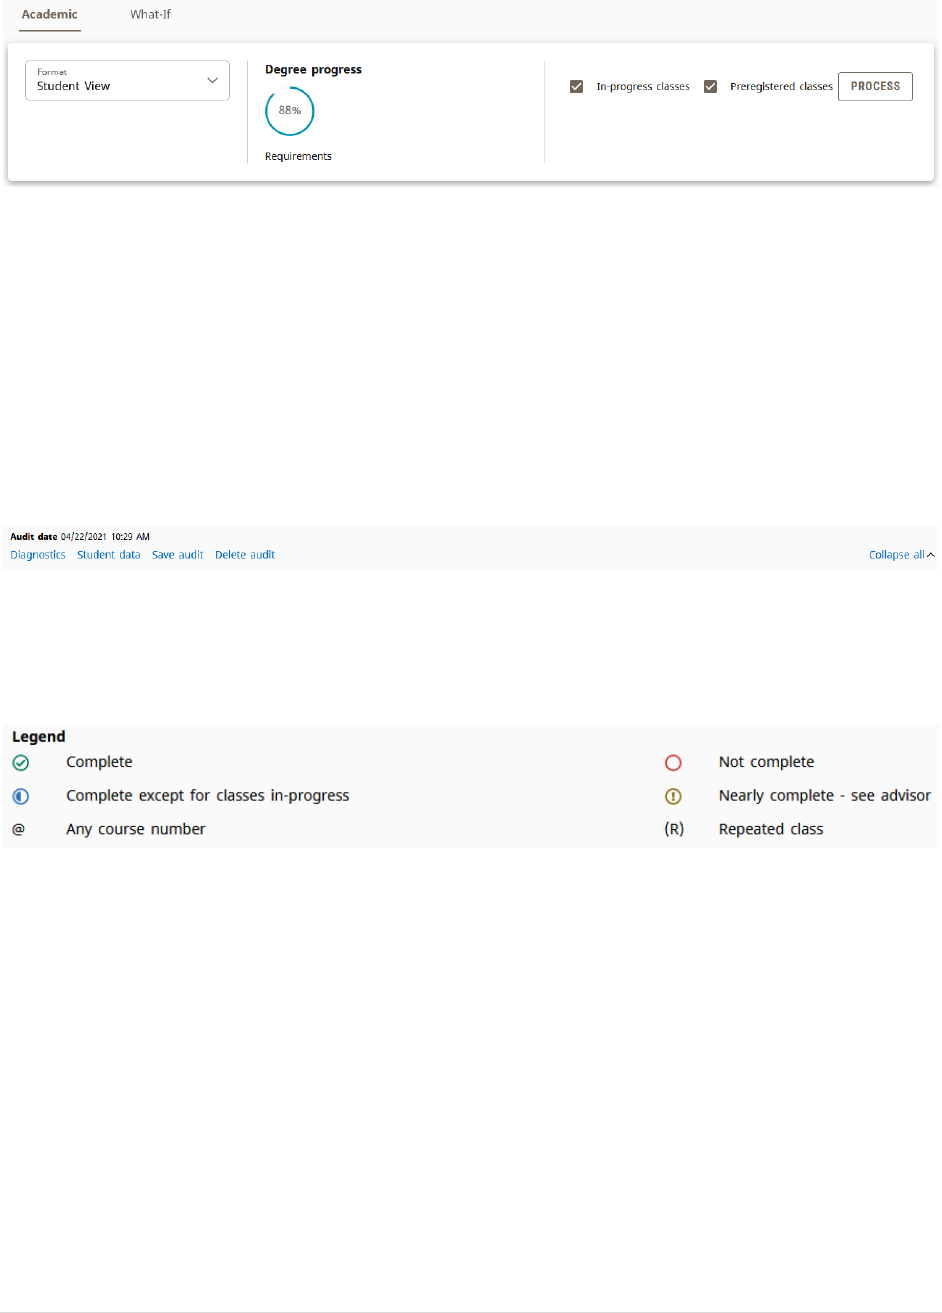
Above the next block is where you pick the type of audit you wish to run. Academic is the primary audit.
The other choice is What-If, which is a prospective audit for a different program. In the second block,
you will find the Format drop-down, where you can select the audit view you wish to use. The Student
View is the default view used by students and advisors. The Registrar Report view is like the Student
View but also shows the Scribe programming behind the audit. The other views here are rarely used. As
you move to the right, you will find the degree progress wheel. This shows the student’s progress
towards checking off all the requirement boxes on the degree audit. This is not the number the credits
completed towards graduation.
Continuing to the right, you will find the in-progress (or current semester) and pre-registered (or future
semesters for which the student is registered) checkboxes. These are checked by default but can be
unchecked if the user wishes to run an audit excluding these courses.
To the right of these checkboxes is the “Process” button. This is the button clicked when the user wishes
to run a new degree audit.
10 | P a g e
Just below the second block is the date and time of the current degree audit. The audit will check each
evening to see if the student had a grade, registration, or test score change. If any changes are found, a
new degree audit will generate. Otherwise, the audit can be manually updated using the “Process”
button described above.
There is an additional menu below the Audit Date line. The first link is the Diagnostics link, which helps
Registrar staff in seeing the logic that the auditor is using to assign courses. The second link is the
Student Data link, which helps Registrar staff in seeing course characteristic data assigned in the audit
functions. The third link is the Save Audit link, which allows Registrar staff to save a specific audit if
needed. The fourth and final link is the Delete Audit link, which allows Registrar staff to delete a specific
audit if desired. These are rarely used.
Degree Audit Legend
The Degree Works symbol legend can be found at the end of the degree audit. So, while this is
presented out of order compared to the flow of the audit, it’s important to understand the symbols
used before going into the degree audit requirements.
• Complete (green circle with a checkmark)-Requirement is met.
• Not complete (open red circle)-Requirement is not met
• Complete except for classes in-progress (half-filled blue circle)-Requirement being met with current,
future, or incomplete classes
• Nearly complete-see advisor (yellow circle with exclamation mark)-Requirement is not satisfied but
there are no specific classes assigned to address it such as a GPA issue
• Any course number (@)-Wildcard to represent any missing applicable number. For example, HST @
means any HST course. SPN 5@ means any 500 level SPN courses.
• Repeated class (R)-Found in the Audited, Failed, Dropped, Repeated sections on classes that have
been excluded due to be repeated.
• While not formally found on the legend, transfer grades are indicated with a “T” in front of them.
Additionally, transfer course listings include originating institution, course number, and course title.
• Additionally, at the overall block level, the “Complete” symbol is replaced by the word “Complete”
in a green box, the “Complete except for classes in-progress” symbol is replaced by the word “In-
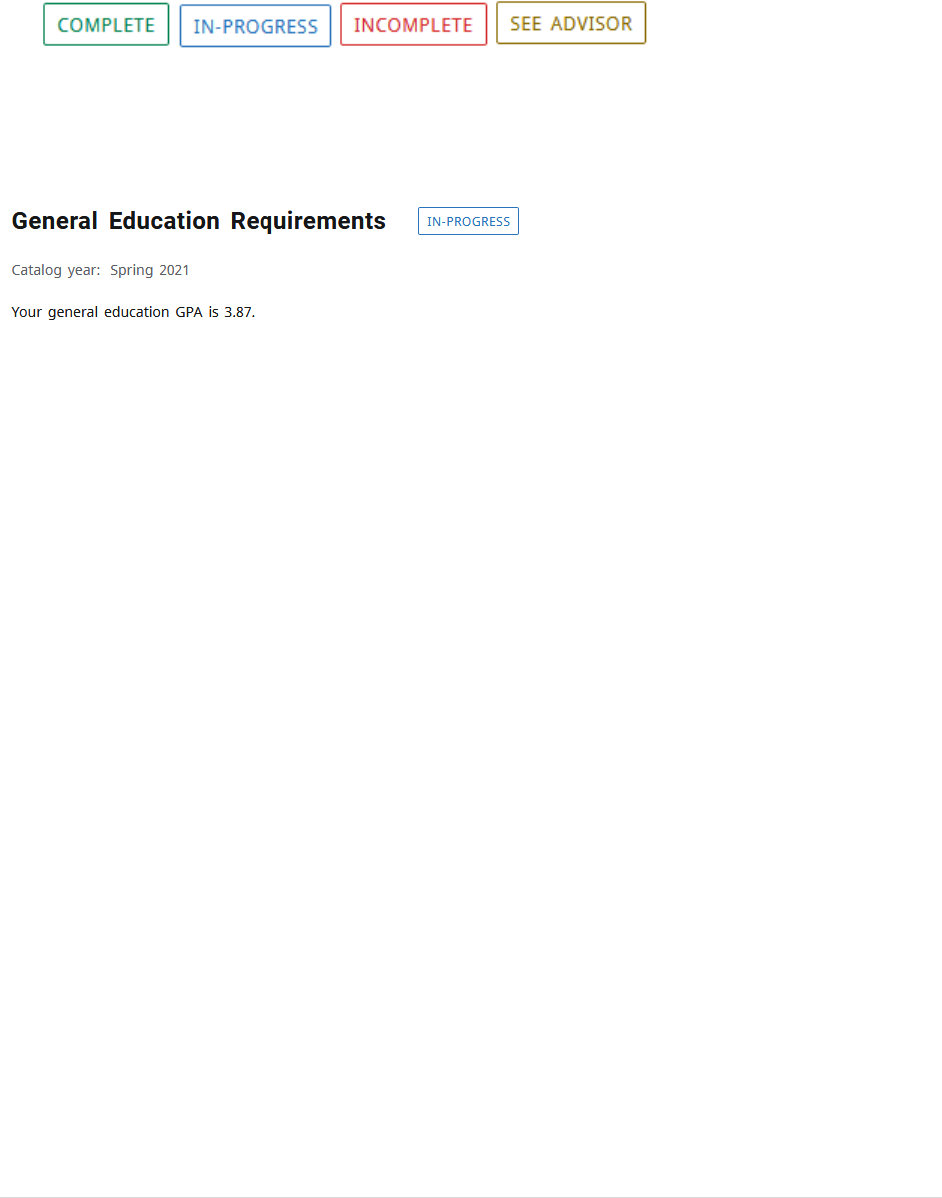
11 | P a g e
Progress” in a blue box, the “Not Complete” symbol is replaced by the word “Incomplete” in a red
box, and the “Nearly complete-see advisor” symbol is replaced by the words “See Advisor” in a
yellow box.
Degree Audit Block Structure and Type
There are several types of blocks. Each block will display the catalog year it is operating from just below
the block title. The completion status of the block is displayed to the right of the block title as
incomplete (red text), in-progress (blue text), complete (green text), or nearly complete (yellow text).
• Degree block-This is the requirement that monitors everything needed to complete the degree. This
includes general baccalaureate degree requirements (120 minimum hours, 40 hours upper division,
residency, exit survey, and other such degree or program requirements) as well as that general
education, major, and minor (as applicable) requirements have been fulfilled.
• General Education or Core 42 block-Found on undergraduate audits only, this is the block that
shows which set of requirements the student is following. If the student has an AA degree, 42-hour
block, or previous bachelor’s degree with the proper accreditation transcripted on their transfer
evaluation, any missing courses in this block will automatically be waived.
• Major, minor, or certificate blocks-This is where the respective major, minor, or certificate
requirements are monitored.
• Additional program/degree blocks-These are additional requirements necessitated by the program
and/or degree the student is pursuing. Examples include blocks such as program admission
requirements, secondary education requirements, College of Business globalization and upper-
division GPA requirement, Bachelor of Arts (BA) degree requirements, and other such requirements.
• Audited, Dropped, Failed, Repeated block-This contains the courses that are not eligible to fulfill
requirements for the various reasons listed in the title. Repeated courses do not move to this
section until the corresponding repeat code is assigned during end of term processing.
• Not Counted block-This contains courses that are not eligible to apply towards graduation. This
includes courses that are part of a rule where only one of a group of courses can be counted toward
graduation and courses that are only allowed to apply towards a specific program or degree.
• Honors College block-This contains the requirements for those participating in the University’s
Honors College program. Since Honors College participation is not a graduation requirement, it is a
graduation-optional block, meaning that students who leave the Honors College will not be
penalized in graduation eligibility checking when this block is not completed.
The block also contains the requirements related to the respective block. In this example from a General
Education block, we will focus on the Human Cultures requirement. This shows that the overall Human
Cultures section is unmet, as symbolized by the Not Complete symbol to the left of the Human Cultures
section title. Under it, there are three sub-requirements. The first two Focus (Social and Behavioral
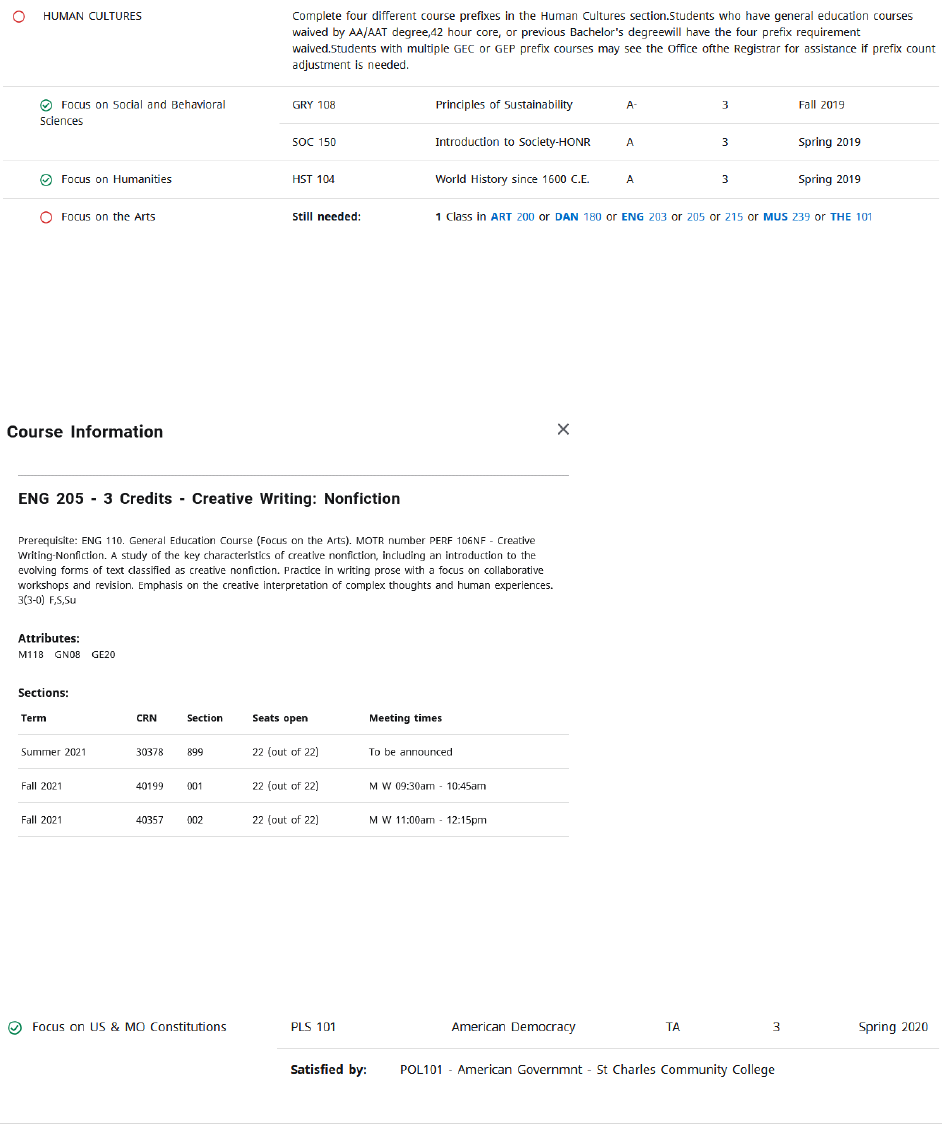
12 | P a g e
Sciences and Humanities) are met as symbolized by the Complete symbol to the left of their titles. The
last Focus (Arts) is not met as symbolized by the Not Complete symbol to the left of its title. To the right,
it lists what is still needed to meet it, which is one course from a list of courses. Once the student
registers in one of these courses, both the Focus on the Arts and Human Cultures title symbols will
change to Complete except for classes in-progress. Once the class is complete and passed, these will
change to Complete.
Degree Audit CourseLink
If you click on a hyperlinked course anywhere in the degree audit, it will bring up a block of information
that shows the course prerequisite (if applicable), catalog description, and class schedule information
including date/times that courses are scheduled to be offered along with the number of seats available
in each section.
Degree Audit Transfer Equivalency Information
If you have transfer work, you can see how those courses applied to your degree audit. Each transfer
course will show the originating institution, course title and course number below the MSU equivalency
as shown in the screen shot below.

13 | P a g e
Degree Audit Exceptions
Departments sometimes will substitute or waive a course requirement. Department heads and
authorized designees may enter exceptions through the exceptions tab for their department’s majors,
minors, and certificates only. They are not authorized to make exceptions to University degree
requirements and/or general education. Those types of changes must be authorized by the
corresponding authority or committee.
Exceptions show in two places on the audit. The first is near the applicable course location. Included is
who entered the exception, the date, and a description of the action taken. The second is an exception
section at the bottom of the audit. This includes whether the exception is “enforced” or working. The
primary reason one would not be enforced is that the student changed catalogs and/or programs and
therefore the exception was broken. Each exception ties to a specific block, which is like an address
based on the program and catalog identification of the block.
Degree Audits-Limitations Due to Administrative Process Dependence
The degree audit’s ability to process that a student is repeating a course is based off of the
corresponding repeat codes in Banner. Repeat codes are not applied until the end of the semester.
Therefore, if a student passes a course and is in the progress of repeating it (Ex: gets a “D” in ABC 123 in
a previous semester, takes it again to improve their grade this semester), the course could be used in
the requirements twice until the repeat code is assigned and the first attempt is excluded. Therefore, it
is important to look for these situations when advising a student.
Mixed credit (courses with special approval to count as both undergraduate and graduate credit) require
special end-of-term processing. During the semester of enrollment, the student will be enrolled in the
graduate side of the credit, and graduate credit does not appear on an undergraduate audit. At the end
of the semester, the undergraduate level is added to the course, which allows the credit to be displayed
in the undergraduate audit. Therefore, it is important to look for situations where the student may be
“missing” an item that will be fulfilled by the mixed credit.
14 | P a g e
Degree Audit Links
Located at the end of the header row, the Links section contains links to various University websites that
may be helpful to MSU students and advisors. It includes the following:
• Degree Works Homepage
• Major/Minor/Certificate Code Sheets
• Undergraduate Catalog
• Graduate Catalog
• Commencement Information
• Core 42 Resources
• GPA Calculator
• Holds Contact Information
• Transfer Equivalencies
• Advisor Toolkit
Section 2: How To Use The What-If Degree Audit
A “what-if” degree audit allows the user to see what their degree audit would look like if they were to
change programs or catalogs prior to formally requesting the change.
Between the first and second block (below the ID block and above the format/degree progress block),
there is an area where you can select the type of degree audit you want. Click on “What-If”
Next, select the “Catalog year” and “Degree Term” you wish to use in the what-if audit. The catalog year
will default to the current semester. You will also want to select the appropriate level so it knows
whether to apply your undergraduate or graduate courses. In the “Areas of Study” section, select the
first majors and first minor (if applicable) you wish to pursue. The major (includes certificates as well)
selection menu is filtered based on the degree selected. The minor selection menu is not filtered. Users
should only select minors available in the same degree type as the degree selected. Each minor lists the
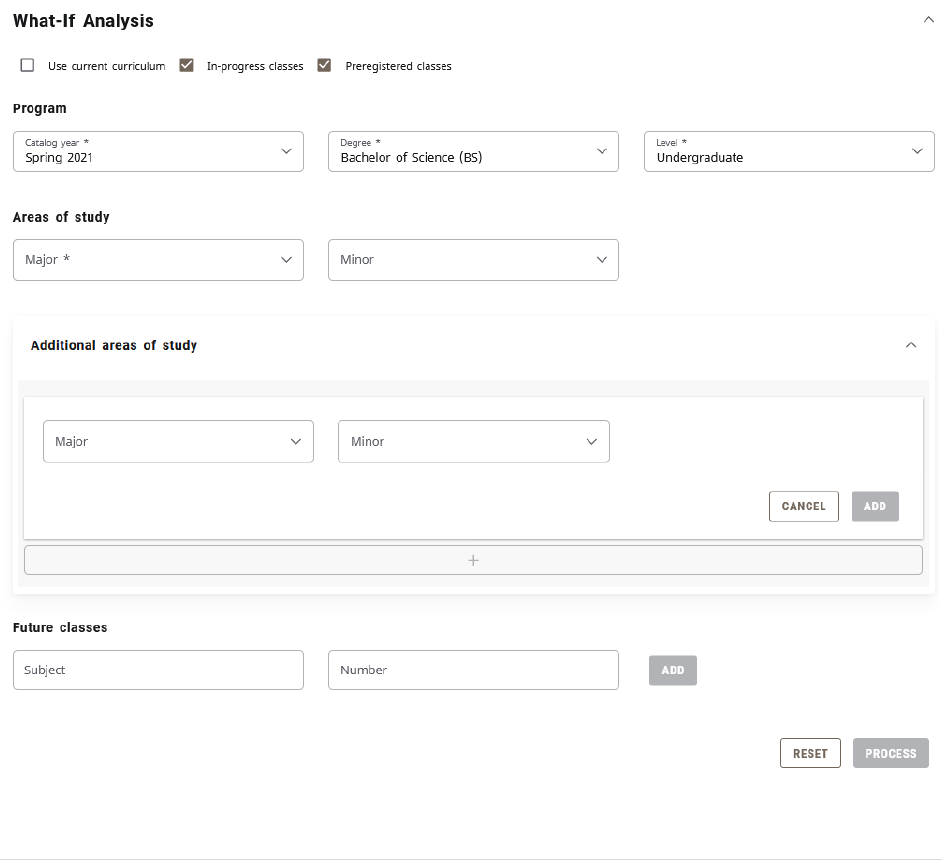
15 | P a g e
corresponding degree information in parathesis behind the minor title. At the end of these menus, there
may be programs that begin with “z-.” These programs are no longer available.
Additional majors and minors may be selected in the Additional Areas of Study section. First, click the
down arrow at the end of the Additional Areas of Study row. This will make a button with a plus sign
available. Click it and an additional major and minor field will appear. You can select an additional minor
and/or additional major. Major will be filtered by the degree type selected for the what-if audit and
minor will not be filter, similar to the opening section of the what-if audit. Click the add button to add
your selection. Additional majors and/or minors may be added by clicking the plus button and repeating
the above process.
There is also the ability to add courses to the audit that you are thinking about taking in the future to
see where they would fit. You can do this in the “Future Classes” section. You add the subject and
number, and then click “Add.” There are checkboxes that are checked by default to indicate whether
you wish to include in-progress (current semester) classes and pre-registered (future semester) classes.
When finished, click the “Process” button to review the what-if degree audit.
16 | P a g e
Section 3: How To Use the Student Educational Planner (SEP)
The Student Educational Planner (SEP) is an online tool that allows students (or an advisor on the
student’s behalf) to create an individualized plan for completing requirements as they proceed towards
graduation. Used alongside your degree audit, the user can place requirements semester-by-semester
into the SEP plan to anticipate time to graduate. Access to the SEP is through the same link used to
access the degree audit.
SEP Initial Plan Creation from a Template (Preferred Method)
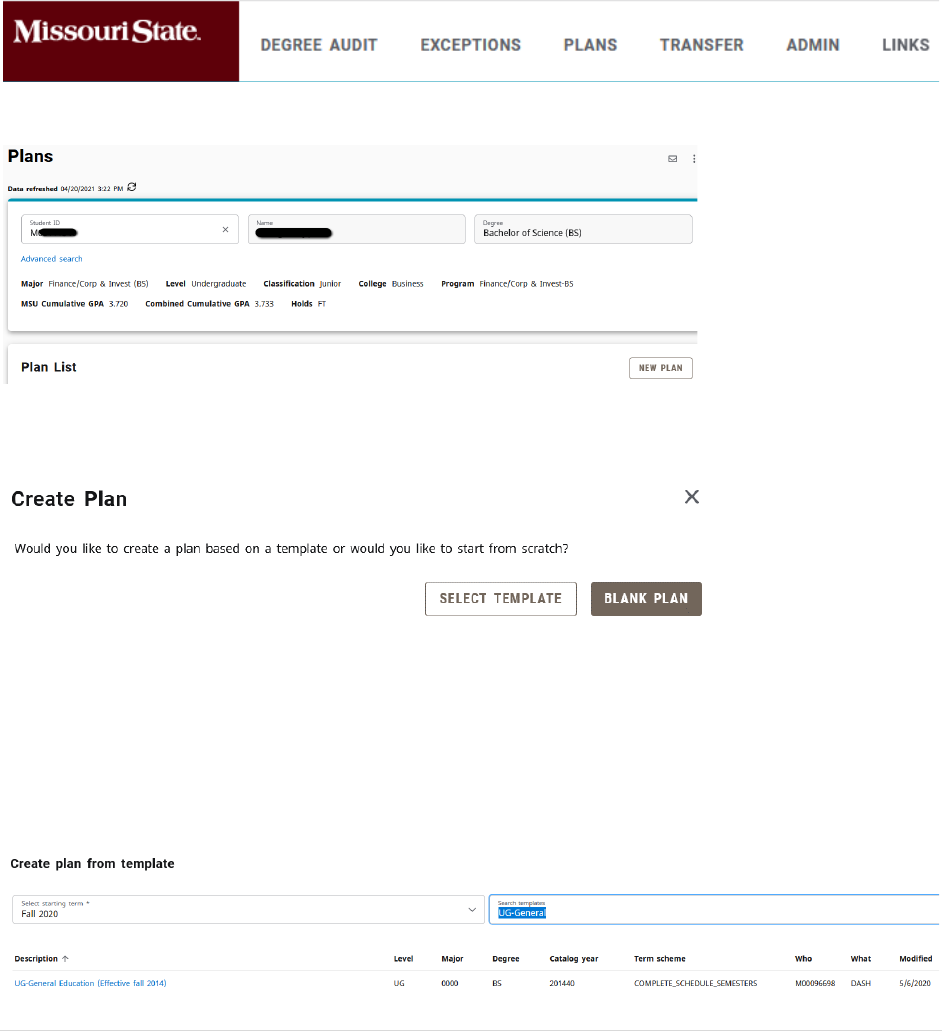
Click on the “Plans” link found at the top of the degree audit.
If the student has no plan, it will be blank. Click the “New Plan” button at the bottom right.
When creating an initial plan, you will be asked if you wish to create a plan based on a template or if you
would like to start from scratch. Click “Select Template.”
Select the first fall term (or semester) that should be included (NOTE: If the student is starting in spring
or summer, there will be an opportunity to address that later). If you select spring or summer, you will
get an error message. Search for the template you wish to use. Undergraduates will likely use one of the
“UG- General Education (Effective fall 2014)” or the “UG-Core 42 (Effective fall 2018)” templates. Click
on the desired template title. When you do, it will automatically create the template framework.
17 | P a g e
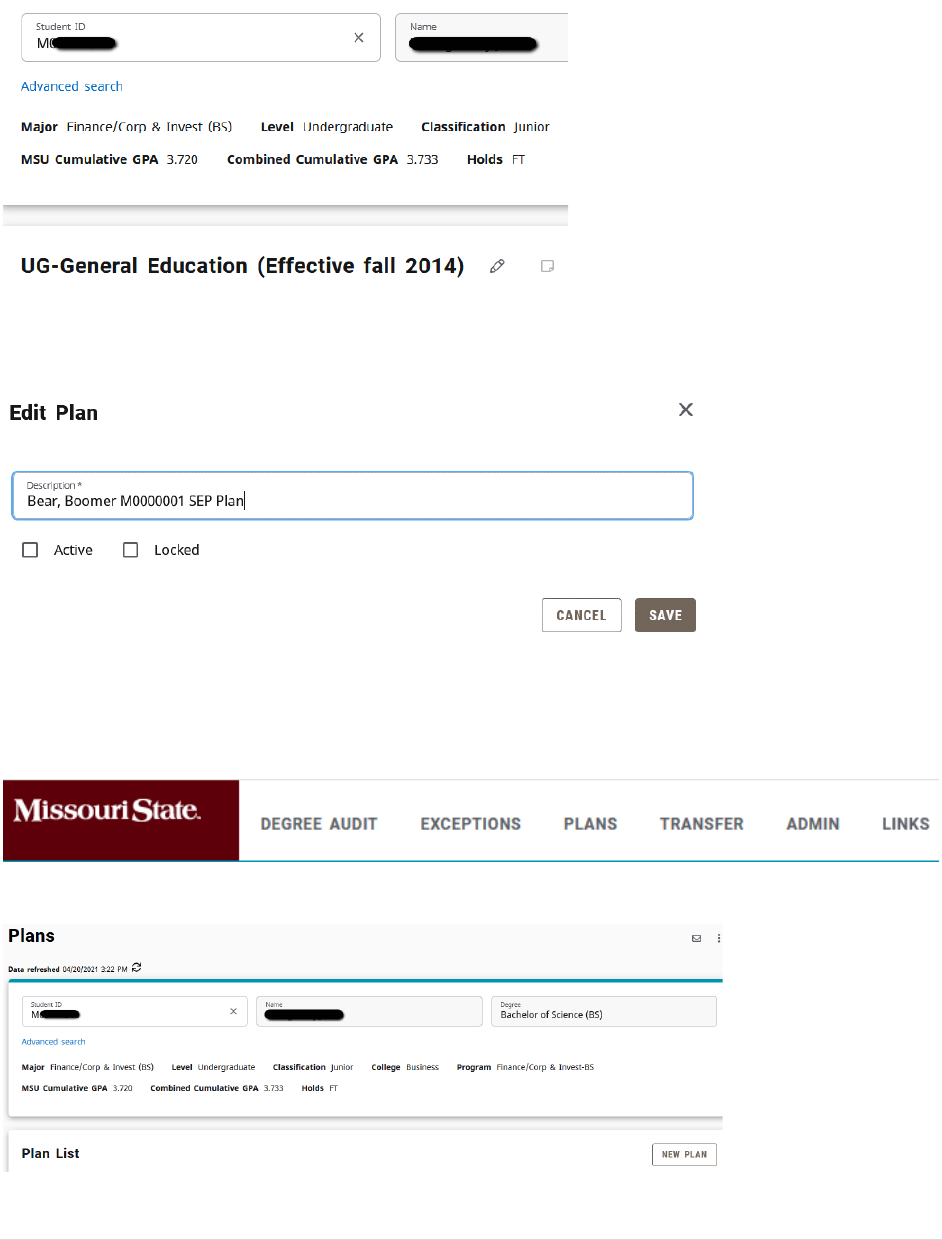
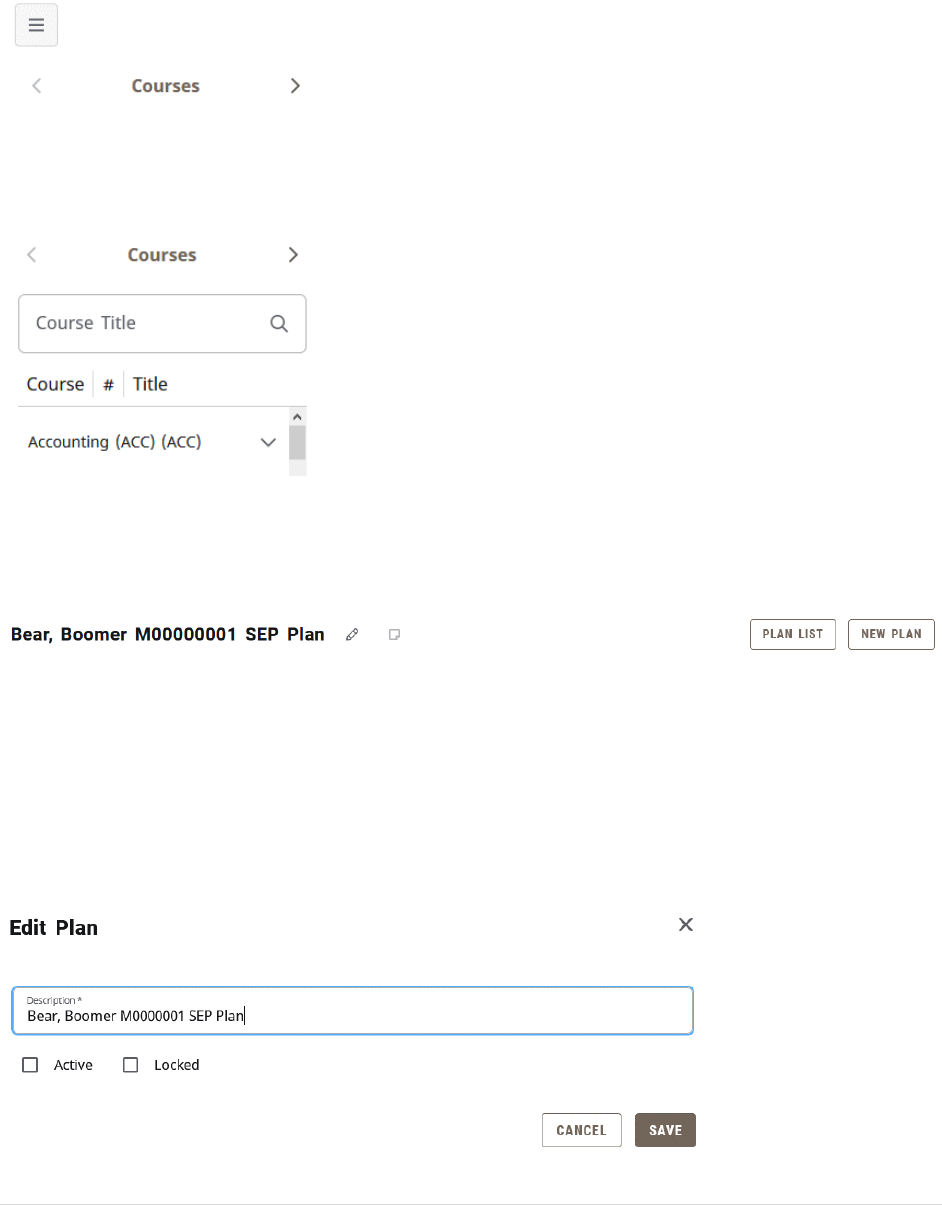
Next, retitle the create plan by clicking the pencil (Edit plan) button to the right of the plan title, which
will default as the template title.
In the Edit Plan box, retitle the plan using the following naming convention and click save when finished:
<Last name, First name BearPass number (or M-Number) SEP Plan>
The initial plan is now created and ready for editing.
SEP Initial Plan Creation from Scratch
Click on the “Plans” link found at the top of the degree audit.
If the student has no plan, it will be blank. Click the “New Plan” button at the bottom right.
18 | P a g e
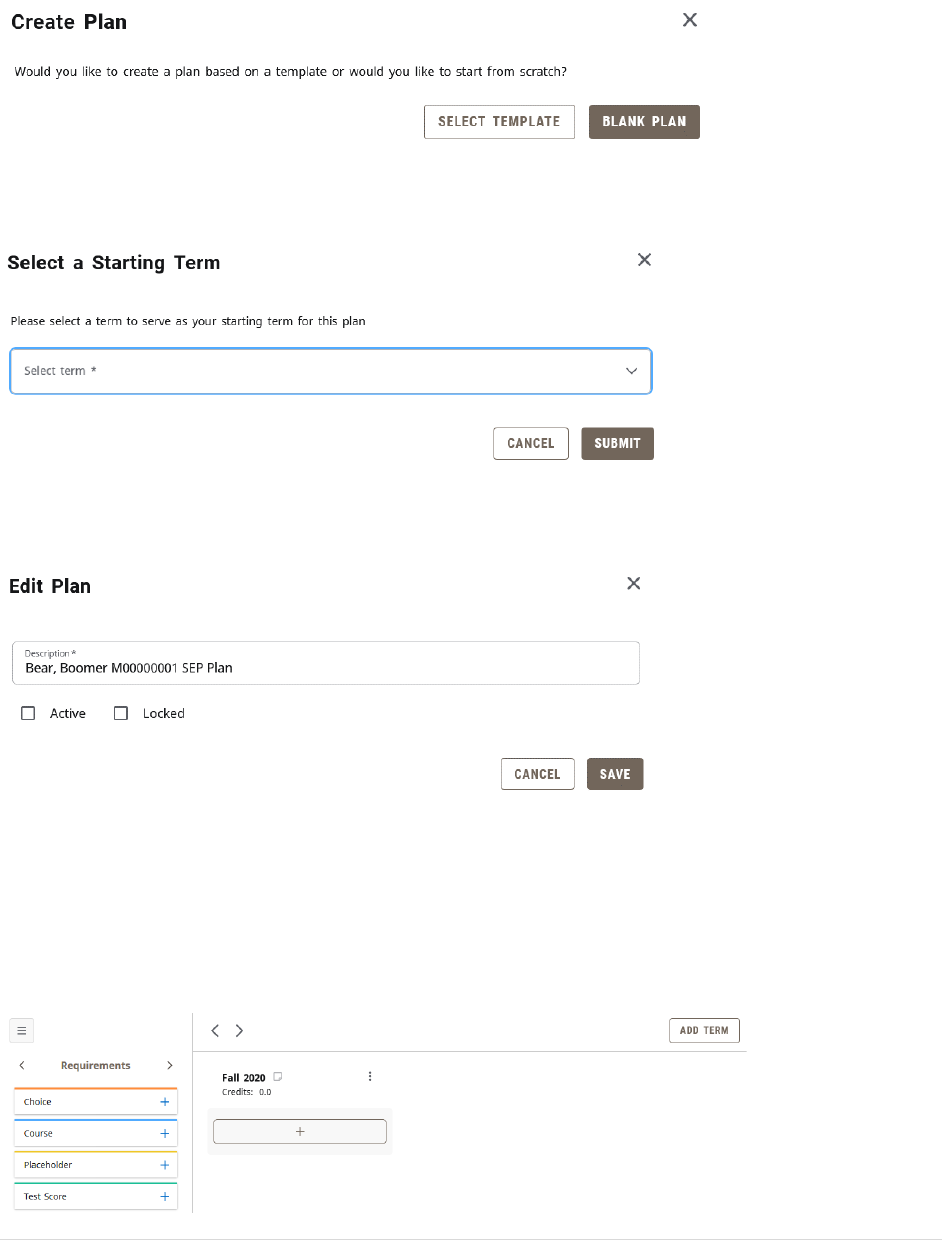
When creating an initial plan, you will be asked if you wish to create a plan based on a template or if you
would like to start from scratch. Click “Blank Plan.”
Select the first fall term (or semester) that should be included (NOTE: If the student is starting in spring
or summer, there will be an opportunity to address that later). Click “Submit.”
In the Edit Plan box, retitle the plan using the following naming convention and click save when finished:
<Last name, First name BearPass number (or M-Number) SEP Plan>
The initial plan is now created and ready for editing.
SEP Term Editing
This section covers how to make basic term edits to the SEP.
Adding a Term
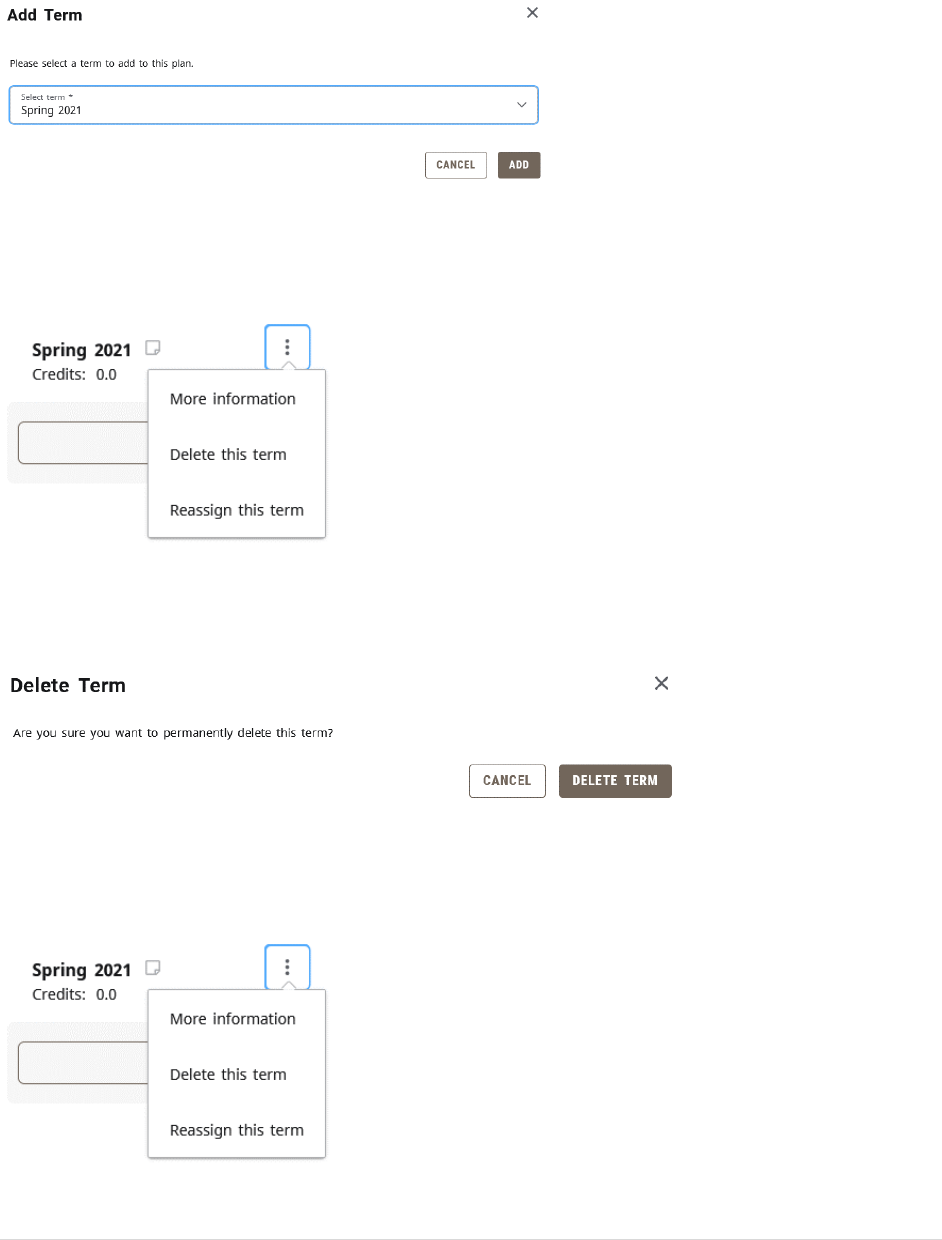
Click the “Add term” button in the upper right portion of the SEP plan field.
19 | P a g e
The Add Term box will open. In the “Select term” field, select the next term you wish to add and click
the “Add” button. Repeat this process until all desired semesters are included.
Deleting a Term
Click the ellipse (three dots) button to the right of the semester you wish to delete. Click the “Delete this
term” link.
You will get a Delete Term confirmation box. Before deleting, make sure that there is no planned
coursework existing on that semester that you wish to keep as it will be deleted as well if you delete the
term. Once you are ready to delete it, click the “Delete term” button.
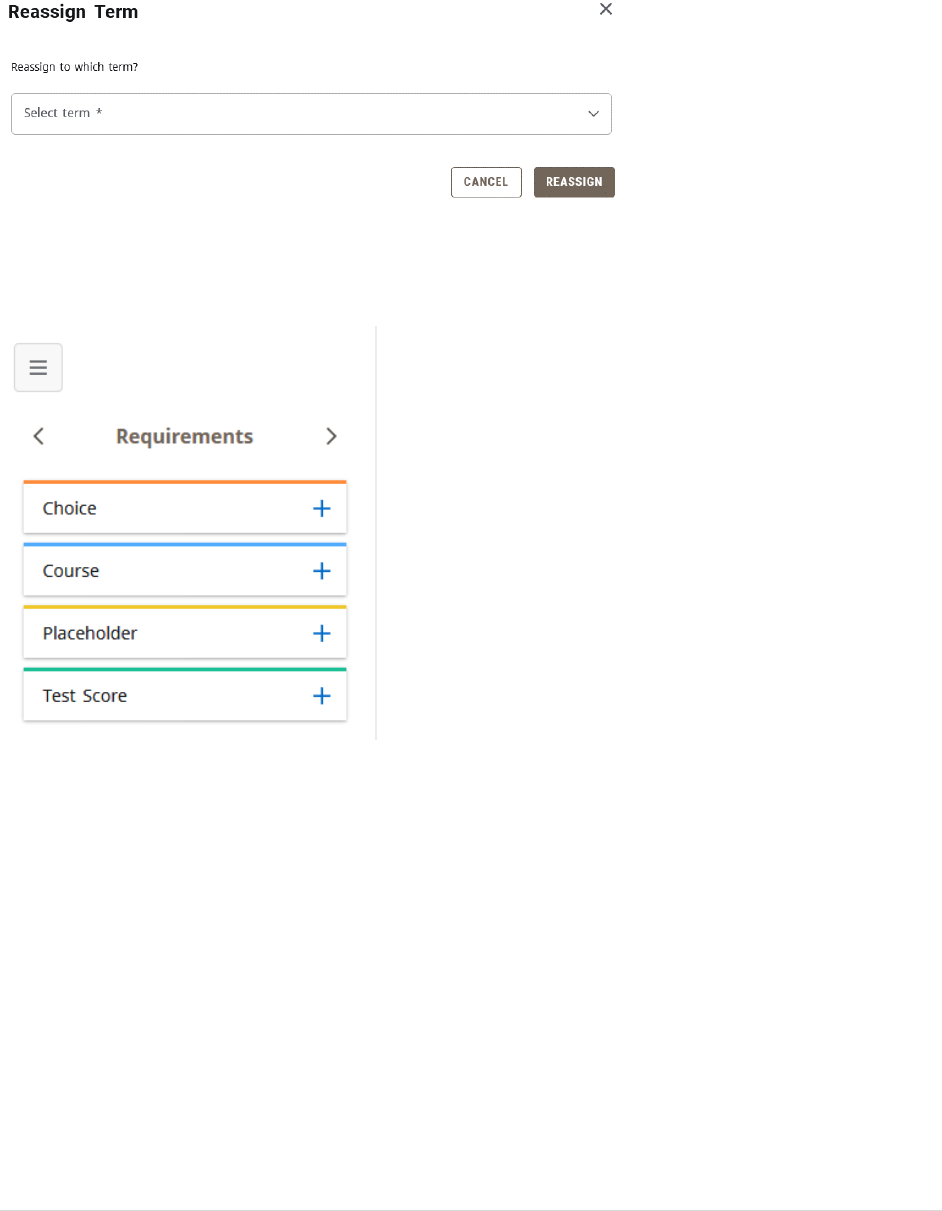
Reassign a Term
Click the ellipse (three dots) button to the right of the semester you wish to delete. Click the “Reassign
this term” link.
20 | P a g e
You will get a Reassign Term confirmation box. Before reassigning, make sure that the reassigned
semester does not already exist in your SEP plan as you cannot have two semesters with the same
semester assignment. Once you are ready to reassign it, click the “Reassign” button.
SEP Requirement Types
There are four types of requirements (or items) that you can add to an SEP plan. The Requirements
menu is located on the left navigation bar of the SEP.
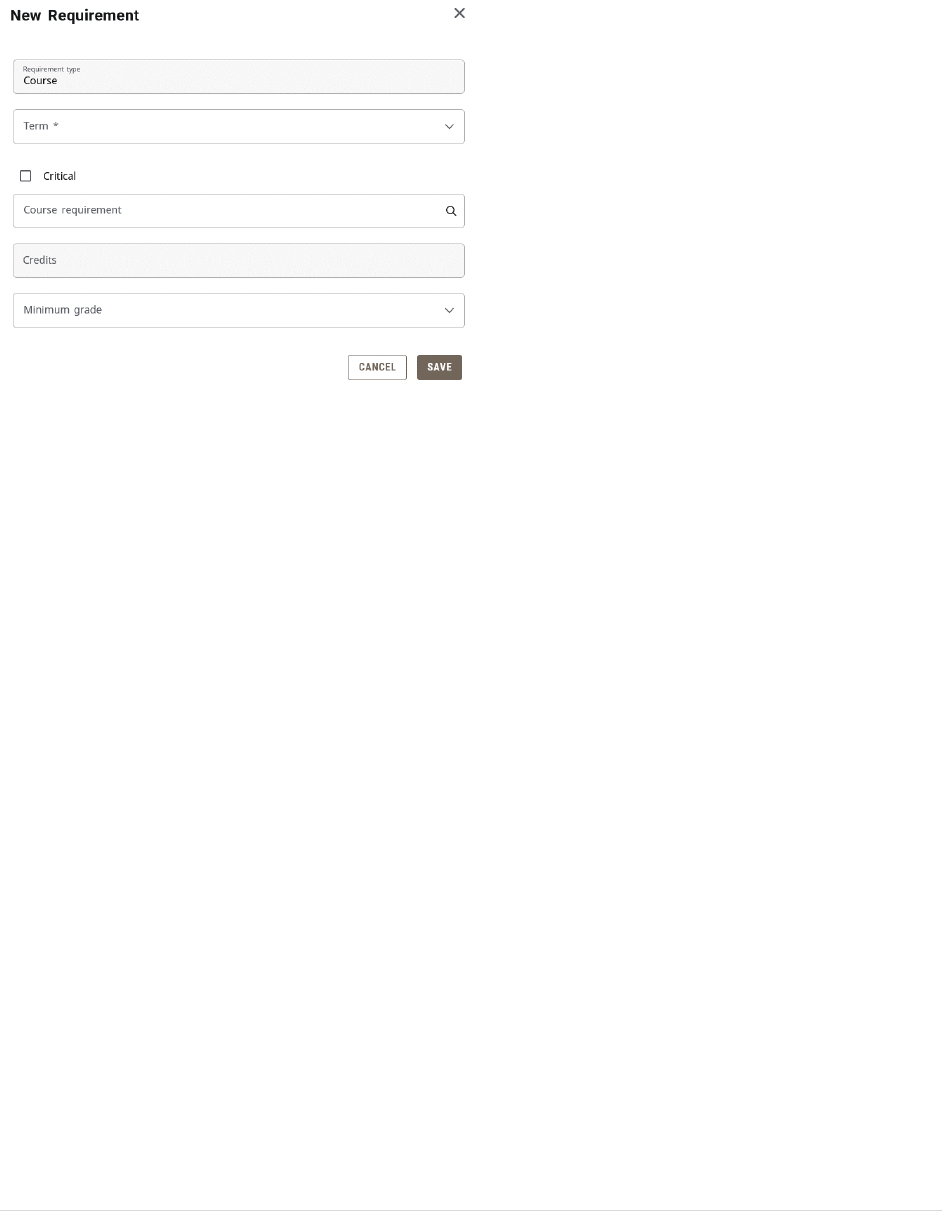
Course
This requirement type is used to add one specific course to an SEP plan. To select the Course
requirement, click the “+” sign to the left of the Course requirements field. This will open a “New
Requirement box with the “Requirement type” of course selected. The next field down is “Term”, where
you will select the semester in which the course will be completed. Next, check the “Critical” checkbox.
In the “Course requirement” box, begin to type either the prefix/number or title of the course you wish
to select. After you type the first few characters, it will begin to display matching choices. Once you see
the course you want, you can click on it rather than type out the rest of the characters. If you select
from the menu, the next field “Credits” will fill in by default. This is the number of credits the course is
worth. If it does not fill in manually, you must fill it in. Variable credit courses will default to the high end
of the credit range, so if you need it for less than the maximum, you can change it.
21 | P a g e
For the minimum grade, enter “D+” for undergraduates or “C” for graduates unless the course is part of
a program that requires a minimum grade higher than that. When finished, click the Save button in the
lower portion of the New Requirement box.
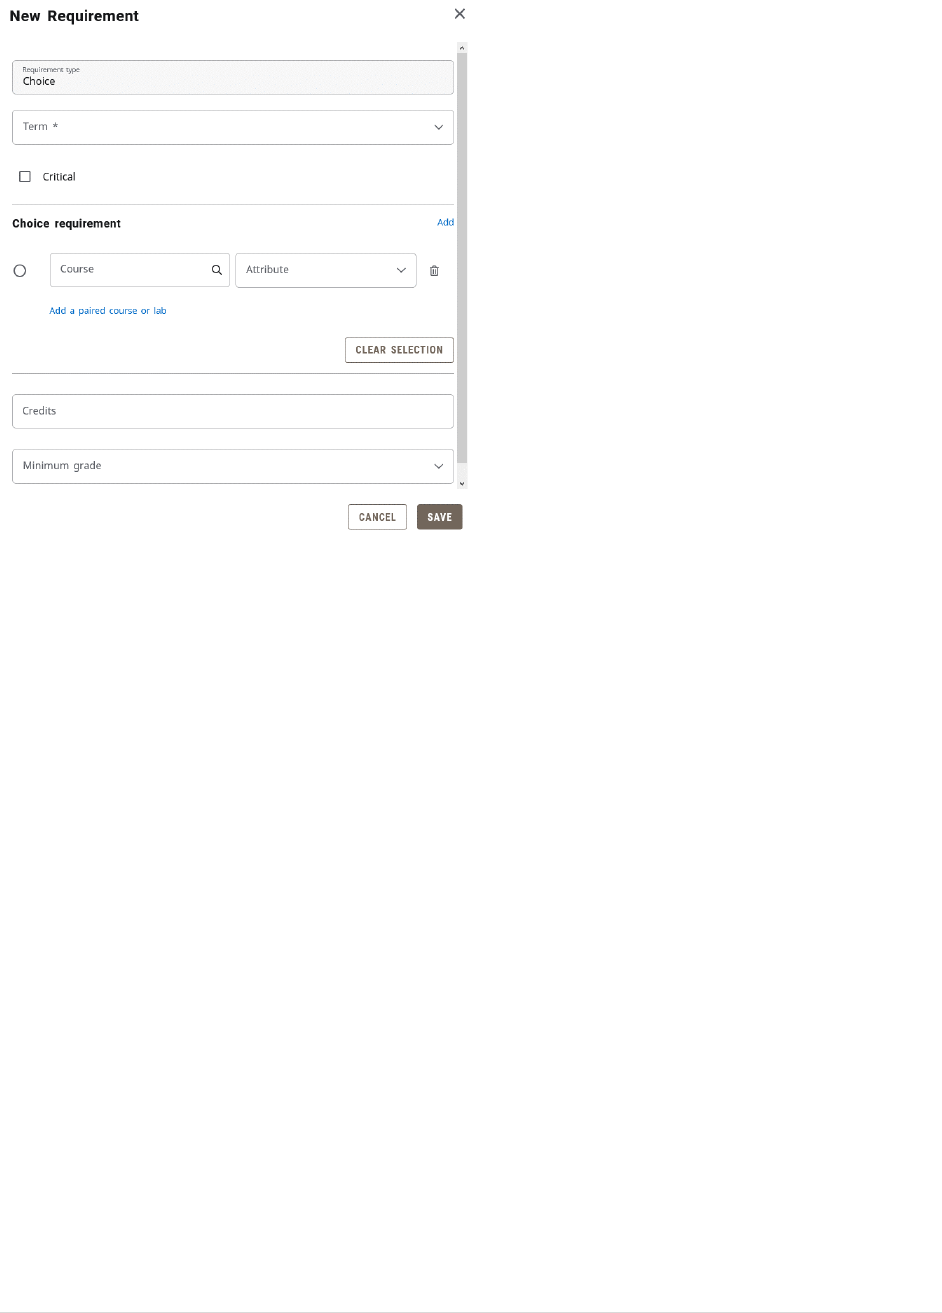
Choice
This requirement type is used to add a requirement where the user selects one out of multiple
presented options. To select the Choice requirement, click the “+” sign to the left of the Choice
requirements field. This will open a “New Requirement box. The next field down is “Term”, where you
will select the semester in which the course will be completed. Next, check the “Critical” checkbox.
In the “Choice requirement” box, begin to type either the prefix/number or title of the course you wish
to select. After you type the first few characters, it will begin to display matching choices. Once you see
the course you want, you can click on it rather than type out the rest of the characters. To add the next
choice, click “Add” on the right side of the Choice requirement title line. Continue to add the additional
choices following these procedures. If you wish for a choice to have paired classes (Example: Take
course A or take both courses B and C), you can do this utilizing the “Add a paired course or lab” link
below the entry of the course to which you wish to add the pair.
For credits, enter the lowest number of credits that will fulfill this choice. For example, if you put a 3-
credit course or a 4-credit course as the two choices, you would enter “3” in the Credits field. For the
minimum grade, enter “D+” for undergraduates or “C” for graduates unless the course is part of a
program that requires a minimum grade higher than that. When finished, click the Save button in the
lower portion of the New Requirement box.
22 | P a g e
Placeholder
This requirement type is used when you know general characteristics about the type of course you plan
to take, but not what the specific course will be. This can also be used when you wish to add a reminder
about an event or item, an advising situation, or add information such as a website for future reference.
Below are the types of placeholders available:
• Advisement-This is a placeholder to use when there is something you need to discuss with
your advisor. For example, if you wished to discuss accelerated master’s degree options with
your advisor during your sixth semester, you could add a placeholder to remind you of this.
• Comment-This is a placeholder to use when there is an item you wish to make sure to
participate in during a particular semester. For example, if you want to participate in a
career fair, you could remind yourself to do this during a particular semester.
• Elective-This is a placeholder for when you just want to take a random elective for fun or,
for undergraduates, for your 120 minimum credit hour count or 40-hour upper division
count.
• Requirement Choice-This is a placeholder for when a course is meant to fulfill a specific
degree audit requirement but you don’t know what course you plan to take yet.
• Transfer- This is a placeholder to account for situations where you are taking a course at
another institution. This is helpful for your academic advisor in terms of being aware of the
additional course load that they may not know about since you are not taking it at MSU.
23 | P a g e
• Videos and Resources-This is a placeholder to save information you want to refer to later
about an item. While you cannot paste in text as a hyperlink, you can paste it into the
requirement notes (discussed later) as general text which you can later copy and paste into
a web browser.
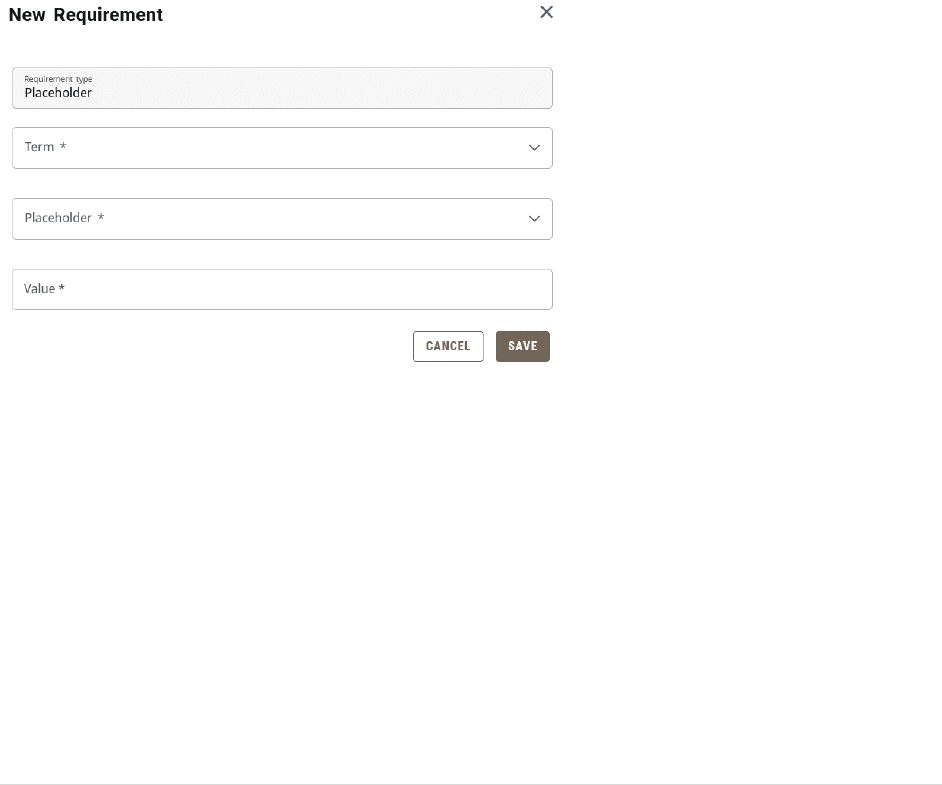
To select the Placeholder requirement, click the “+” sign to the left of the Placeholder requirements
field. This will open a New Requirement box with a default Requirement Type of “Placeholder.” The next
field down is “Term”, where you will select the semester in which the item/course will be completed.
The next field is “Placeholder.” This is where you pick the type of placeholder you wish to use based on
the previous placeholder descriptions.
In the “Value” box, begin to type a text description of the item/course. For example, if you plan 3 credits
of general elective towards graduation, you might type “General elective for 120 minimum/40 UD (3
credits).” It is recommended to always include the credits in parenthesis as this requirement type does
not present an option to select the number of credits. You are limited in characters here, but there is a
way to provide additional information later in these instructions. When finished, click the Save button in
the lower portion of the New Requirement box.
Test Score
This requirement is the least used of the four requirement types. This is for situations where there is an
exam requirement housed outside of a course that must be completed as part of a program
requirement. For undergraduates, the most common is the University Exit Survey, although some
programs have additional program-related exams. For graduates, the most common is comprehensive
exams and/or thesis defense tracking.
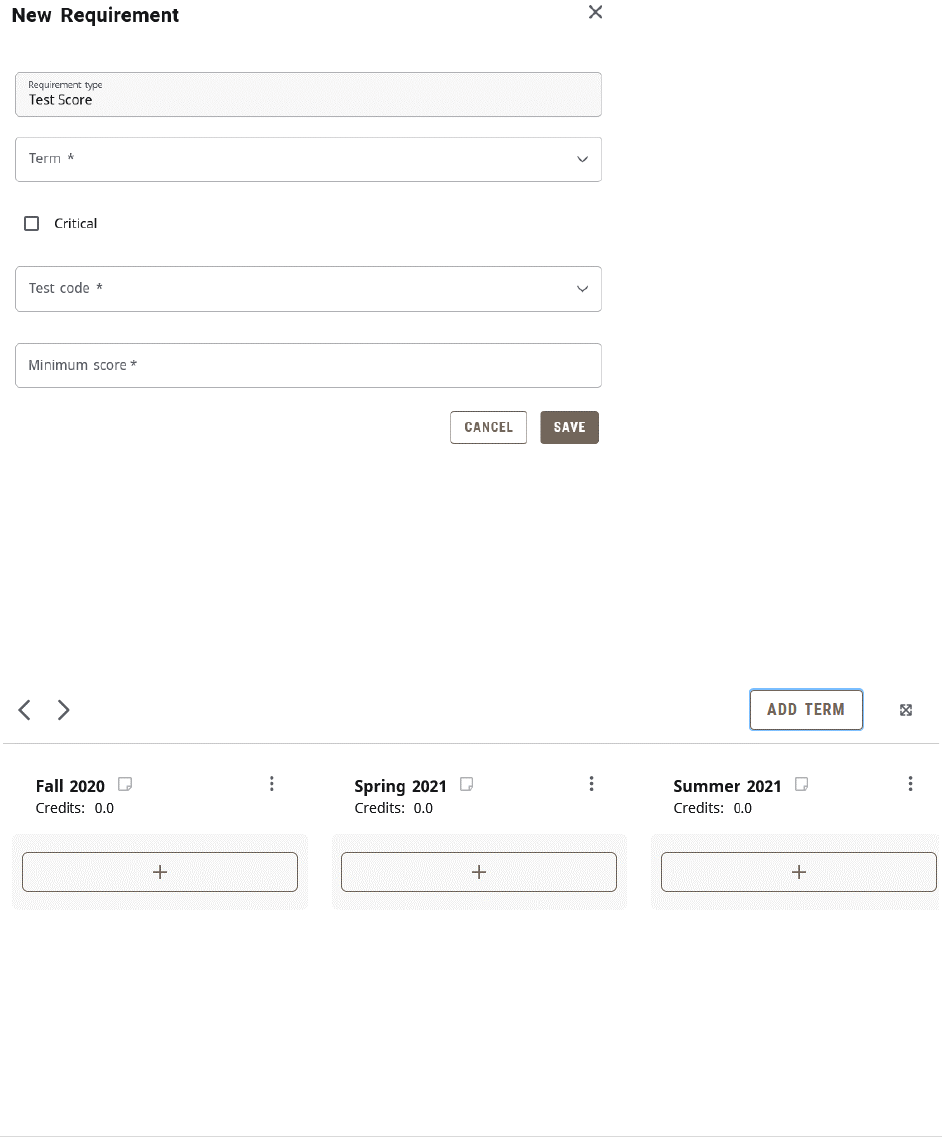
To select the Test Score requirement, click the “+” sign to the left of the Test Score requirements field.
This will open a New Requirement box with a default Requirement Type of “Test Score.” The next field
down is “Term”, where you will select the semester in which the item/course will be completed. Next,
check the “Critical” checkbox.
24 | P a g e
Next, click the “Test code” field to pick from the selectable test code options. For the minimum score,
enter a value of “Y” which represents “yes” for completion of the exam. When finished, click the Save
button in the lower portion of the New Requirement box.
NOTE-This requirement will later be recorded as met once the corresponding test value is recorded on
the student’s test score record.
SEP Navigation and Editing
This section is designed to help you navigate the SEP and make changes to items existing from use of a
template or changing items you previously added to the SEP plan
Semester Transition
You can back and forth between semesters using the “<” and “>” arrows found in the upper left just
above the semester grid in the SEP plan.
Course Editing Options
There are a number of editing options for SEP requirements. They are described below and can be
accessed by clicking the ellipse (three dots) button to the right of the requirement.
25 | P a g e
More Information (CourseLink Information)
To see CourseLink information for a course such as prerequisite, course description, date/time offering
for open registration semesters, and seat availability, click the ellipse next to the course and select the
“More information” link.
Edit This Requirement
To edit the requirement, taking you back to the original entry screen for the requirement, click the
ellipse next to the course and select the “Edit this requirement” link.
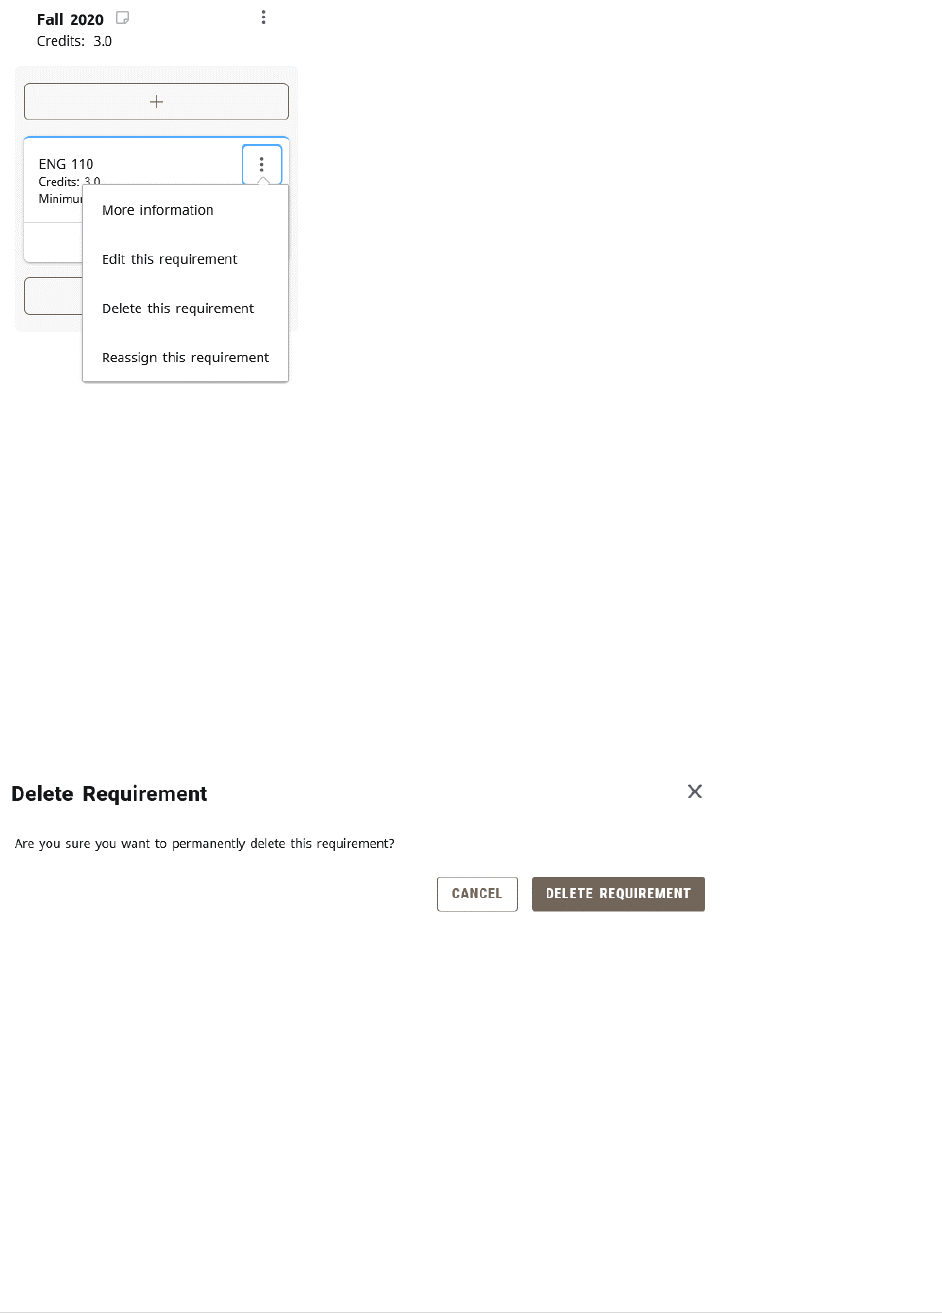
Delete This Requirement
To delete the requirement off of the SEP plan, click the ellipse next to the course and select the “Delete
this requirement” link. When the Delete Requirement confirmation box opens, click the “Delete
requirement” button.
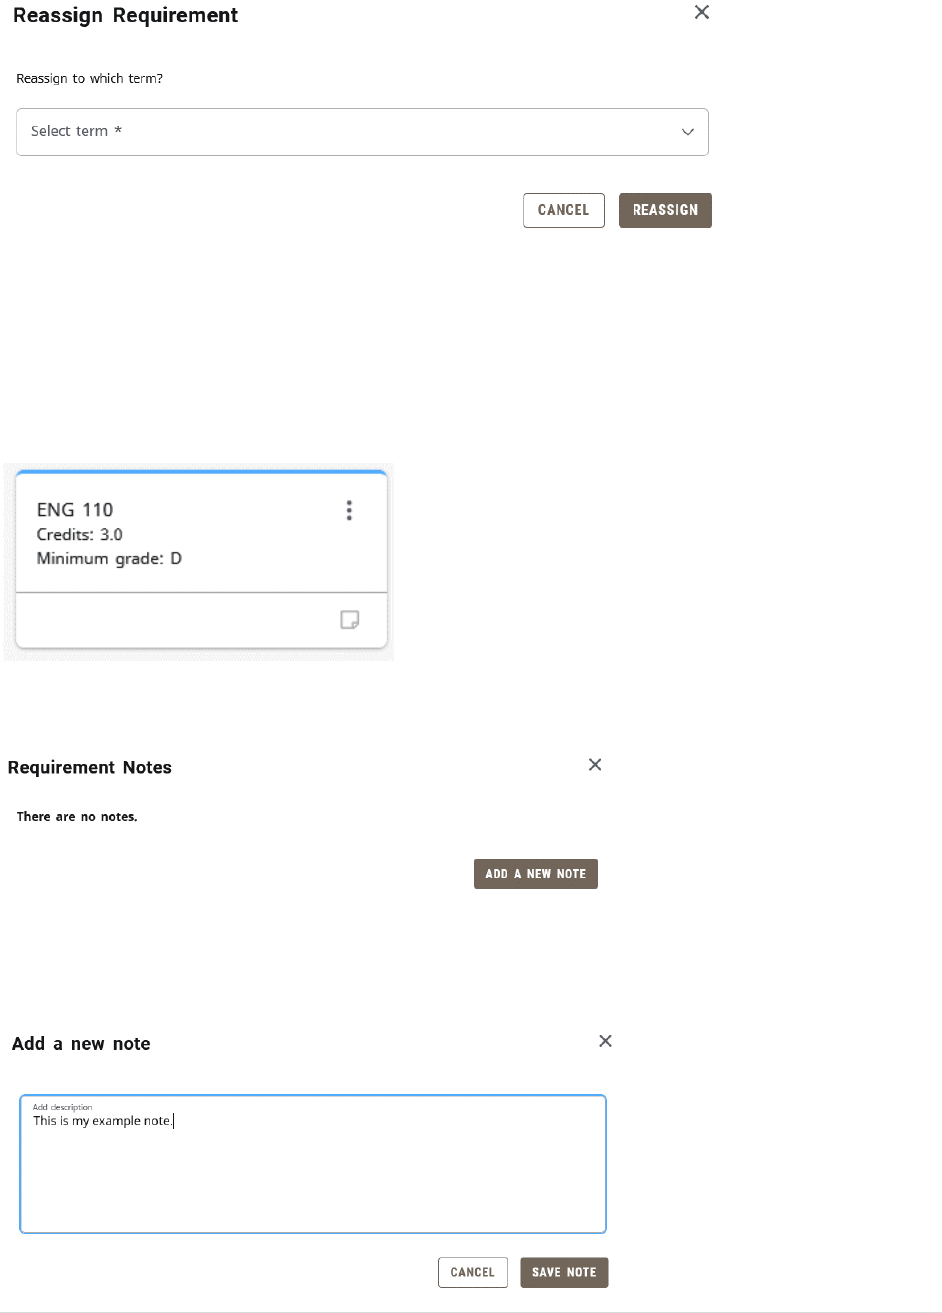
Reassign This Requirement
To reassign the requirement to a different semester within the SEP plan, click the ellipse next to the
course and select the “Reassign this requirement” link. When the Reassign Requirement confirmation
box opens, select the semester you wish to change it to in the “Term” box and click the “Reassign”
button.
26 | P a g e
NOTE: You may also reassign a requirement by hovering your mouse over a requirement, holding down
a single left click, and drag and drop it on the semester you wish to assign it to.
Add Requirement Notes
Users have the ability to add additional information to a requirement in the form of a requirement note.
To do this, click on the notepad in the bottom right corner of the requirement to which you want to add
the note.
This will open a Requirements Notes box. If there is no existing note, it will have a button you can click
to add a new note.
Type the note you wish to add (or paste in text you have copied from something else). Click the “Save
Note” button when finished.
27 | P a g e
SEP Degree Audit
Users can see what their planned courses look like in a degree audit by clicking the “Audit” link in the
top left just above the SEP plan. The audit will open in a separate window for viewing.
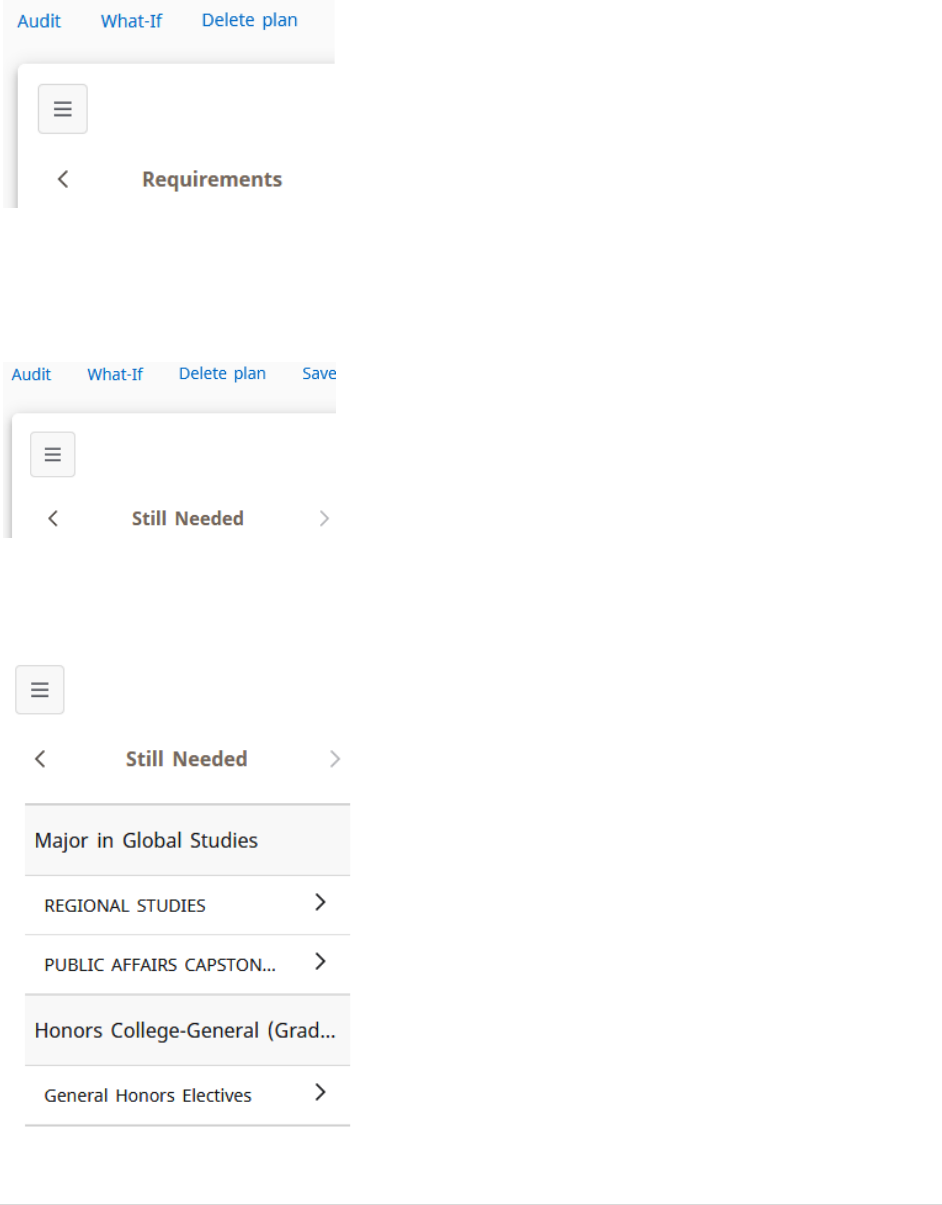
SEP Still Needed
Users can see a “list view” of unmet requirements by navigating to the “Still Needed” list. To find this,
click the right arrow by the Requirements header.
This will show requirements that do not have a specifically planned courses associated with it. After
drilling down to see the specific courses listed, users may click and drag any course they wish to add to
their plan to the corresponding plan semester as an alternative way to add the course to the plan.
28 | P a g e
SEP Courses
Users can see a “list view” of university courses by navigating to the “Courses” list. To find this, click the
left arrow around the Requirements header.
This will show a list of courses built in Banner. After drilling down to see the specific courses listed, users
may click and drag any course they wish to add to their plan to the corresponding plan semester as an
alternative way to add the course to the plan. This does include old courses that are no longer offered.
SEP Plan Activation and Locking
When an initial SEP plan is completed and ready for use, the user should activate the plan. To do this,
the user should click the pencil icon to the right of the SEP plan title to open the Edit Plan box.
Once open, the user should check the “Active” checkbox. This indicates the plan is now active and being
followed. Students will only see the “Active” checkbox. Advisors and Registrar staff will also see a
“Locked” checkbox. If an advisor checks the “Locked” checkbox, it means the advisor has reviewed and
approved the plan and locked it so there can be no further changes without the student contacting
them. One benefit of locking the plan is that it cause plan tracking to be turned on so the plan will have
an indicator on their plan that shows whether the student is on-track or off track with their plan.
29 | P a g e
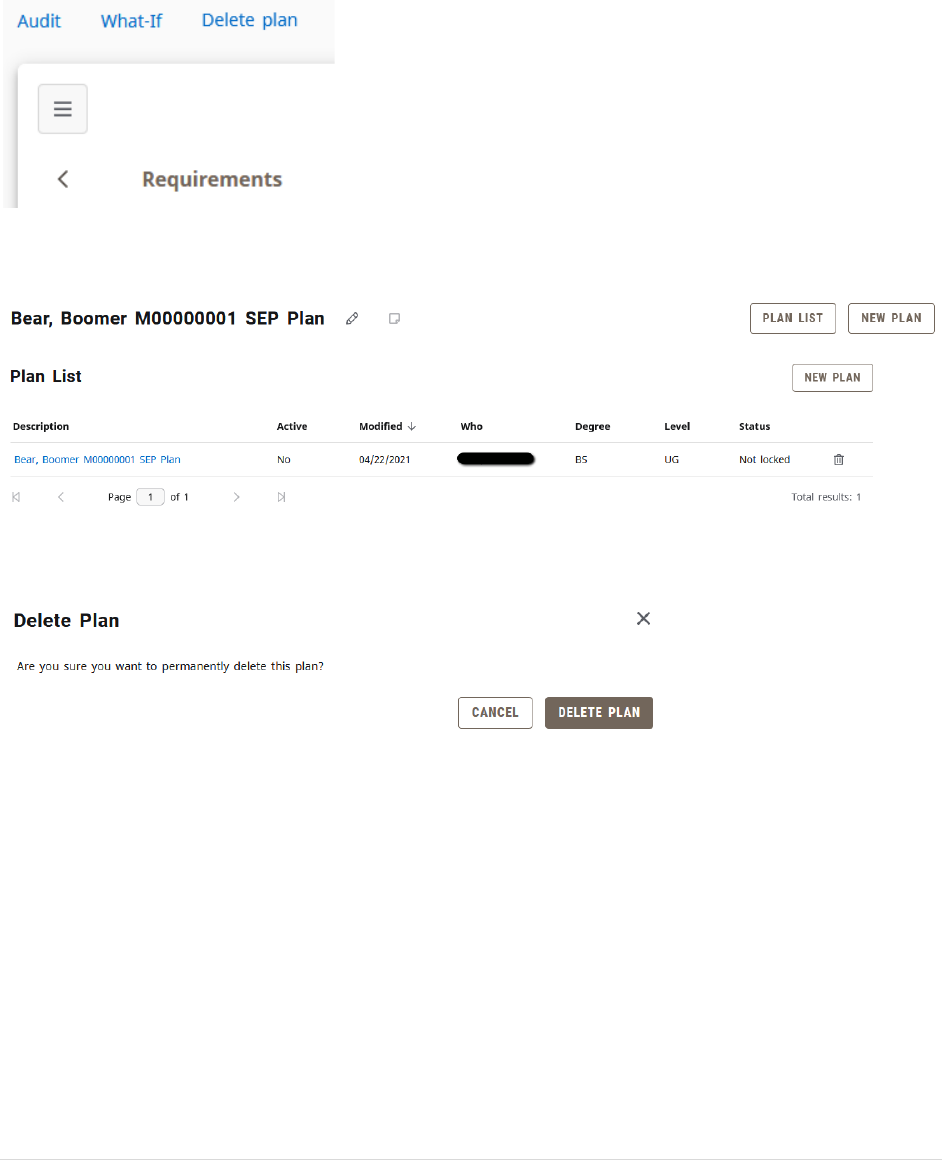
SEP Plan Deletion
If the user wish to end their existing plan and start over, there are two ways that an SEP plan can be
deleted.
Option 1: Click Delete Plan in the menu just above the SEP Plan.
Option 2: Click the Plan List button to the right of the plan title and then the trash can at the end of the
plan’s listing on the Plan List
Using either option will take the user to the Delete Plan confirmation box. To delete the plan, click the
Delete Plan button. Once deleted, there is no way to retrieve the plan.
Section 4: Exception Processing
Exception processing is used when a department (or authorized University administrator) wishes to
record the approval of a course substitution, waiver, or requirement adjustment in the degree audit
system.
Exception Access
All Office of the Registrar staff members have exception processing access as part of the Registrar
security role. OR staff processes approvals made by the Provost’s Office (typically through the Associate
Provost-Student Development and Public Affairs) or designated committees such as the Degrees
Committee. For majors/minors/certificates, department head are granted access upon their installation
as the department head. The department head has the authority to expand access to other designees by
30 | P a g e
submitting their request to the Associate Registrar-Degree Programs and Advisement Support. For
graduate programs, Graduate Program Directors are granted access through Graduate College approval
and the approval is processed by the Office of the Registrar.
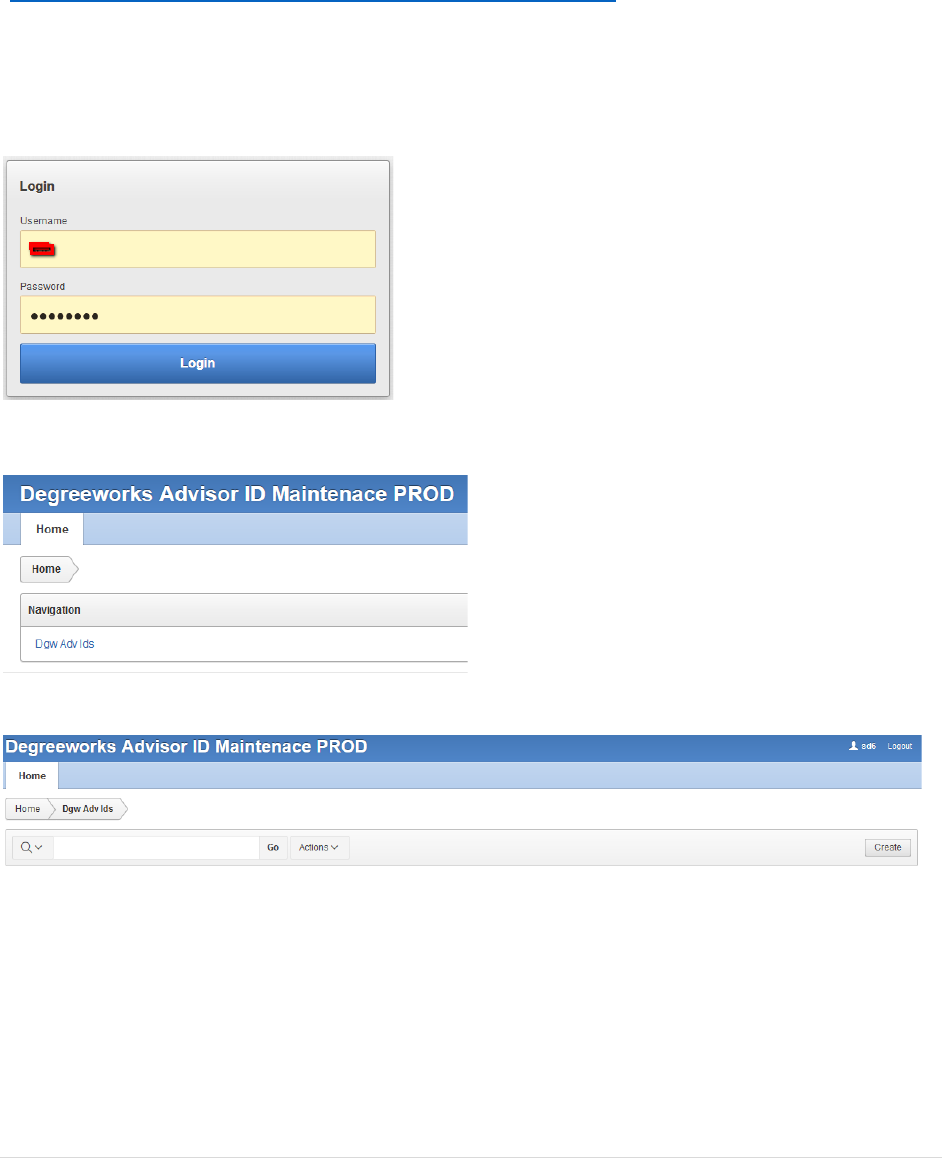
Access is granted through an ADV Access program built by MIS
(https://apexprod.missouristate.edu/ords/f?p=119:LOGIN_DESKTOP). A link to this is located on the
Registrar Staff Resources Link>Banner Systems>Degree Works section of the page. Access is managed
using the following steps:
Adding Exception Processing Access
Login using BearPass login and password.
Click the “Dgw Adv Ids” link in the Navigation box.
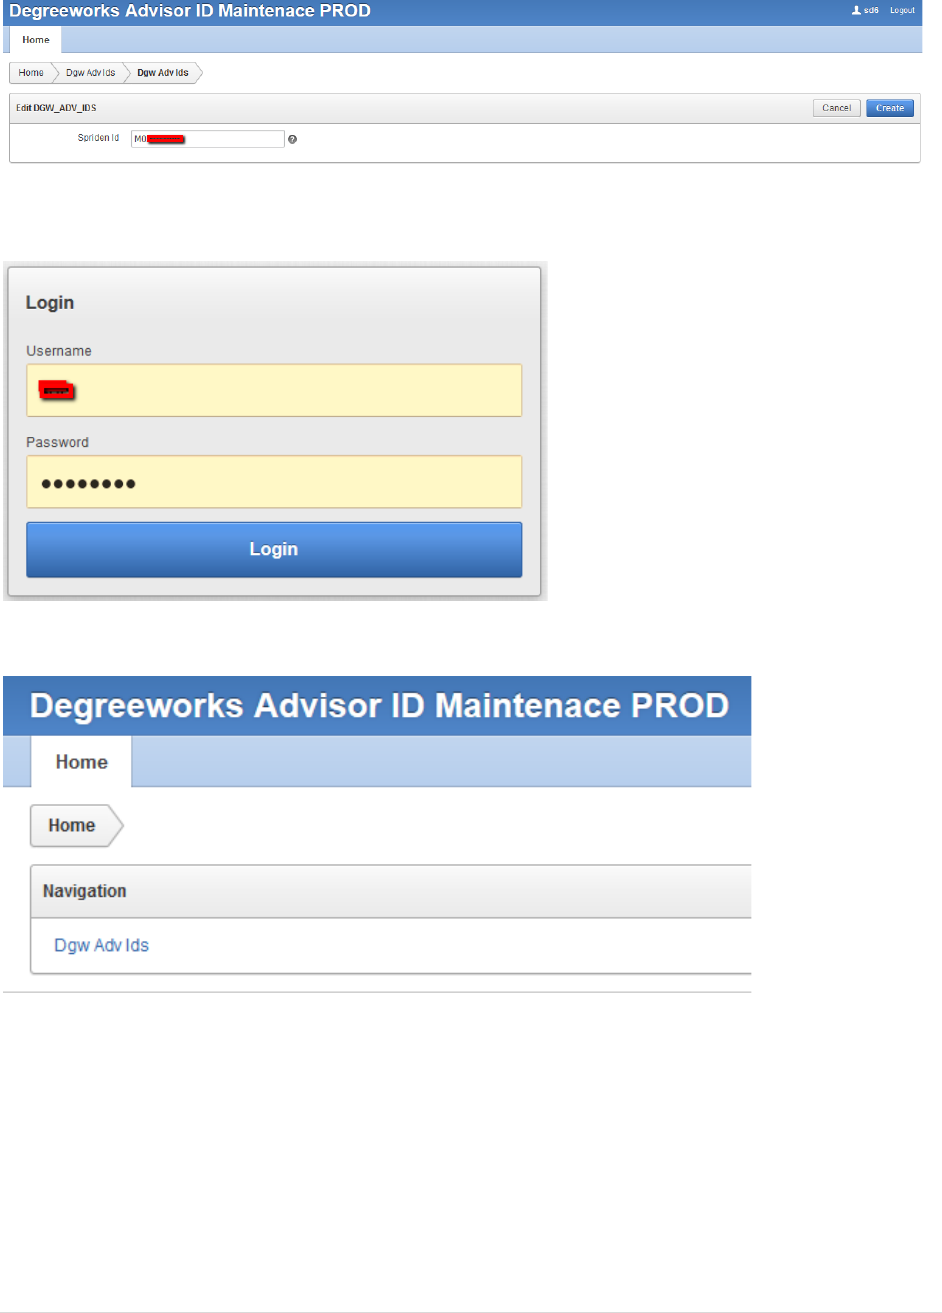
Click the “Create” button on the far right.
Enter the BearPass number (M-number) of the person who should receive exception access. Click the
“Create” button on the far right. An “Action Processed” button will confirm the access was granted. The
access is not immediate. Exception access is wiped each evening and reassigned sometime after 9:00
pm, so access would typically appear the following morning.
31 | P a g e
Deleting Exception Processing Access
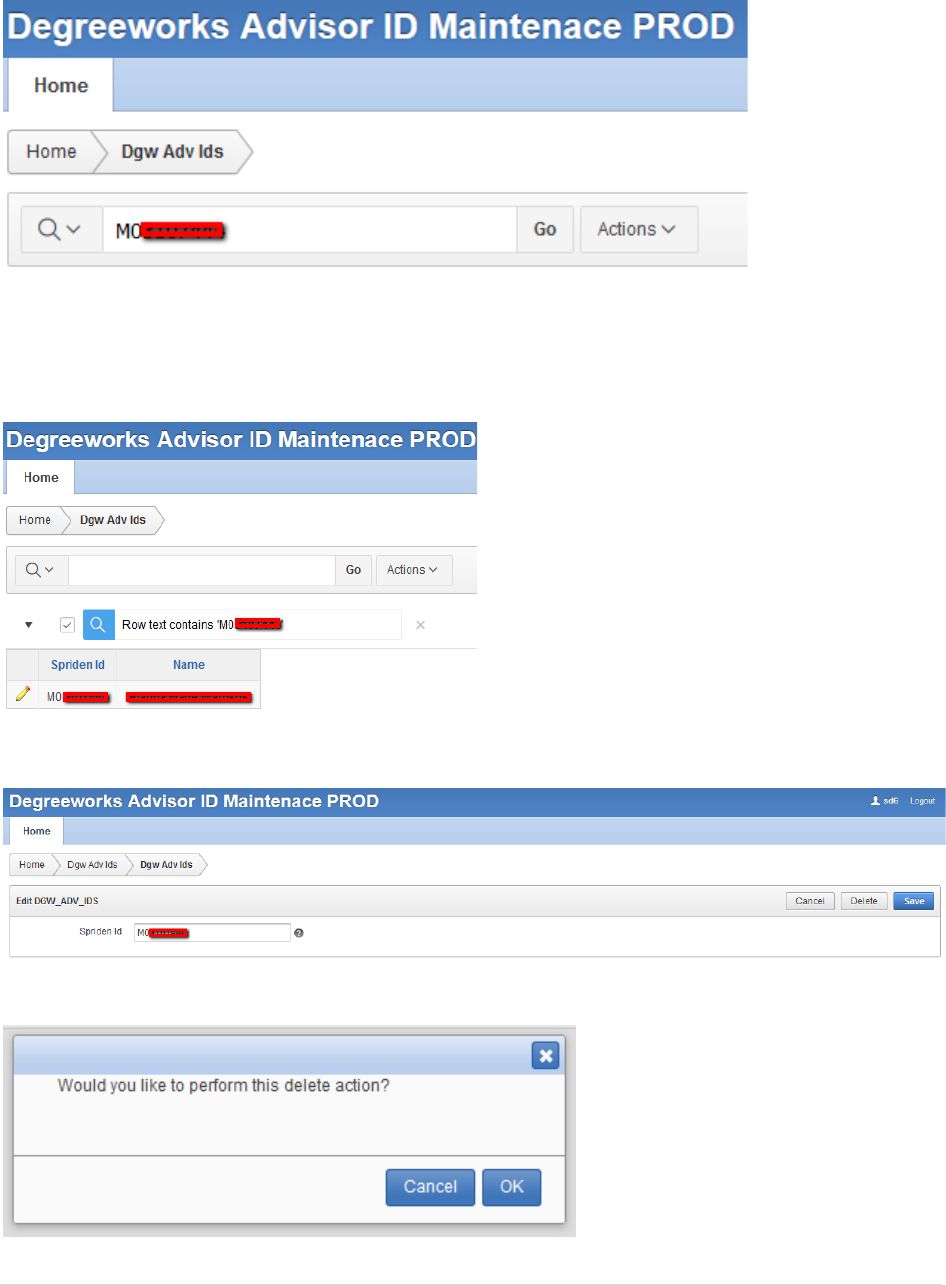
Login using BearPass login and password.
Click the “Dgw Adv Ids” link in the Navigation box.
Enter the BearPass number (M-number) of the individual who should have exception access removed.
32 | P a g e
You will see the individual displayed. Click the Edit (pencil) icon to the left of the individual’s BearPass
number.
Click the “Delete” button on the right side of the page followed by the “Save” button.
You will get a deletion confirmation box. Click “OK.”
33 | P a g e
Re-establishing Missing Exception Access
Each evening, an update process runs where exception access for all non-Registrar staff is temporarily
removed and restored later in the evening by the ADV process described in the previous section.
On rare occasion, the overnight process that reapplies exception access will fail to run properly and will
need to be manually run. Since Office of the Registrar staff has a different level of security, we will not
notice this and will typically learn about it when we start getting contacted about missing exception
access. To manually run the process to reapply access, do the following:
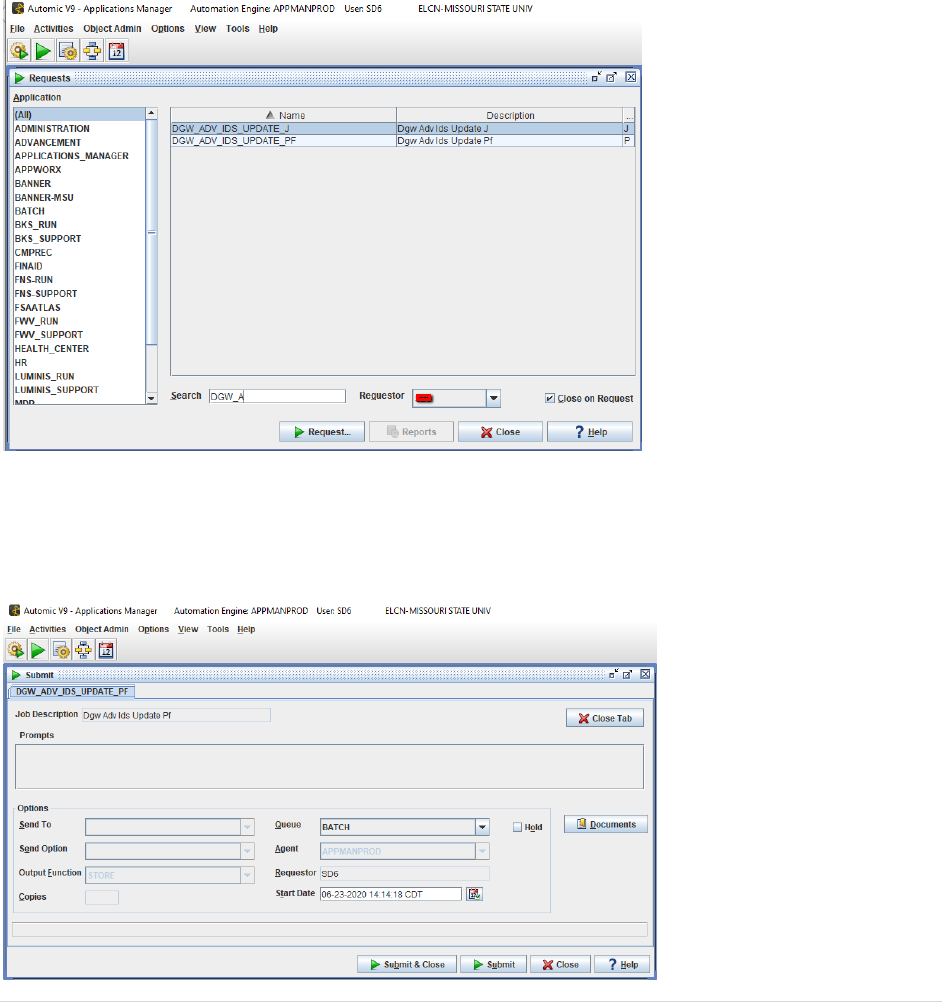
Login to AppMan. Click the Request button and find DGW_ADV_IDS_UPDATE_PF. Click the “Request”
button at the bottom of the screen.
Click the “Submit and Close” button. It generally takes less than two minutes to run. Once complete, ask
a user who reported exception processing missing to try again. They will need to close out Degree Works
and reopen it. Typically, access has returned. If the user still reports the exception tab as missing, they
may need to clear their browser cache for it to return.
34 | P a g e
Exception Application Rules
There is not a way to limit exception access by department, so authorized exception processers are
expected to follow the following exception application guidelines.
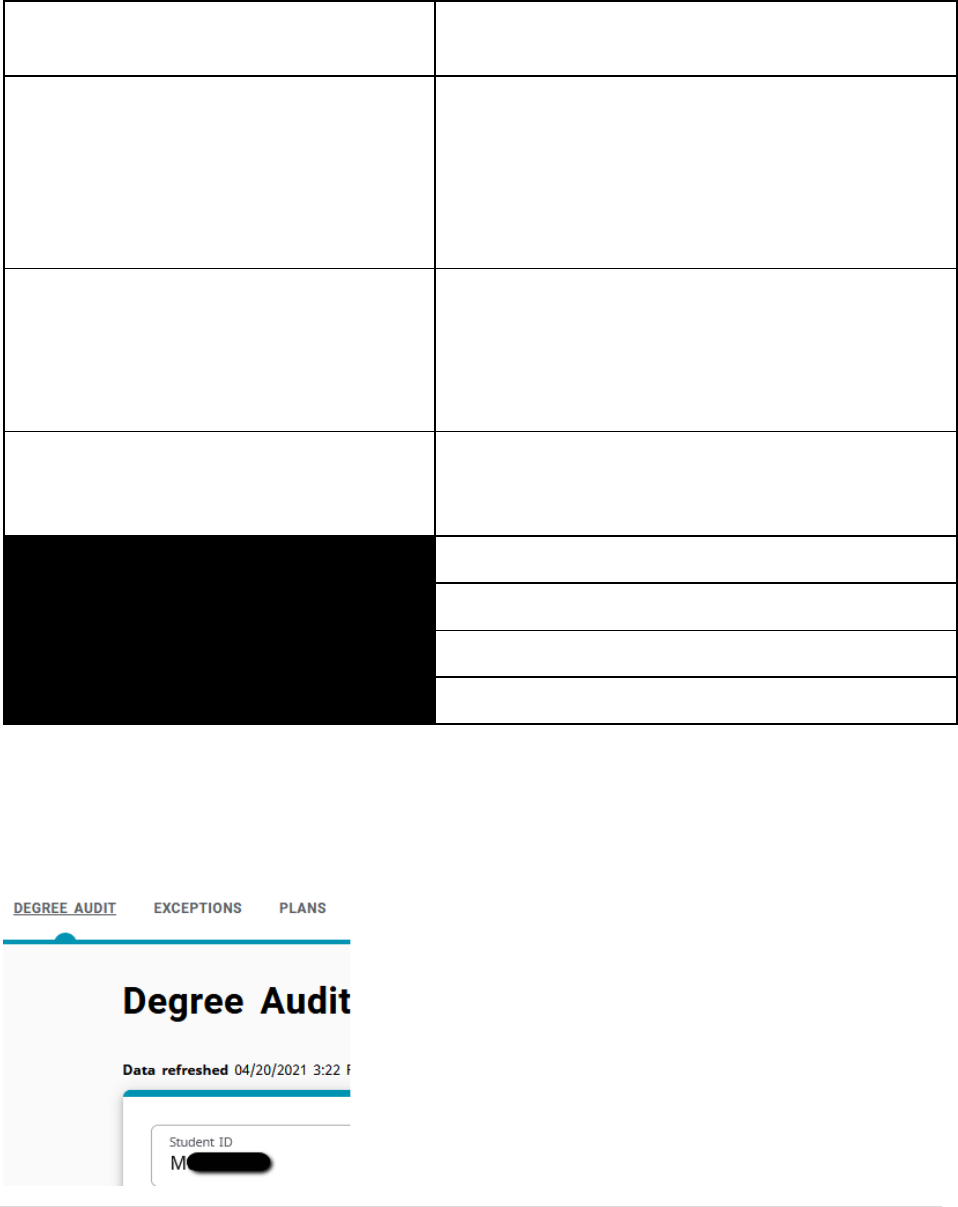
Degree audit blocks a department head may
adjust
Degree audit blocks a department head may not
adjust
Major in (a major belonging to the adjusting
department head) except for major GPA and
residency as those are University rules
Degree blocks (Degree in …). This includes the 120
minimum hours, 40 hour upper-division, cumulative
GPA, exit exam, and any other requirements in this
block. If you think something should be adjusted, the
adjustment must be received by the Office of the
Registrar through the approval of the proper authority.
Minor in (a major belonging to the adjusting
department head) except for minor GPA and
residency as those are University rules
General education or Core 42 block. This is true even
when the potentially waived course is from the
department head’s department as all general education
waivers are processed through the Office of the
Registrar through the approval of the proper authority.
Major or department-related admission
requirements (for a major belonging to the
adjusting department head)
Other blocks such as secondary education
requirements, even if associated with a department
related discipline.
Major in … blocks belonging to another department
Minor in … blocks belonging to another department
Bachelor of Arts degree requirement blocks
Honors College requirements
Exception Processing-Adding an Exception
Login to Degree Works. Open the degree audit of the student for which you wish to enter an exception.
Click the Exceptions tab at the top of the degree audit screen.

35 | P a g e
The “exception” view of the degree audit will open. Scroll down to the portion of the degree audit you
wish to change and click the radio button to the left of the requirement to change. Click the plus (+) sign
button to the left of the requirement.
This will open an Add Exception box. In the “Exception type” box, select the type of exception you wish
to enter. Once you do this, the information fields for the respective exception type will open. See the
Exceptions Type section below for additional information on the various types of exceptions available
and instruction on how to complete them.
After filling out the exceptions field’s, click in the Description field. Make sure the field is blank and click
Add Exception. When you do this, a message will appear indicating the description field was left blank
and will default a sample description. Click the “X” in the top right of description field warning message.
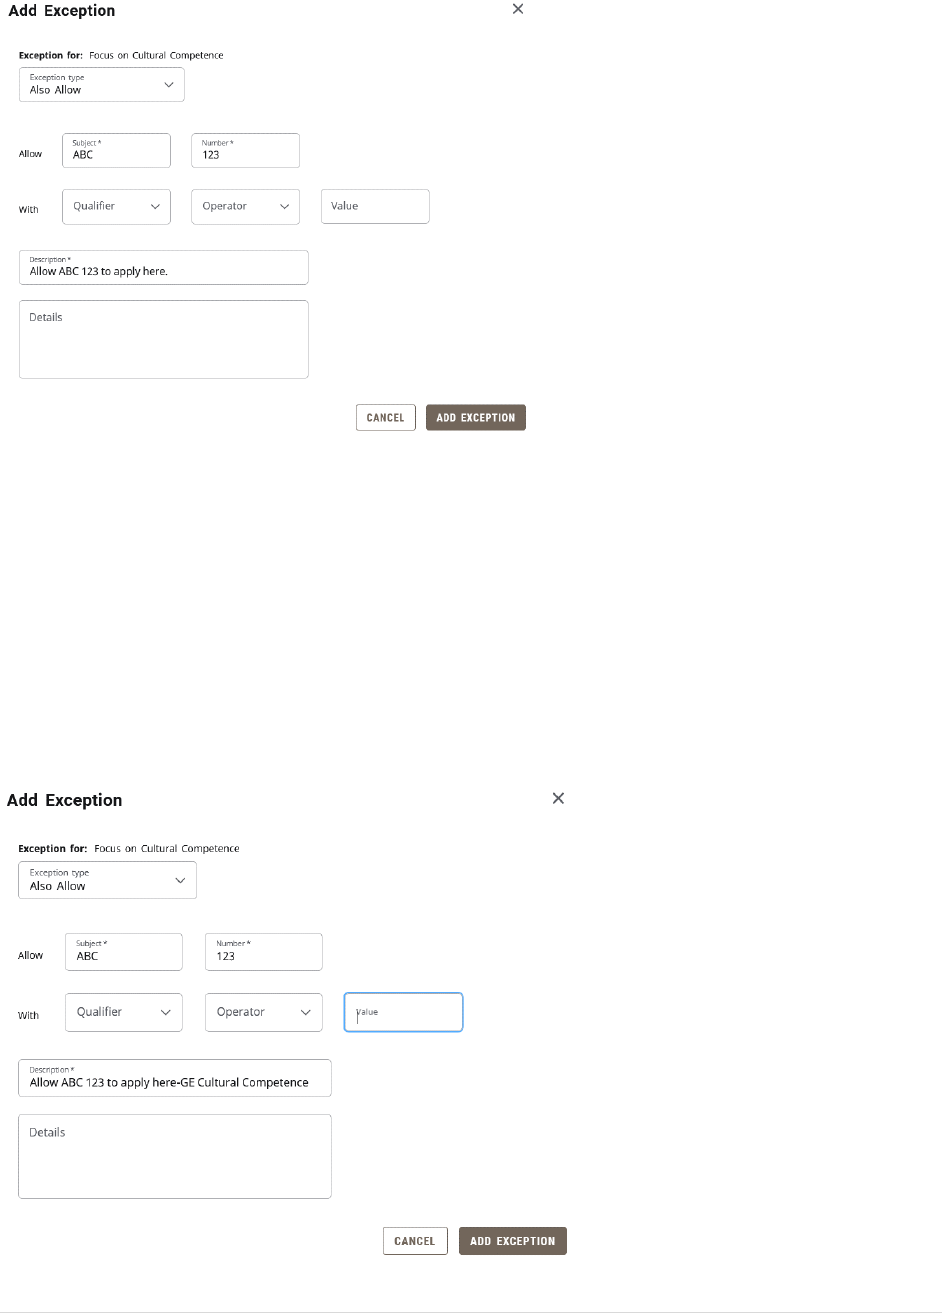
36 | P a g e
This puts the action you performed in the description field. It is recommended to add the program to
which it is being applied towards such as “-History major” or “-Psychology minor”.
The “Description” field used in exceptions is 50 characters long. There may be instances where you wish
to provide internal documentation as to why an exception was made. You can use “Details” box for this.
It is optional and rarely used. Here you can type additional text up to 220 characters. When finished,
Click OK. This message will not be viewable to those who only have a “Student” user role but will be
viewable to any user with any other role. It will be viewable as a pop-up hint over the exception
description.
When finished, click the “Add exception” button.
37 | P a g e
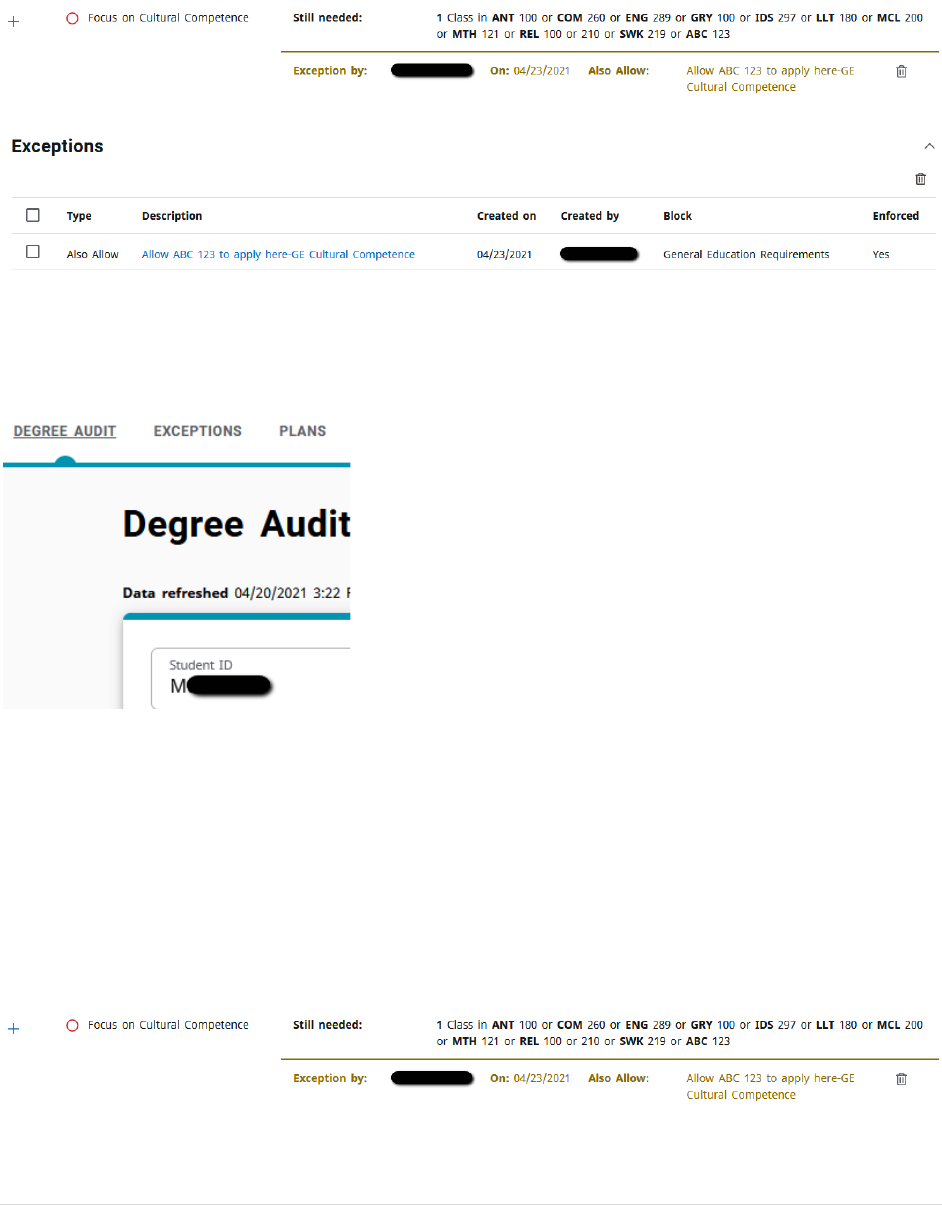
Exceptions will be visible in two locations. One of them is immediately below the requirement to which
the exception was applied. The other is the Exceptions section located towards the end of the degree
audit.
Exception Processing-Deleting an Exception
Login to Degree Works. Open the degree audit of the student for which you wish to enter an exception.
Click the Exceptions tab at the top of the degree audit screen.
The “exception” view of the degree audit will open. You cannot edit an exception. To correct a mistake,
you must delete the old exception and enter a new exception. Scroll down and find the exception you
wish to remove. This can be either exception view (located at the requirement, located in the exception
box in the bottom).
If you go to the requirement location, you just need to click the Remove Exception icon, which is a trash
can located on the right side of the exception row. If you go to the Exceptions section, click the check
box to the left of the exception you wish to delete and then click the Remove Exception icon, which is a
trash can located in the upper right portion of the Exceptions box.
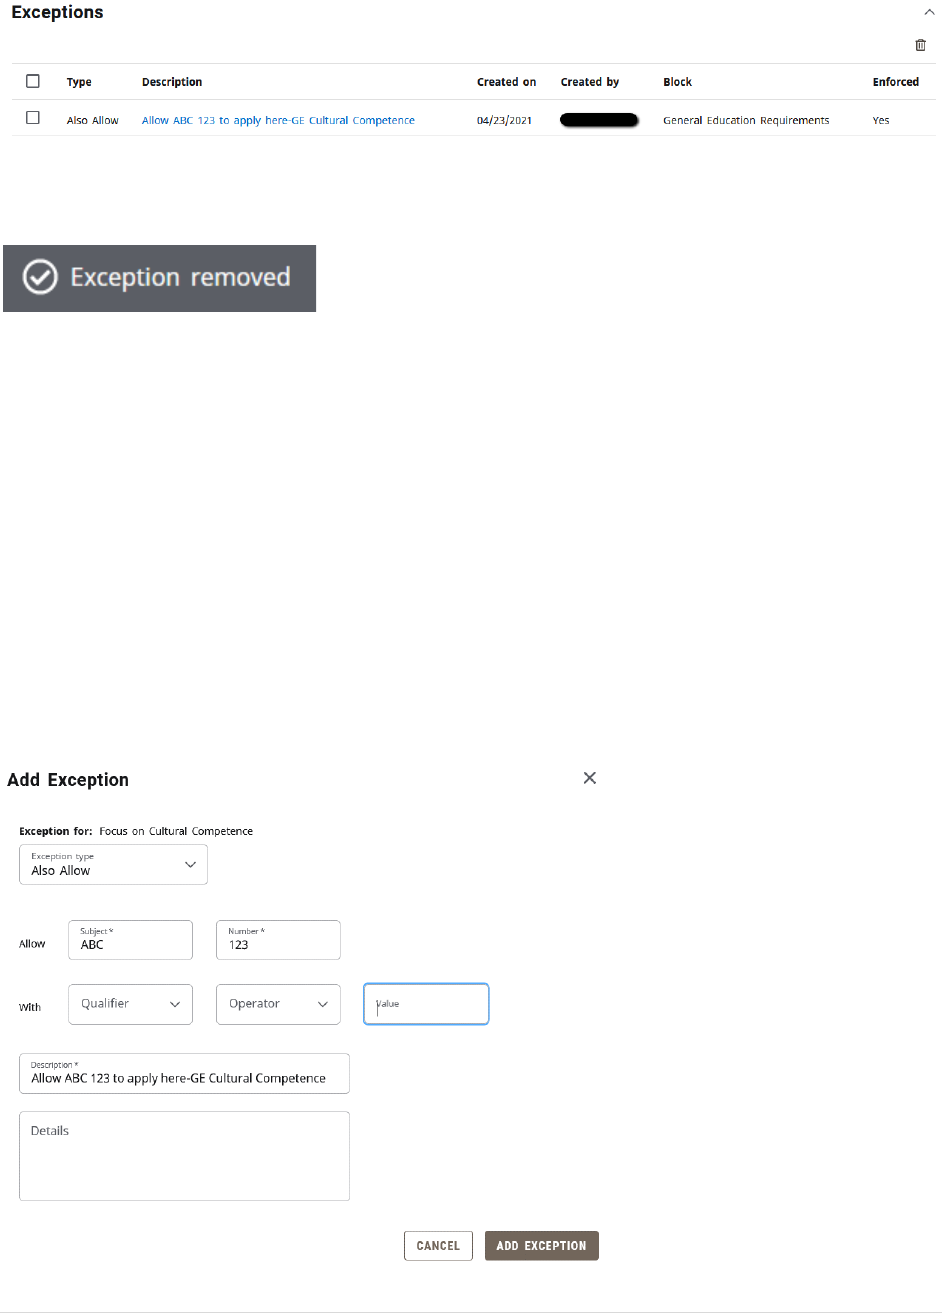
38 | P a g e
The removal will be immediate without a warning box. A gray box will pop open in the upper right
portion of the screen indicating that the exception was removed.
Exception Types
Also Allow
This exception is used to add a course to a requirement list. For example, if there are five acceptable
courses to pick from and you wish to add a sixth course, and it does not matter which of the six courses
the student takes, you would use this exception. This type of exception should also be used when a
student has a course in progress, has not taken a course yet, or incomplete grade. The “Allow” subject
and number field must be typed in. If it is a transfer course, it should be the MSU equivalency, not the
original number at the other institution.
The second line “With” field can be used to provide additional qualifiers to the substitution as explained
in the Exception Filtering section of this guide. Additional qualifiers are optional and can be left blank if
not needed. A description explaining the location of the action and describing the action should be
included.
39 | P a g e
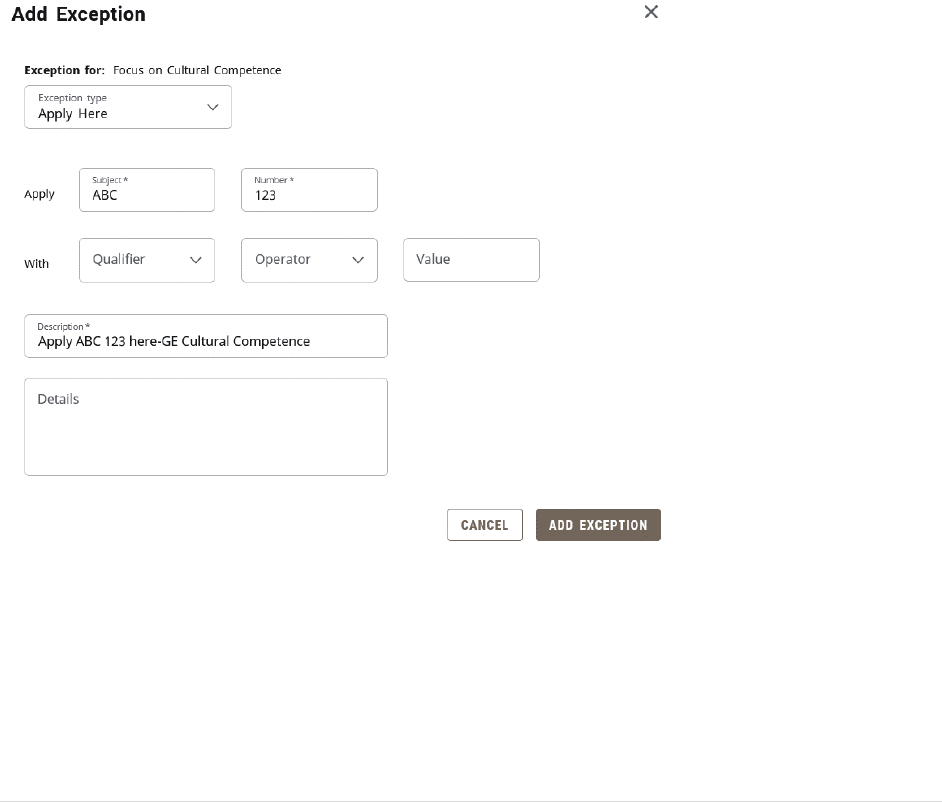
Apply Here
This exception is similar to Also Allow but is more powerful and is used to absolutely assign a specific
course to a requirement. Examples where this could be used is when pass/not-pass is not allowed but
you want to apply a pass course any way. Another example is when a course can fill multiple
requirements but cannot be shared, so you wish to move a course from one place to the other. Only use
this exception when the course has a final passed grade. The reason for this is if a student receives an F
grade in a class, it will still apply using this exception. The “Allow” subject and number field must be
typed in. If it is a transfer course, it should be the MSU equivalency, not the original number at the other
institution. The second line “With” field can be used to provide additional qualifiers to the substitution
as explained in the Exception Filtering section of this guide. A description explaining the location of the
action and describing the action should be included.
NOTE: There are rare times when this exception must be used with an in-progress report, such as to
allow a double count. In those cases, you must use exception filtering of "DW Grade Number" "equal to
or greater than" "1.0." (1.0 is the same as a grade number value as a D). If the exception is being
entered to allow an in-progress pass/not-pass course to apply, you must use exception filtering of "DW
Grade Letter" "equal to or greater than" "P”.
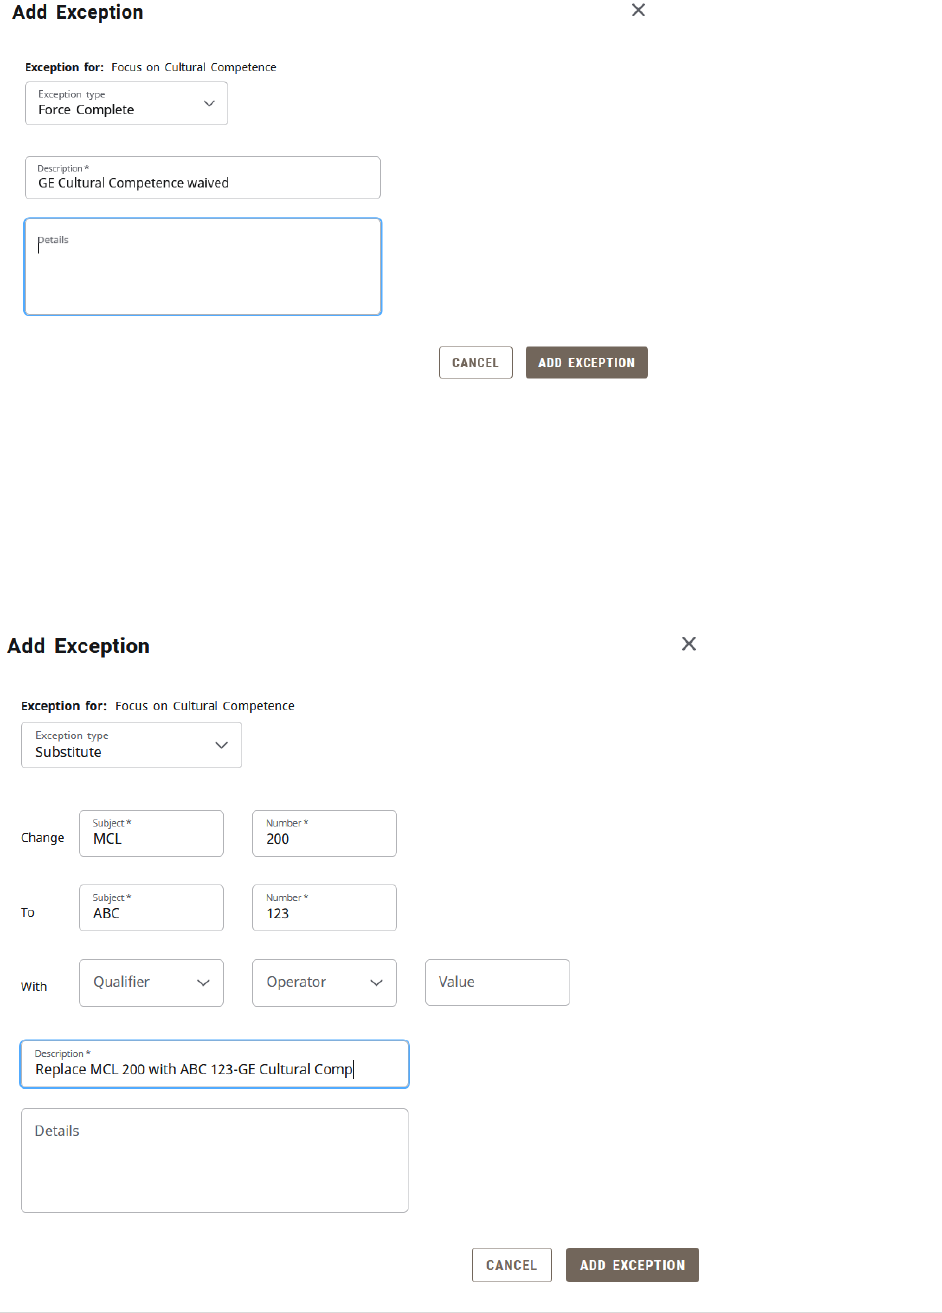
Force Complete
This exception is used when you have no specific action you desire to take such as substituting or
waiving a course. This is a way to tell Degree Works that a requirement should be marked as okay
without any additional action. It is a very powerful exception and should be among the least used
exceptions. Since there is no action to take, the only information to enter is a description of why you are
forcing the requirement to be complete. A description explaining the location of the action and
describing the action should be included.
40 | P a g e
Substitute
This exception is used when you wish to remove one course from a requirement and replace it with a
different course. The “Change” fields must have the course subject code and number typed in that you
wish to remove. The “To” fields must have the course subject code and number typed in that you wish
to add. The second line “With” field can be used to provide additional qualifiers to the substitution as
explained in the Exception Filtering section of this guide. A description explaining the location of the
action and describing the action should be included.
41 | P a g e
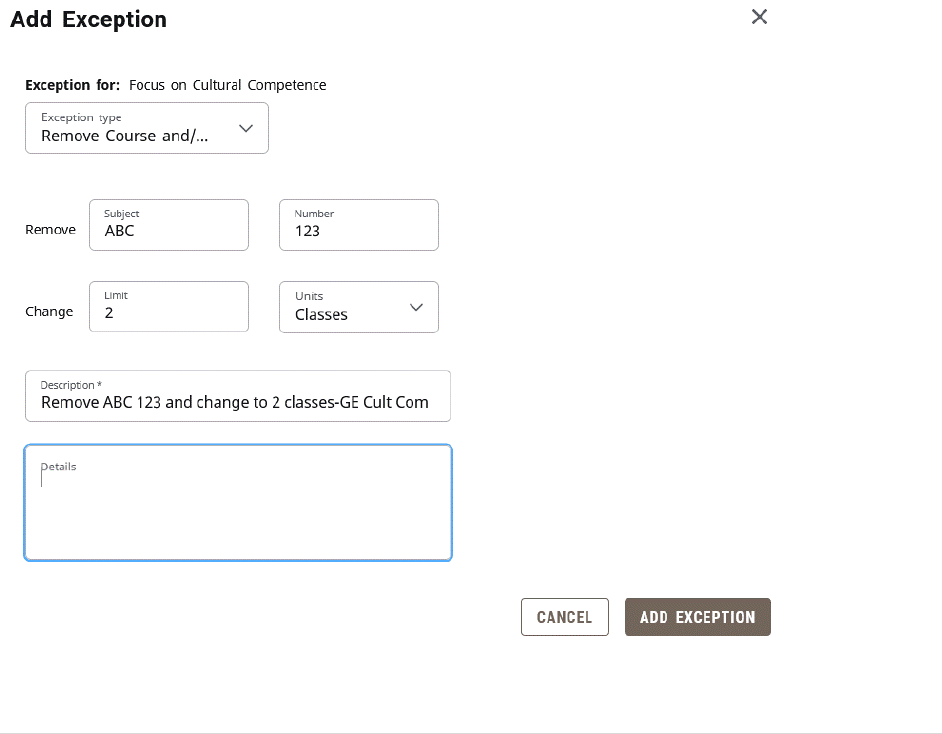
Remove Course and/or Change the Limit
This exception has multiple functions. The first function is the ability to remove a course from a list. This
is another alternative available to maneuver courses to a desired location on the degree audit. The
“Remove” subject and number fields can be filled in by typing the subject and number.
The second function is the ability to change the number of credits or classes in a requirement. This
includes both raising and lowering a limit. Raising could be used when a department wishes to have
additional courses pulled into a major/minor for inclusion in the requirement in order to allow for the
improvement of major/minor GPA. In these cases, it may need to be paired with an “Also Allow” or
“Apply Here” exception. Lowering could be used when a department wishes to waive one course out of
a requirement that requires multiple courses.
The “Change Limit” box has a Units drop-down menu to the right. The choice made in this box should
match the language used in the requirement. For example, if a requirement says “Complete 9 credits”
and you wish to reduce it to 6 credits, you would select “Credits” in the Units drop-down menu. If a
requirement says to “Complete 3 classes” and you wish to reduce it to 2 classes, you would select
“Classes” in the Units drop-down menu.
You can use both function in the same exception transaction. A description explaining the location of the
action and describing the action should be included.
42 | P a g e
Exception Filtering
Sometimes when entering a Degree Works exception, you need to use a course in your exception that
appears more than one time on the degree audit. The most common situations are repeatable variable
topic courses or transfer electives. Degree Works provides some filters you can use to delineate the
course you wish to use in your exception. The filter option is found on the Substitute, Also Allow, and
Apply Here exception types and begins with the word “With”. There are three filtering menus used in
exception filtering: Qualifier, Operator, and Value. The qualifier is the criteria you wish to filter by. The
Operator is where you tell the filter to look for higher, lower, or equal to the value, and the Value is the
value you are looking for in the qualifier.
Below is a description of how to use these filters. This focuses on the most commonly used.
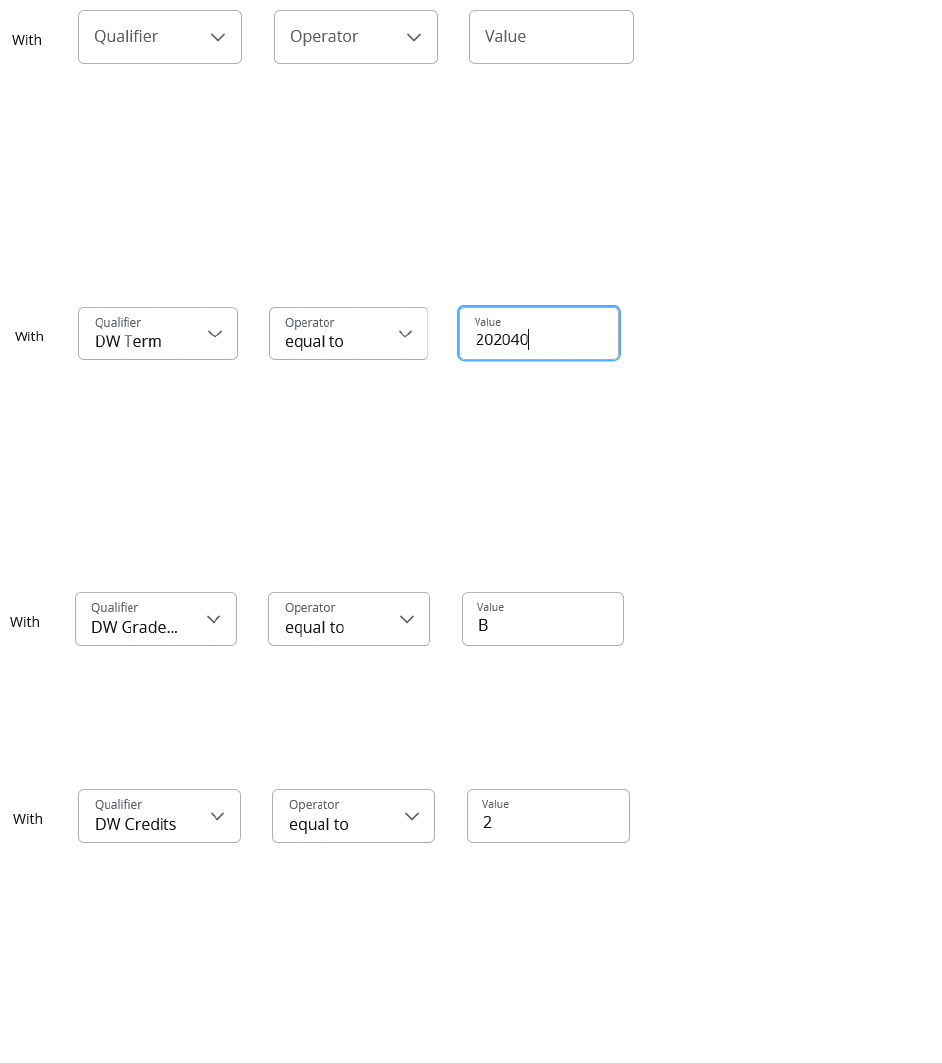
Filtering by Term
This is a filter you would use when the courses in question were completed in different terms
(semesters). The term format must be Banner term format which is a six-digit number that is entered in
the following format: First four digits (year); last two digits (semester indicator: 20 for spring, 30 for
summer, 40 for fall). The qualifier is DW Term.
Filtering by Grade
This is a filter you would use when you want to filter by grade. For example, a student takes two ABC
397 courses in the same semester so you cannot filter by term. The student earned an A in one and a B
in the other and you wish to substitute the one where a B was earned. Plus/minus grading is supported
with this. You can also use an operator of “equal to or greater than” in a situation where an in-progress
course could be substituted only if a minimum grade level is earned. The qualifier is DW Grade Letter.
Filtering by Credits
This is a filter you can use when a student has multiple courses with the same term and grade, but a
different number of credits. The qualifier is DW Credits.
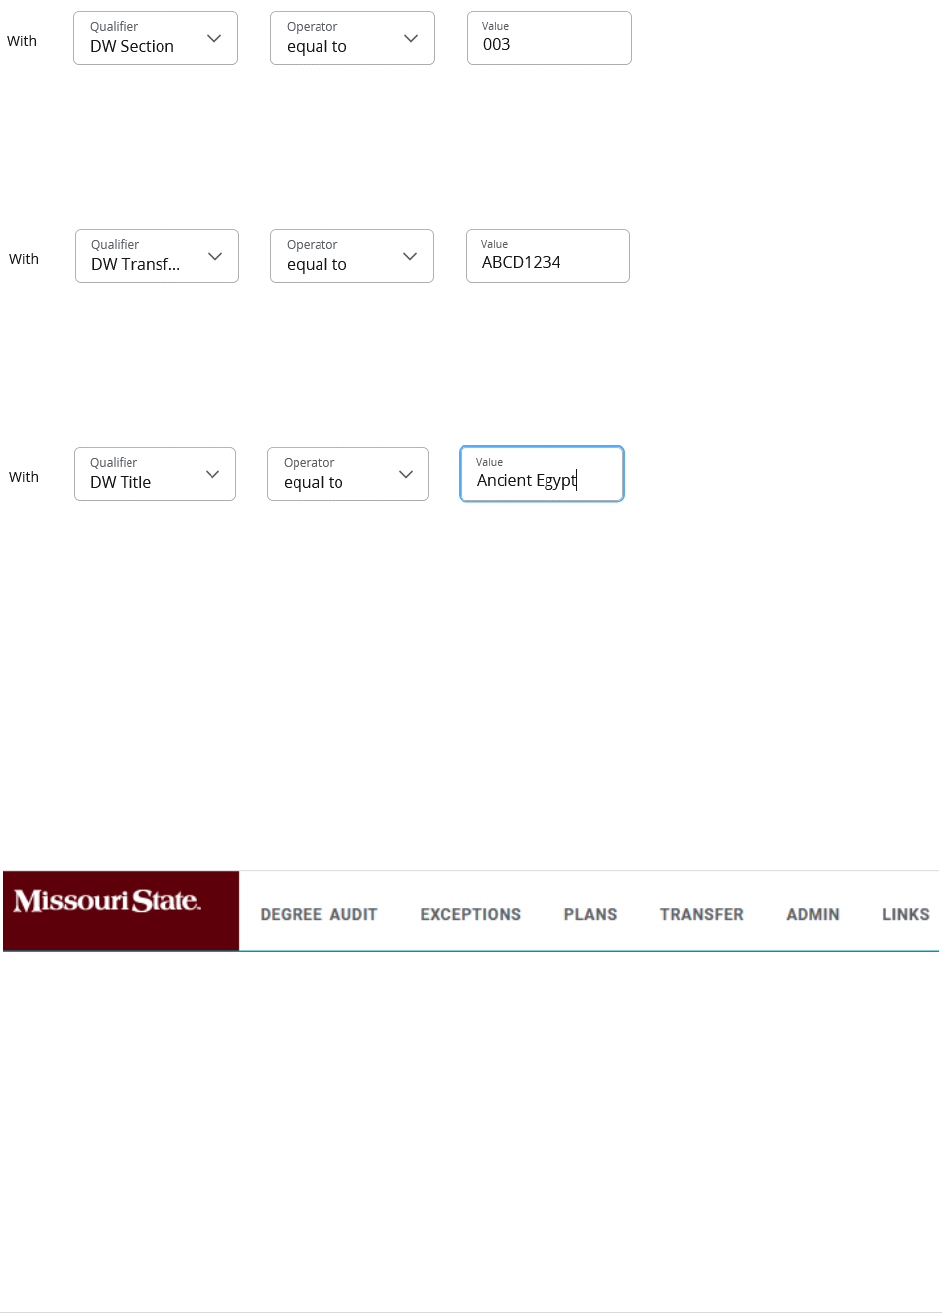
Filtering by Section
This is a filter you can use to filter by MSU section number (not CRN). However, if the student had the
same course in different semesters, and the same section number on each of those courses, this would
not work. It must be a three-digit number when entering a numerical section (i.e. use 004 instead of 4).
The qualifier is DW Section.
43 | P a g e
Filtering by Originating Transfer Course Prefix and Number
This is a filter you can use to delineate between transfer electives. You can get the originating transfer
number from the degree audit. It is recommended to copy and paste this number so that you get the
exact prefix/number format and spacing. The qualifier is DW Transfer Course.
Filter by Course Title
This is a filter you can use to delineate between MSU (not transfer) course titles. This is used on variable
topic courses where the department changed the displayed course title when the course was built. It is
recommended to copy and paste this from the audit
It is recommended to consult with Office of the Registrar staff is additional filtering is needed that is not
covered within the above filters. There are additional filters available in the Qualifier menu but these are
rarely used and may require additional guidance.
Exception Management/Reporting
This allows users with access to run reports to identify exception usage by various criteria. This may be
helpful in identify commonly entered exceptions, exception volume by exception processor, and in
monitoring appropriate exception application by block type.
To open Exception Management, hover over the Admin tab located at the top of the degree audit. This
can be accessed from Worksheets or Exceptions. This will open a sub-menu. Click “Exception
Management.”
This will open the Exceptions Report search criteria box. Available search criteria include the following:
• Show exceptions from: Values include Last week, Last 30 days, Last 6 months, Last year, Show all.
• Show exception type: Values include the five different exception types.
• Status filter: Users should leave this on Show all statuses. Other filters are to find broken exceptions.
• Exceptions created by ID: This is used when you want to find exceptions entered by a specific
individual. The ID used is BearPass number (M-number).
• Exceptions on student ID: This is used when you want to pull a list of exceptions for a specific
student. The ID used is BearPass number (M-number). This is also viewable on the student’s degree
audit.

44 | P a g e
• Exceptions on requirement ID: This is used to find requirements that have been entered against a
specific Scribe block. You must know the block’s ID (or RA number) to use this filter. This value can
be looked up in Scribe, or the block ID’s found on a specific student’s degree audit can be obtained
in the Diagnostics Report available on the student’s Worksheets tab.
You can use multiple filters at a time. For example, you could search for the exceptions done during the
last 6 months by a specific user against a specific Scribe block. After selecting the desired criteria, click
the “Run Exceptions Report” button. You can clear your criteria for a new search by clicking the Reset
link.
This will open a report of the exceptions fitting the selected criteria. Just below the filter, the user will
have the option to select “Show Exception Details” or “Show Requirement Block Counts.” Click the
desired format, which is described below, by selecting the corresponding radio button.
Show Exception Details
This view is designed to give the user a detailed description of each individual transaction that meets the
filter criteria. Data listed includes the creation date, creator ID, Scribe block ID, student who received the
exception, the exception type, and description. An expansion arrow at the right side of the row allows
the user to expand the entry to see greater description.
45 | P a g e
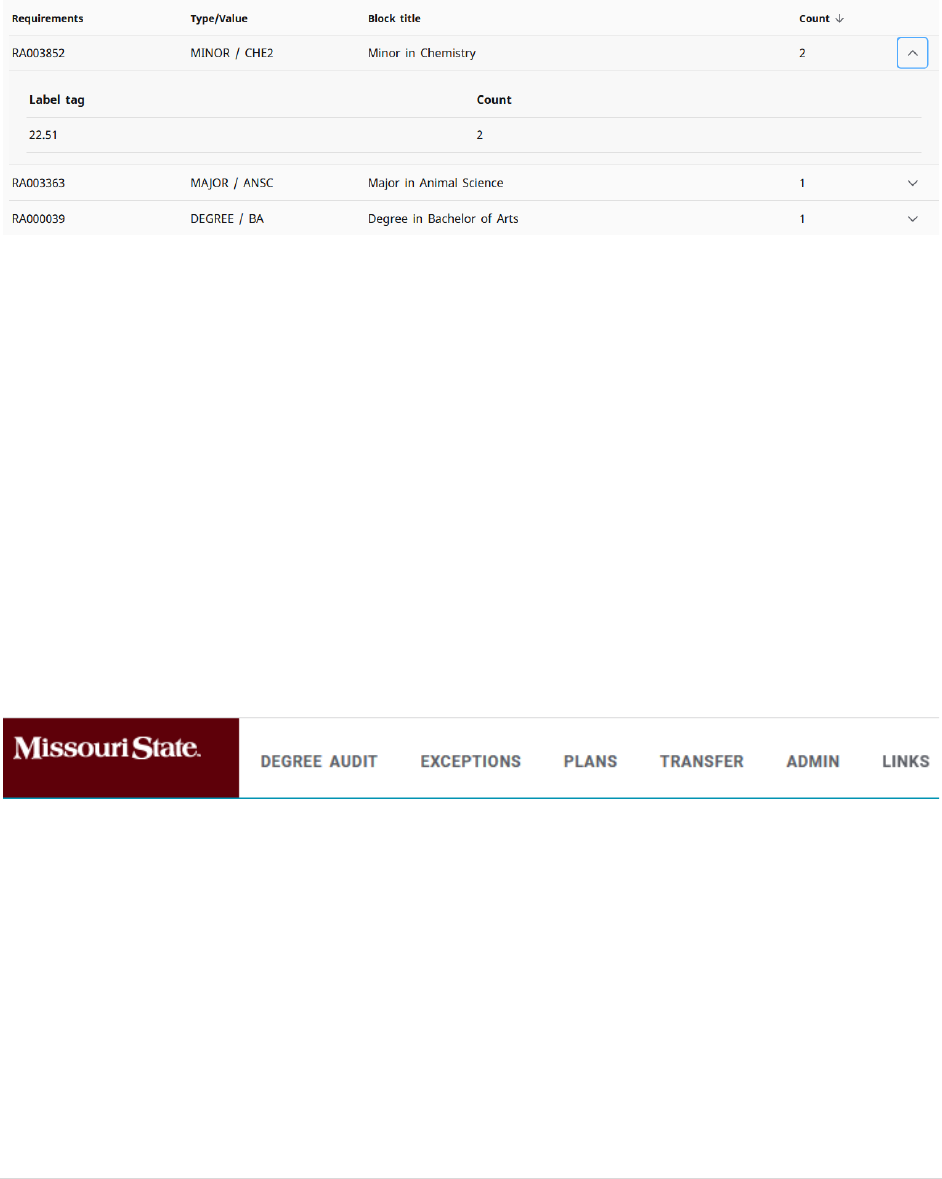
Show Requirement Block Counts
This view is designed to give the user an aggregate summary of the number of transactions that meet
the filter criteria. An expansion arrow at the right side of the row allows for exception to see a
breakdown of applied exceptions by requirement label ID.
Section 5: Student Educational Planner (SEP) Template Management
NOTE: Program-specific templates have been discontinued effective November 2020, but this section
remains in the guide for maintenance of existing templates and in case program-specific templates are
utilized in the future.
The purpose of an SEP template is to contain the general academic plan of a program’s current
curriculum so that students may use it as a starting point to form their individual academic plan. In
addition to courses, SEP templates can include prompts for departmental or advisement milestones and
instructions including hyperlinks or videos. In this section, you will learn the basics about how a
template works and how to maintain and/or create templates for your department’s programs.
Template Management Access Location
In Degree Works, click the Admin tab at the top of the page. This will open a sub-menu. Click “Template
Management.”
Template Management Authorization
In order to access SEP template management, you must be authorized by your department head and
must participate in SEP Template Building and Maintenance 101. Users who meet this criteria receive
the SEPTEMBU (SEP Template Builder Editor) user key. Users who do not have this key will not see the
template management menu.
Current SEP Template Holdings
Between fall 2017 and spring 2019, a default SEP template was created for all undergraduate majors
(and options as applicable) for any program that had a published four-year plan. Those four-year plans
were compared to the current catalog requirements at the time of the review in order to identify any
discrepancies and inefficiencies. Based on the findings, an SEP template was created with the best
information available at the time. Therefore, the current template could contain an issue and/or have

46 | P a g e
become outdated by curricular changes that have occurred since the time of that review. Departments
were given the option to take over management of these templates or to have the template inactivated.
There are also default general education and Core 42 templates available for students who are in
programs that do not offer a program-specific SEP template.
For these reasons, the majority of SEP template work consists of revision of existing SEP templates to
update them to the most current catalog requirements. New templates will only need to be created if a
new program is created and a program specific template is desired. In template management, there are
both active (available to the public) and inactive (not available to the public) templates as template
managers have access to see all created templates.
SEP Template Management Pre-Edit Preparation
Before you begin to edit an SEP template, you must be confident that your existing four year plan (which
can be found at https://www.missouristate.edu/provost/degree-plans.htm) is in sync with your most
current degree program requirements.
The recommended way to do this is compare your four-year plan to the catalog and literally check off
that each item is in place. Some factors to consider as you do this:
• Is each general education requirement addressed? If your department requires any specific general
education requirements in the catalog, you will want to specify those in your plan and SEP template,
also ensuring that you have not built in both the specific class and left a generic space holder for
that area of general education as well.
• Is each major requirement clearly addressed?
• Do you have any “hidden graduation requirements?” An example of this would be your program
requires students to take ABC 124. ABC 123 is a prerequisite for this course but is not a general
education course or listed in your major requirements, so students really need it, but it’s not listed
anywhere. In the long term, this should be addressed in your curricular requirements.
• Do you have extra courses included that are not listed in your program requirements?
• Have you accounted for minors and/or degree requirements (such as BA degree requirements) as
applicable?
• Have you accounted for electives for the 120 minimum credits and 40-hour upper division
requirements?
• Have you mentioned any opportunities to double count courses (such as the HST 103/104 and
Philosophy BA degree requirements and General Education requirements)?
It is extremely helpful in the SEP template management process to work out any discrepancies in
advance so you have a clear picture of what you want to build in the template. This includes any advice
you may wish to provide related to a course or the ability to double count a course as these types of
communications can be built into your SEP template.
You will also want to work with the person in your department who maintains your department web
page to ensure any four-year plan changes are also made online on your four-year plan page. While the
address above is a central depository page housed by the Office of the Provost, the actual plan is housed
on your departmental web pages and can be changed by your department’s website manager.
47 | P a g e
SEP Template Naming Convention
When the “Browse Templates” screen is open, columns can be sorted. However, the default display is
alphabetical by description. The name convention for SEP templates is:
Level (UG/GR)-<Major title><Degree>/<Option title if applicable> (General education effective term)
It is important to follow the naming convention to make it easy for users to find the needed template.
SEP Template Management Browse Template Columns
Below is a chart that describes the columns found when opening SEP Template Management. This is
based on the default “flat view.” The alternative “tree view” is not recommended.
Header
Value In The Column
Additional Notes
Description
SEP template title per naming convention
Level
UG or GR
Major
4-digit major code as applicable
General templates such as general
education or Core 42 created to serve
multiple majors will use 0000
(undecided) by default.
Degree
Applicable degree type
Catalog
Year
Banner catalog year (Year followed by 20 for
SP, 30 for SU, 40 for FA)
This value should be the beginning date
from which this template should be
considered valid. For example, if a
program changed requirements
effective fall 2017 and nothing has
changed since that time, the catalog
term should be 201740 so users know if
they are on the fall 2017 or later catalog
that they are safe to use this template.
Term
Scheme
Term scheme title selected from drop down
menu. This dictates the number of
semesters and type of semesters (SP/SU/FA)
found in the template.
See the SEP Term Schemes section later
in this document for a description of the
available scheme types.
ID
This is a unique ID number assigned to a
template when it is saved for the first time.
Who
BearPass number (M-number)
This is the last user to edit the template.
What
SEP
Will fill in by default when saved.
Modified
Date
This was the last date a change was
saved to the SEP template.
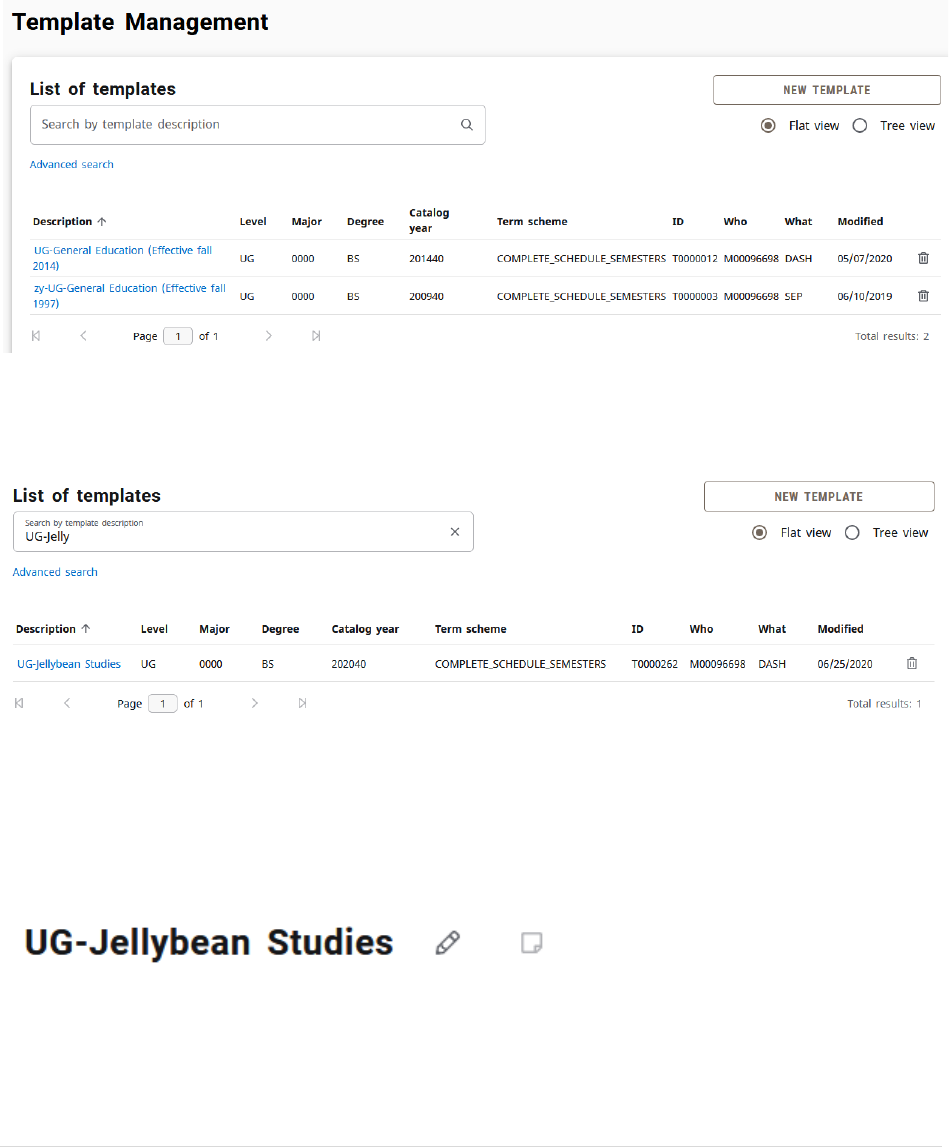
48 | P a g e
How to Open an SEP Template
Click on the name of the template you wish to open in the Description column. You may navigate pages
using the page navigation buttons at the bottom of the search, by typing part of the template title in the
“Search by template description” search box, or by using the Advanced search link (located below the
“Search by template description” search box) to filter criteria.
How to Revise an Existing SEP Template
Open the existing template for this program by clicking on the title in the description column.
Change the “Catalog Year” to the first semester that the upcoming changes will be applicable. For
example, if this is based on curriculum changes going into effect in fall 2020, you will change the catalog
year to fall 2020. To do this, click on the Edit Template icon (pencil) to the right of the template title.
This will open the Edit Template box. Change the Catalog Year field and click the Save button in the
lower left portion of the Edit Template window.
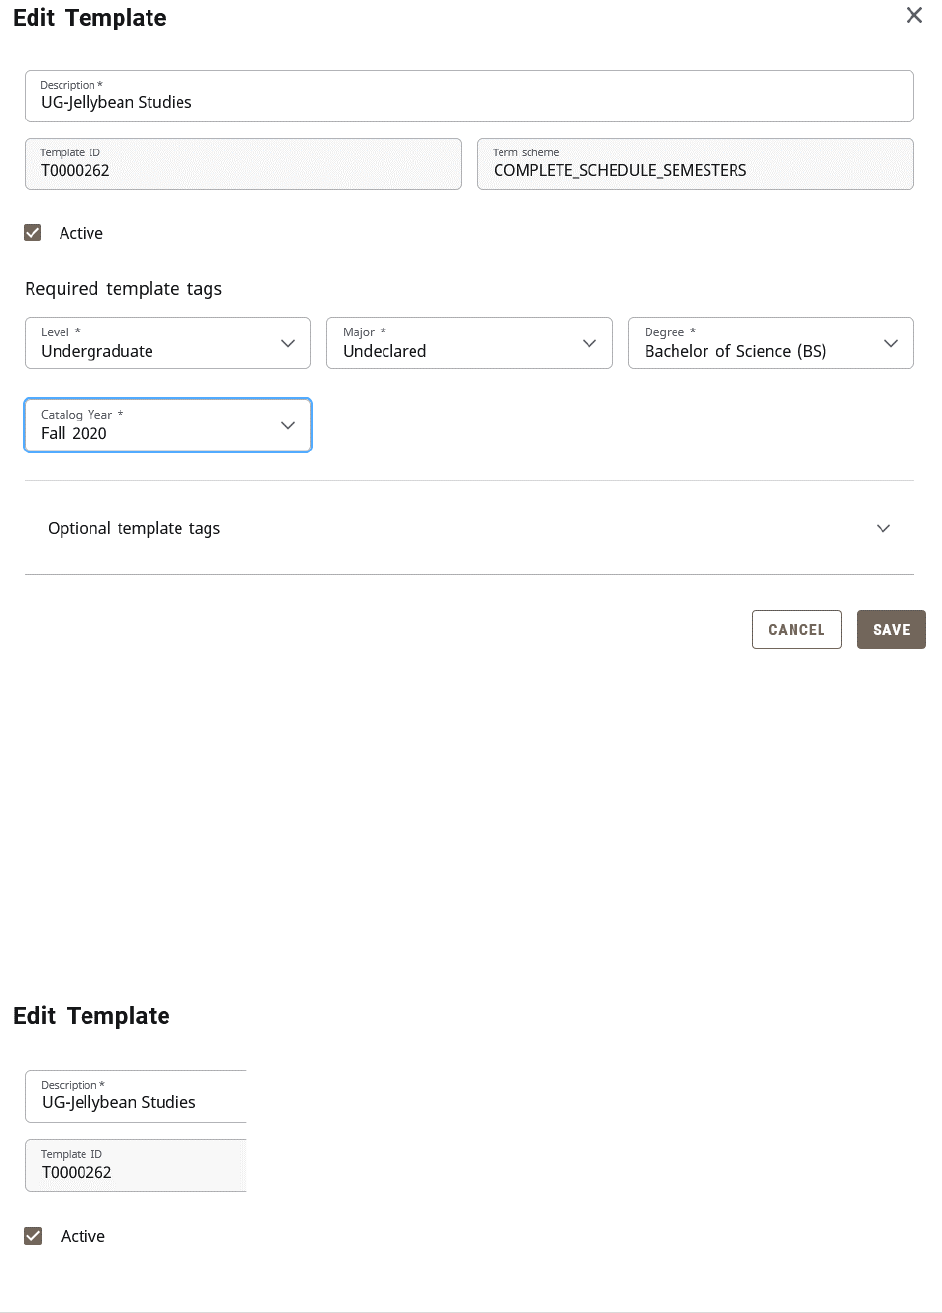
49 | P a g e
Make any applicable changes. Changes within the SEP template parallel the types of changes
students/advisors can make to individual SEP plans. See section 3 of this document for information on
the type of requirements that may be entered within a template. Remember to review any notes within
the plan to ensure they are still applicable depending on if any of them are in a course the change would
affect. As you make changes, it automatically saves after each transaction. You will see a gray Template
Updated message in the upper-right corner of the page.
If this template is not already active, you will need to make it active for it to become visible to students.
Conversely, while you are working on it, you may wish to make it inactive until you finish it so that only
you can see it. The Active checkbox is found in the Edit Template box where you updated the catalog
year. Click the Save button when the active box is checked/unchecked as desired.
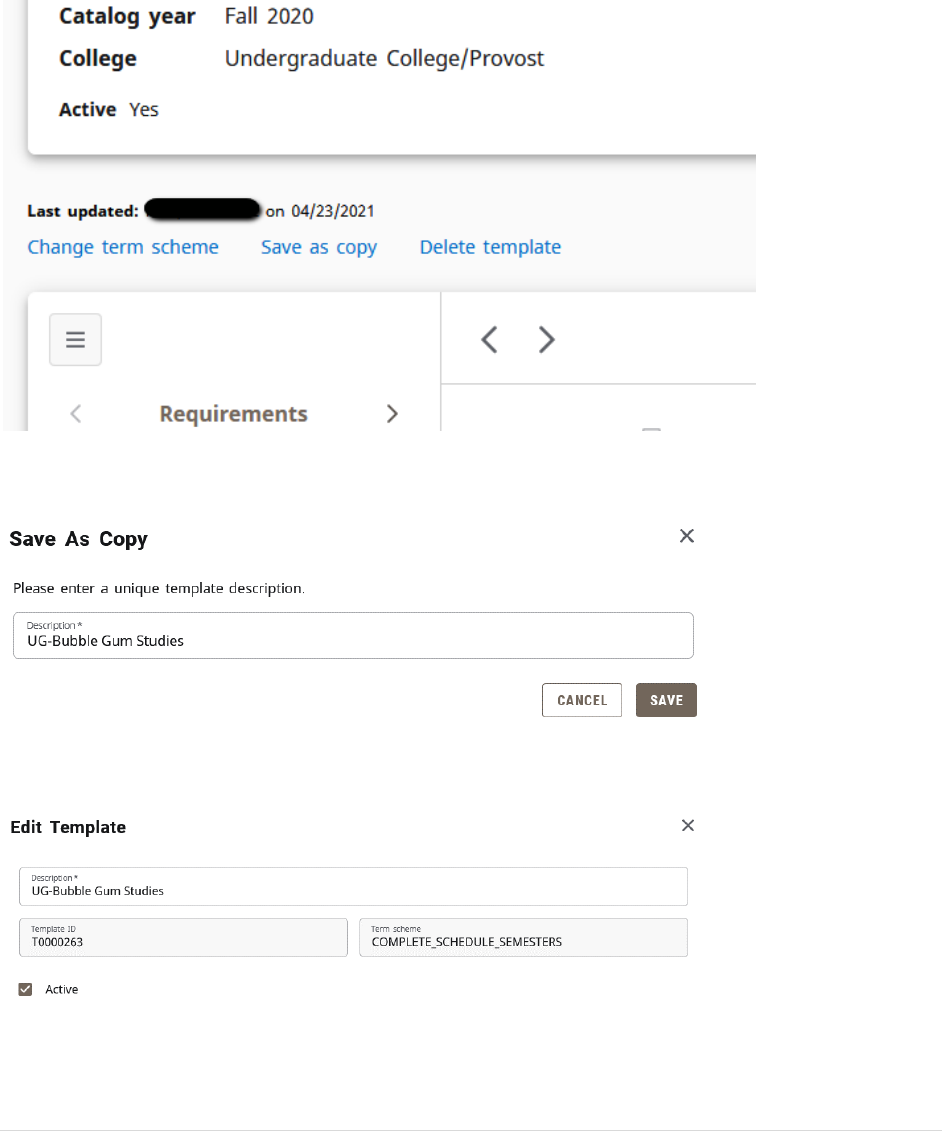
50 | P a g e
How to Create a New Program Template by Copying from an Existing Template
Open the existing template for the program you wish to clone to make the new program template. You
would want to select a template that has significant similarity to the new program.
Once open, click the “Save as copy” link which is located between the template header block and the
main template display.
This is open the Save as Copy box. Enter the name of the new program template and click the Save
button.
Click on the Edit Template icon (pencil) to the right of the template title. This will open the Edit Template
box. Uncheck the “Active” checkbox and “Save.”
Open the Edit Template icon again. Change the Degree, Major, and Catalog Year fields as applicable. The
catalog year would be the term in which the new program begins. When finished, click the Save button.
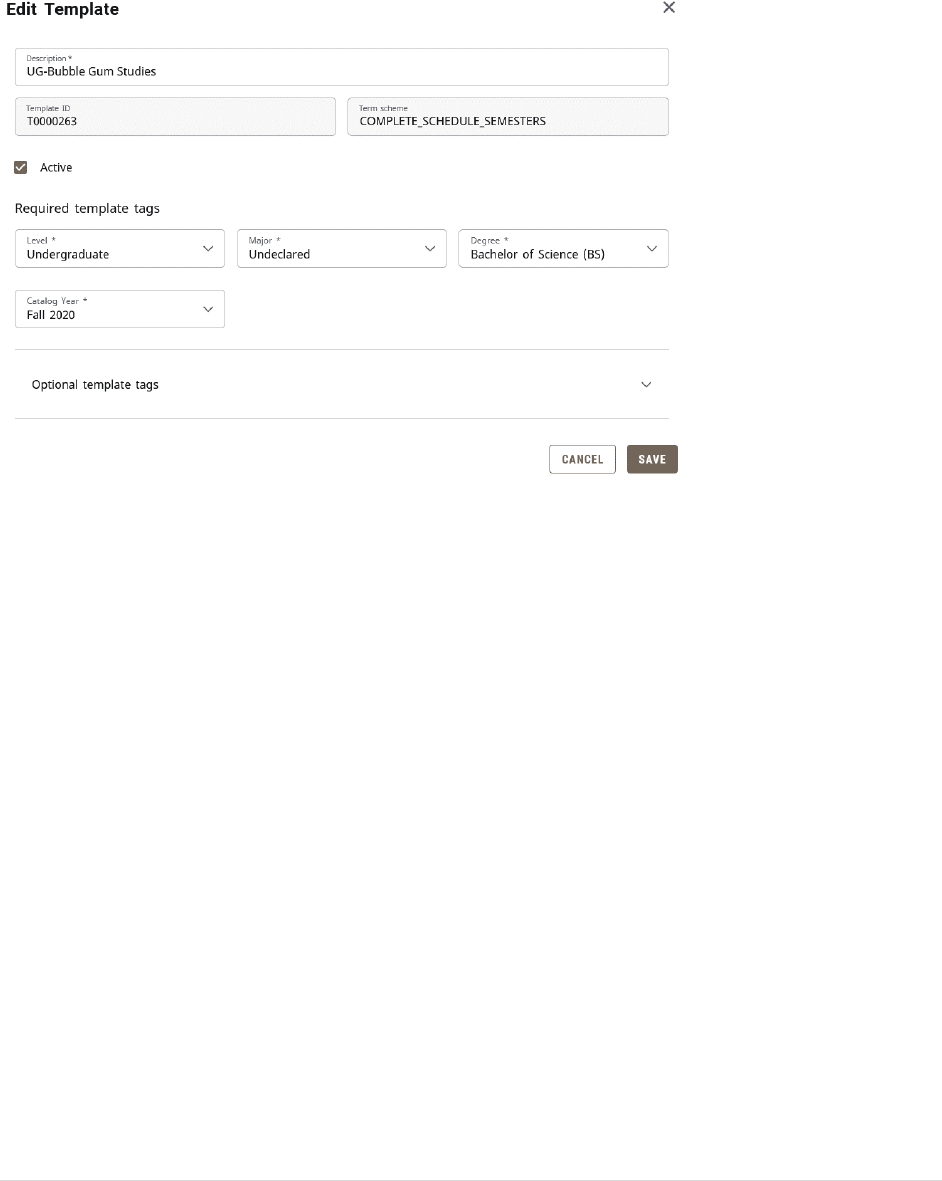
51 | P a g e
On occasion, you may need to change the term scheme (number and/or types of semesters). do this by
selecting the term scheme needed from the “Change Term Scheme” button, which is also found within
the Edit Template box. See the “SEP Template Term Scheme” section of this documentation for
information on how to change this if needed.
You are now ready to begin placing courses. First, arrange the general education courses by clicking and
dragging them to the corresponding semesters. In situations where a specific general education course
is required, start by dragging the general category that course is part of to the corresponding semester
for later adjustment.
Add the remaining courses, choices, and placeholders needed. All courses and choices should be marked
as critical, have the minimum credits added, and the minimum grade assigned (which is D by default
unless there is a specific higher grade required.) As you arrive in semesters where a specific general
education course is needed, add the needed course separately. Copy the note information from the
general education section to the note portion of the specific course. Uncheck the “general” general
education item as critical and drag it to the end of the semester section.
When you are sure you no longer need the “general” general education listing where a specific course is
required, you can delete them by clicking on their ellipse button and choosing “Delete this requirement“
from the sub-menu. It is recommended to keep them until the end to make sure they are not needed
anymore. If you will be copying from this template for additional options and/or degree types, it is
recommended to hold them over if you think they might be needed on another version.
SEP Template Term Schemes
On occasion, you may need to change the number or types of semesters found in a SEP template. There
are a number of existing term schemes already in place as described below.
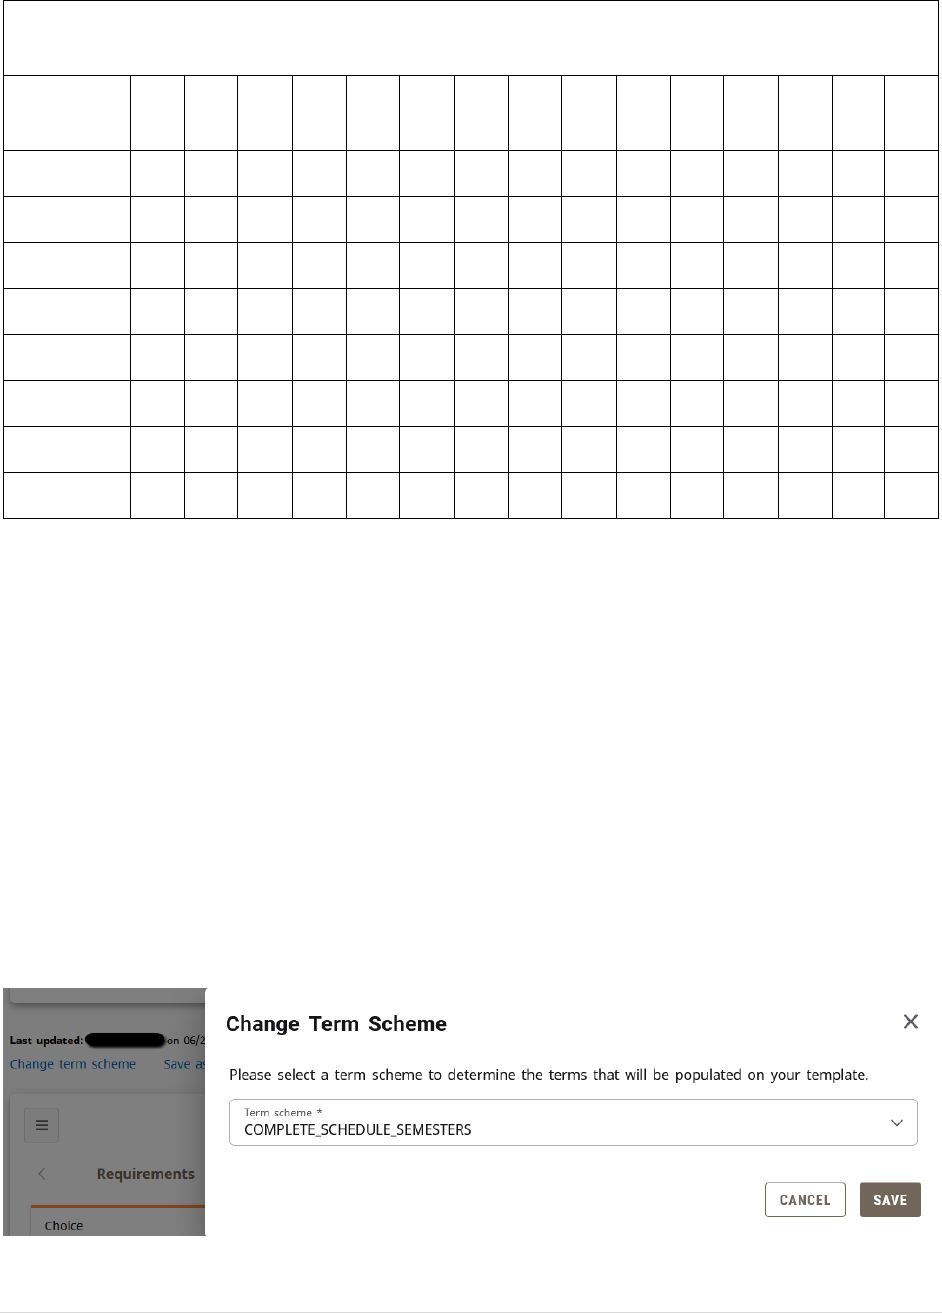
52 | P a g e
Degree Works Student Educational Planner Schedule Semesters Templates
(SEP002: Template Term Schemes)
Template
Name
FA
1
SP
1
SU
1
FA
2
SP
2
SU
2
FA
3
SP
3
SU
3
FA
4
SP
4
SU
4
FA
5
SP
5
SU
5
3YFASPSU
⚫
⚫
⚫
⚫
⚫
⚫
⚫
⚫
⚫
5YRSSPFA
⚫
⚫
⚫
⚫
⚫
⚫
⚫
⚫
⚫
⚫
7SFASPSU
⚫
⚫
⚫
⚫
⚫
⚫
⚫
9SEMSPSU
⚫
⚫
⚫
⚫
⚫
⚫
⚫
⚫
⚫
BNURSING
⚫
⚫
⚫
⚫
⚫
⚫
⚫
⚫
⚫
⚫
COMPLETE
⚫
⚫
⚫
⚫
⚫
⚫
⚫
⚫
CONSTMGT
⚫
⚫
⚫
⚫
⚫
⚫
⚫
⚫
⚫
GRADUATE
⚫
⚫
⚫
⚫
Keep in mind that the name of the template is not important. The important part is that the template
contains the semesters you need. For example, if you need a template that has four fall and spring
semesters plus a summer semester between spring 3 and fall 4, it’s fine to use the “Constmgt” scheme
template even if your major is not Construction Management.
Prior to changing term schemes, make sure all courses and items are located on a semester that will
remain. For example, if you are replacing a standard 8 semester plan with a 7 semester plan, all items on
semester 8 (such as the exit exam and Apply to Graduate video) would be lost unless they are first
moved up within the first 7 semesters prior to the term scheme change.
With this in mind, if you need to change term schemes, click the “Change term scheme” link which is
located between the template header block and the main template display. Once opened, select the
template you wish to use and click Save. If this term scheme only adds semesters to the existing
semesters, it will automatically save. If this term scheme results in the deletion of a semester found on
the current term scheme, there will be a warning message.
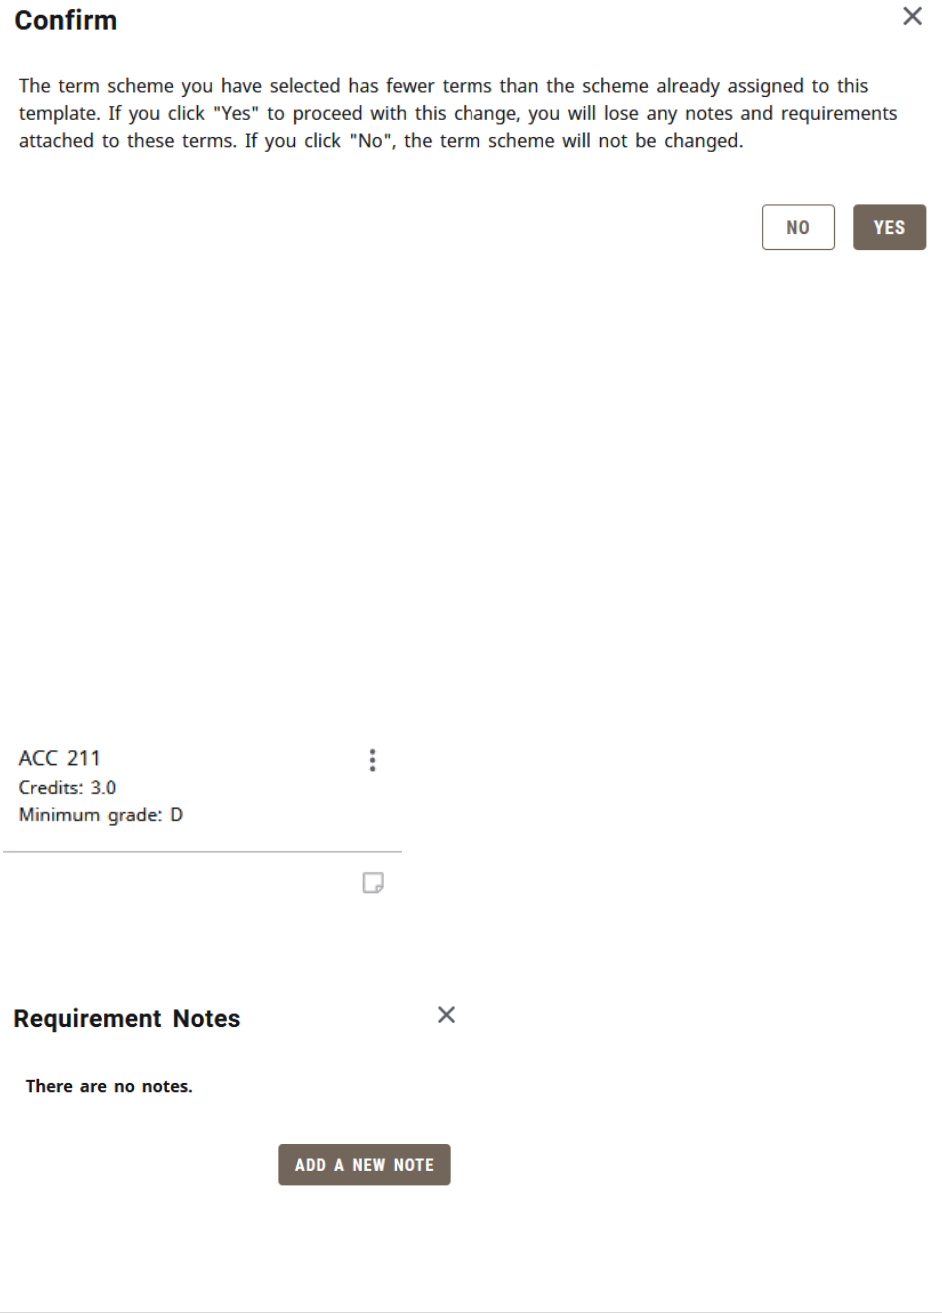
53 | P a g e
If you have the need for a scheme template that is not currently available, contact the Associate
Registrar-Degree Programs and Advisement Support in the Office of the Registrar to build a new scheme
template for you as it must be built on a SEP002 table in Degree Works maintenance by Office of the
Registrar staff.
SEP Template Requirements and Notes
The type of requirements available in an SEP template mirror those available to a student building their
own SEP plan. Please see the SEP Requirement Types portion of the “How to Use the Student
Educational Planner (SEP)” section of this documentation.
You can add additional detailed notes to any course, choice, placeholder, or test score requirement. This
is not intended to replace the student’s Advising Notes. This should be additional supplemental
information related to the requirement to which the note is attached.
To do this, click on the notepad in the bottom right corner of the requirement to which you want to add
the note.
This will open a Requirements Notes box. If there is no existing note, it will have a button you can click
to add a new note.
Type the note you wish to add (or paste in text you have copied from something else). Click the “Copy to
plan” checkbox. Click the “Save Note” button when finished.
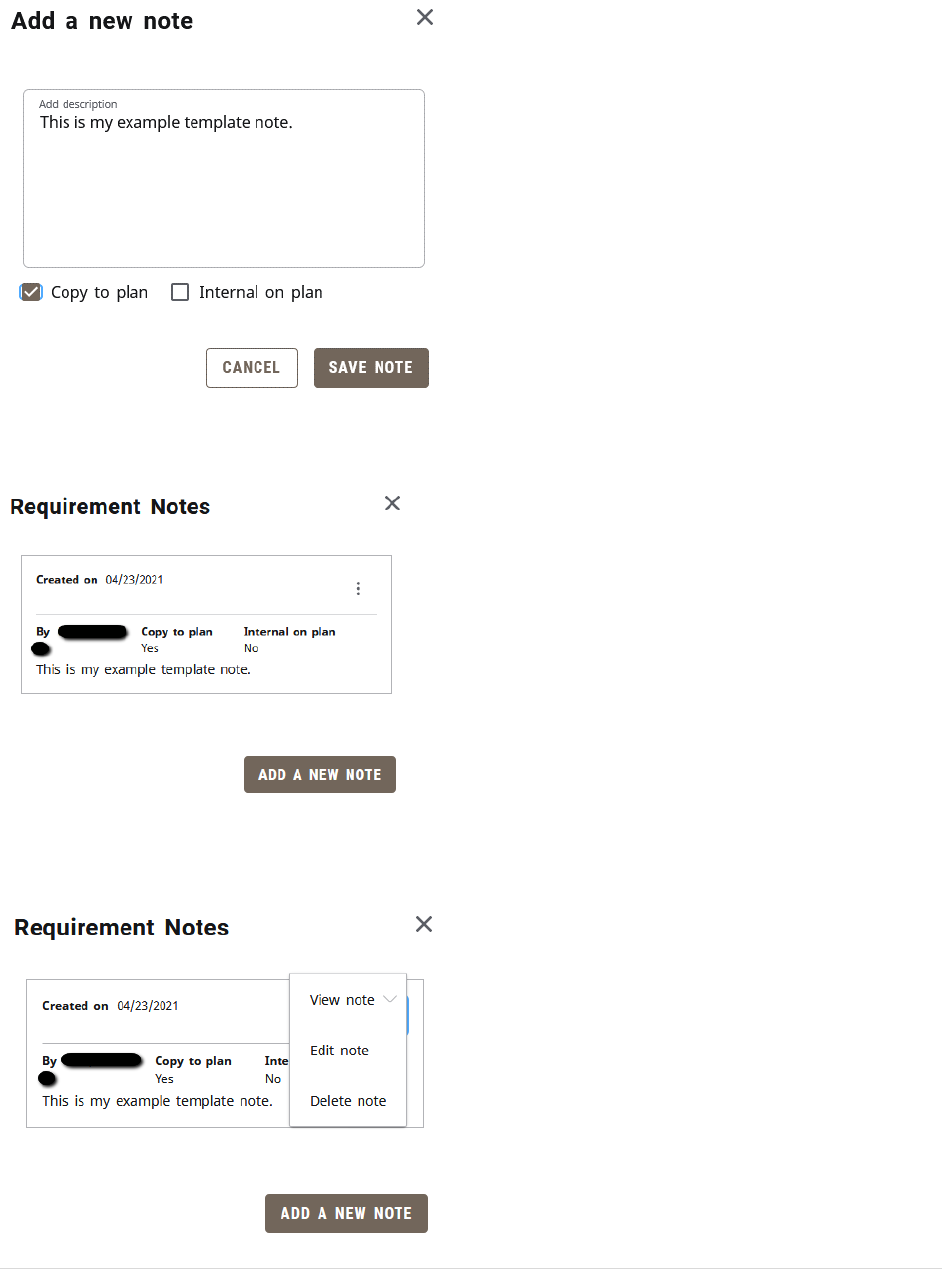
54 | P a g e
To edit an existing template note, click on the Notes icon. Click the Ellipse icon (three dots) on the right
side of the Requirement Notes box.
This will open a sub-menu where you will have the option to edit or delete the note. If you wish to edit
it, click the “Edit note” link, which will take you to the note box where you can edit and save.
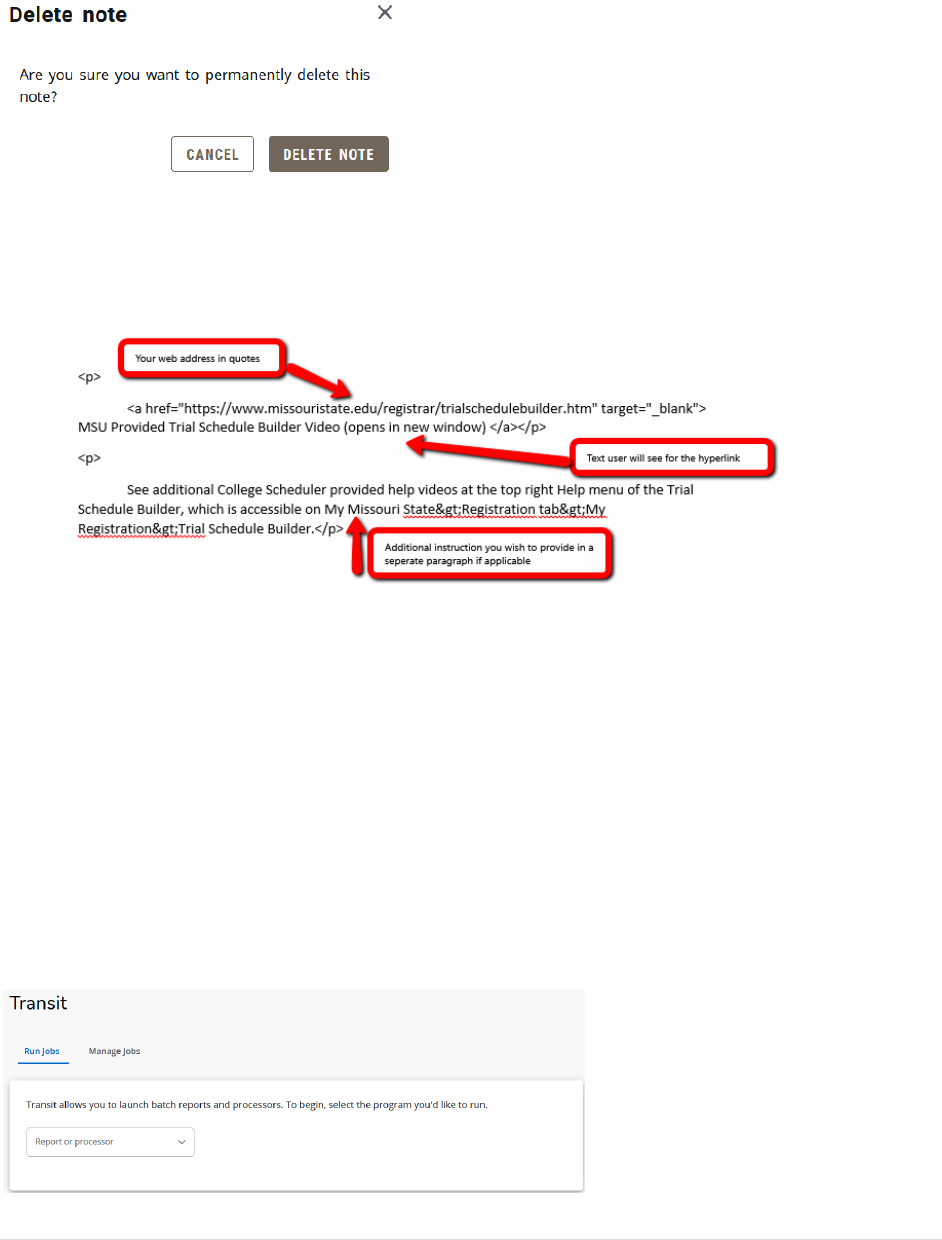
55 | P a g e
If you wish to delete the note, click the “Delete note” link. There will be a confirmation message to make
sure you wish to permanently delete the note. Click the “Delete Note” button.
Putting a hyperlink into a SEP template is not as simple as it is in an email or Word document. In order to
simply this for users, the following is an example of html language that can be copied and pasted in
order to create hyperlink and instruction. For this reason, it is recommended to add web addresses as
plain text which the student can copy and paste in their web browser.
Template Deactivation
If an academic department decides to no longer maintain a SEP template, it is important that is is
deactivated. To do this, please contact the Office of the Registrar to arrange to have the template
inactivated. You do have access to do this independently, but there are some additional steps behind
the scenes that Office of the Registrar staff need to complete related to the naming convention and SEP
template maintenance tracking.
Section 6: Transit Functions
Transit is a tool used to manage some of the various administrative Degree Works functions. The
following section contains instructions on how to run the most commonly used of these functions.
Previous to Degree Works 5.0.3., this was Degree Works transit is located on the Registrar Staff
Resource Links under the Banner Systems header in the Degree Works section.
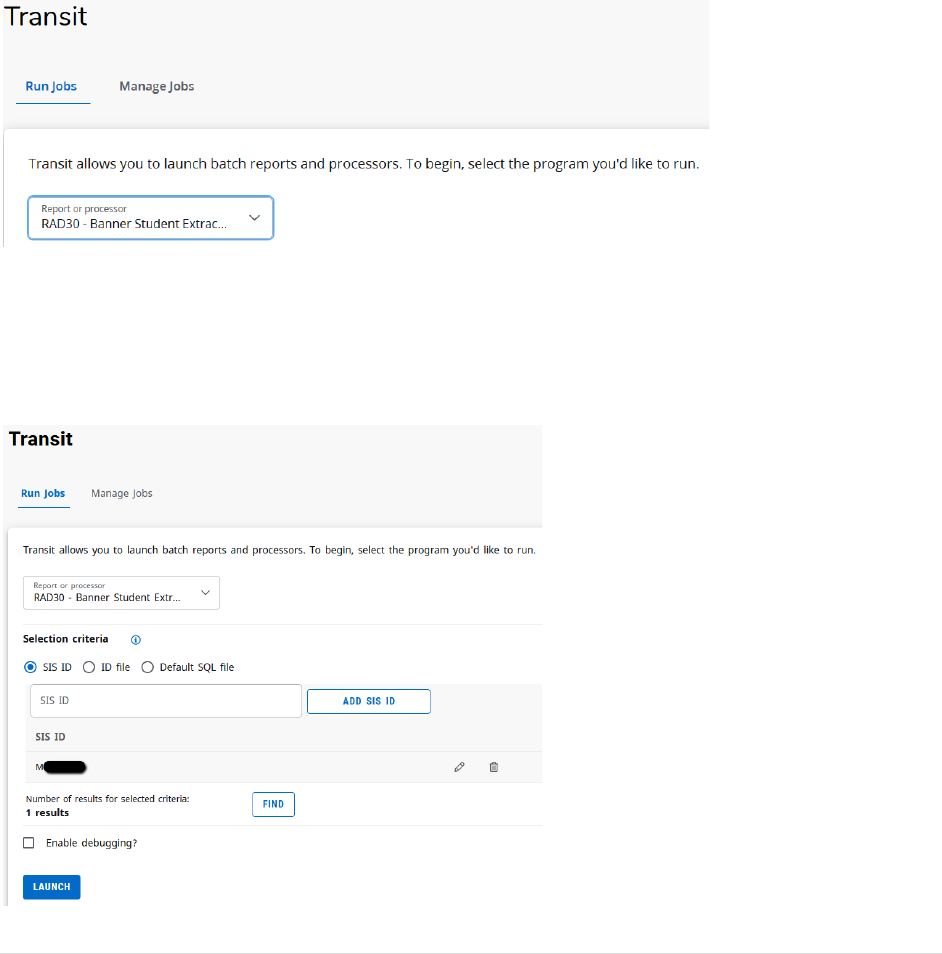
56 | P a g e
Loading a Former Student into Degree Works
There are two reasons that, a student may not be loaded into Degree Works:
1) The student has not attended MSU in the timeframe of students currently migrated into Degree
Works.
2) The student was newly admitted today and the overnight process has not run yet to load the
student into Degree Works. When the student’s new SGASTDN is created, an overnight process
loads the student into Degree Works in the following evening.
The below procedures walk the user through how to extract a student from Banner into Degree Works.
After logging into Degree Works, on the Run Jobs tab, select RAD30 in the “Report or processor” drop-
down menu.
Below the selection menu, click the SIS ID radio button and enter the BearPass number (M-number) of
the student you wish to add to Degree Works. Click the “Add SIS ID” button. Never select the Default
SQL File radio button as this would cause all students to be reextracted into Degree Works, potentially
tying up the Degree Works system for days. Click the “Find” button to ensure that 1 result is found.
Click Launch.
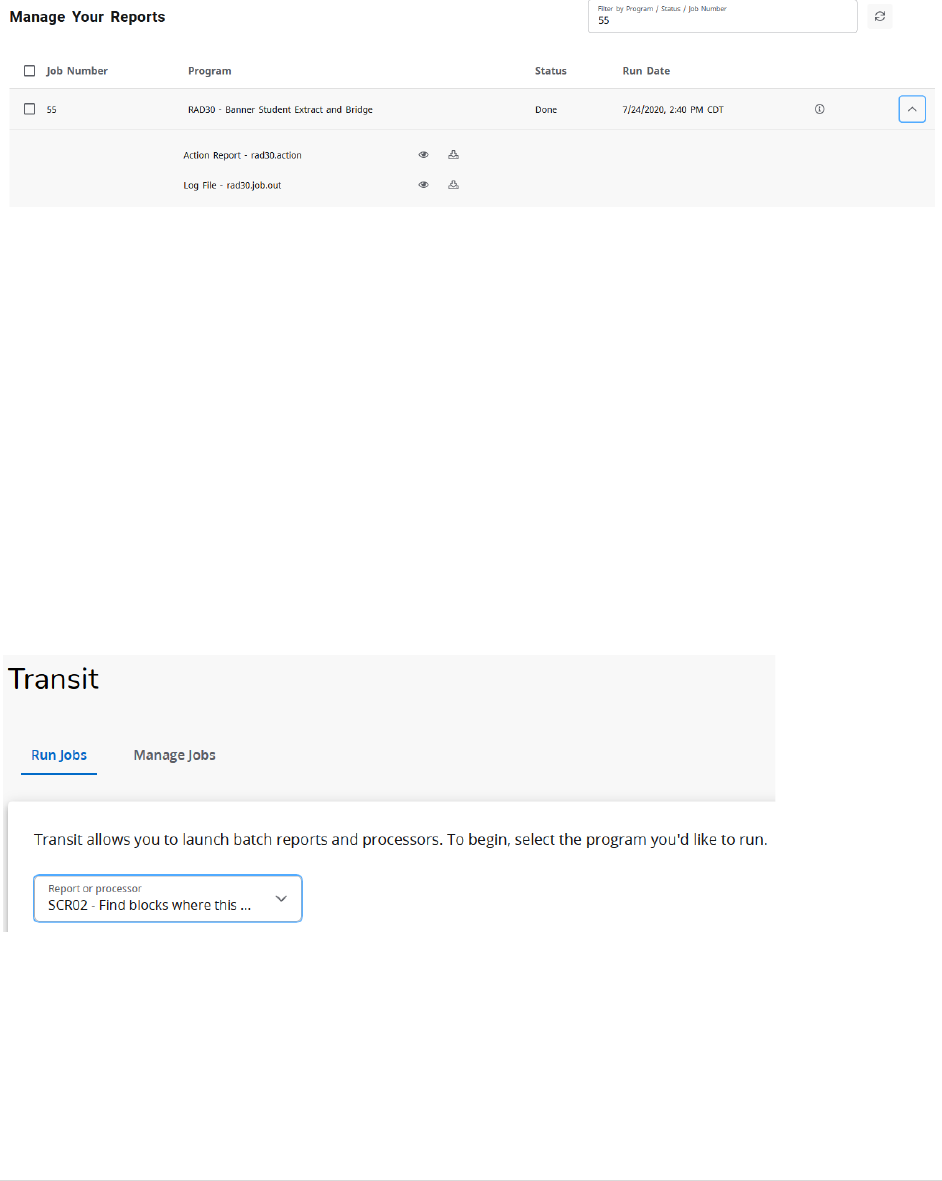
57 | P a g e
At this point, it will automatically go to the Manage Jobs tab. At first your job will appear in the Manage
Your Reports with a status of Pending. You can refresh the page using the refresh icon to the right of the
Filter by Program box. Refresh until the job appears with a Done status.
At this point, you should now be able to find the student in Degree Works. If this is a returning student
who previously attended MSU but has not yet reapplied to return to MSU, it will reflect curricular
information from their past attendance. New changes would not pick up until the student has been
readmitted in the future, but at least the student can be found for using the “what-if” audit. Newly
admitted students who have not attended MSU previously will have their future curricular information
ped up in their degree audit.
Finding Course Usage Within Degree Audit Scribe Programming
Another useful function within Transit is the ability to run a report to find the Scribe blocks in which a
particular course is used. This can be helpful in situations where a course has changed prefix/numbers,
when a course has been deleted, or just when a academic department wants information on programs
that use one of their courses.
After logging into Degree Works, on the Run Jobs tab, select SCR02 in the “Report or processor” drop-
down menu.
Below the selection menu, enter the course code (or prefix) in the “Enter the course discipline” box.
Enter the course number in the “Enter the course number” box. Click the “Launch” button.
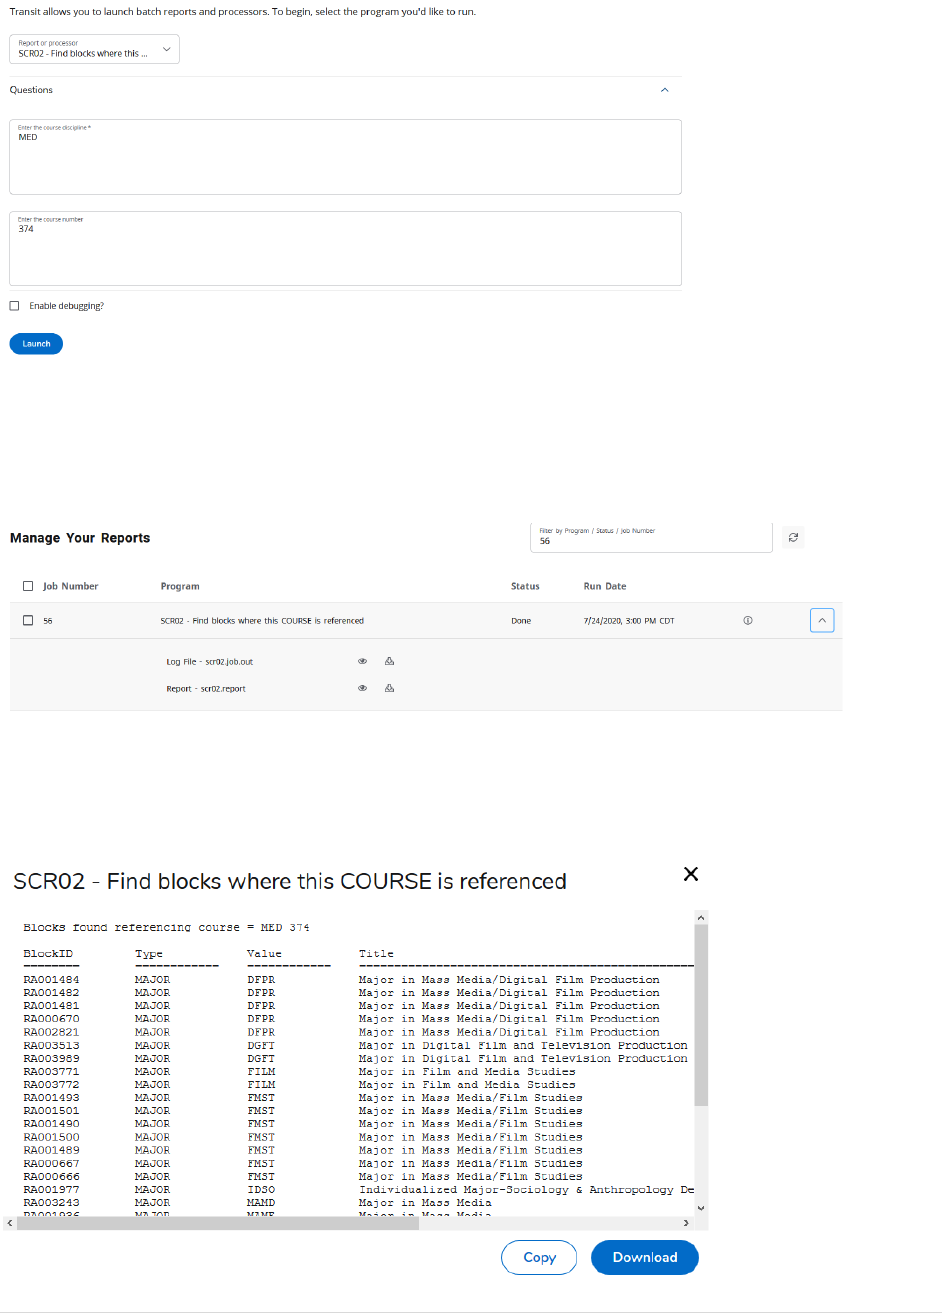
58 | P a g e
At this point, it will automatically go to the Manage Jobs tab. At first your job will appear in the Manage
Your Reports with a status of Pending. You can refresh the page using the refresh icon to the right of the
Filter by Program box. Refresh until the job appears with a Done status. Click the arrow at the end of the
job row to open the report menu. Click View (the eye icon) for the Report line.
This will open the report. The report will list the block ID, block type, block value, and block title of each
Scribe block where the course is used. If you need to print, it is recommended to copy and paste the
data into a Word document. Examples of situations where this report is used can be found in the
Curricular Processing section of this guide.
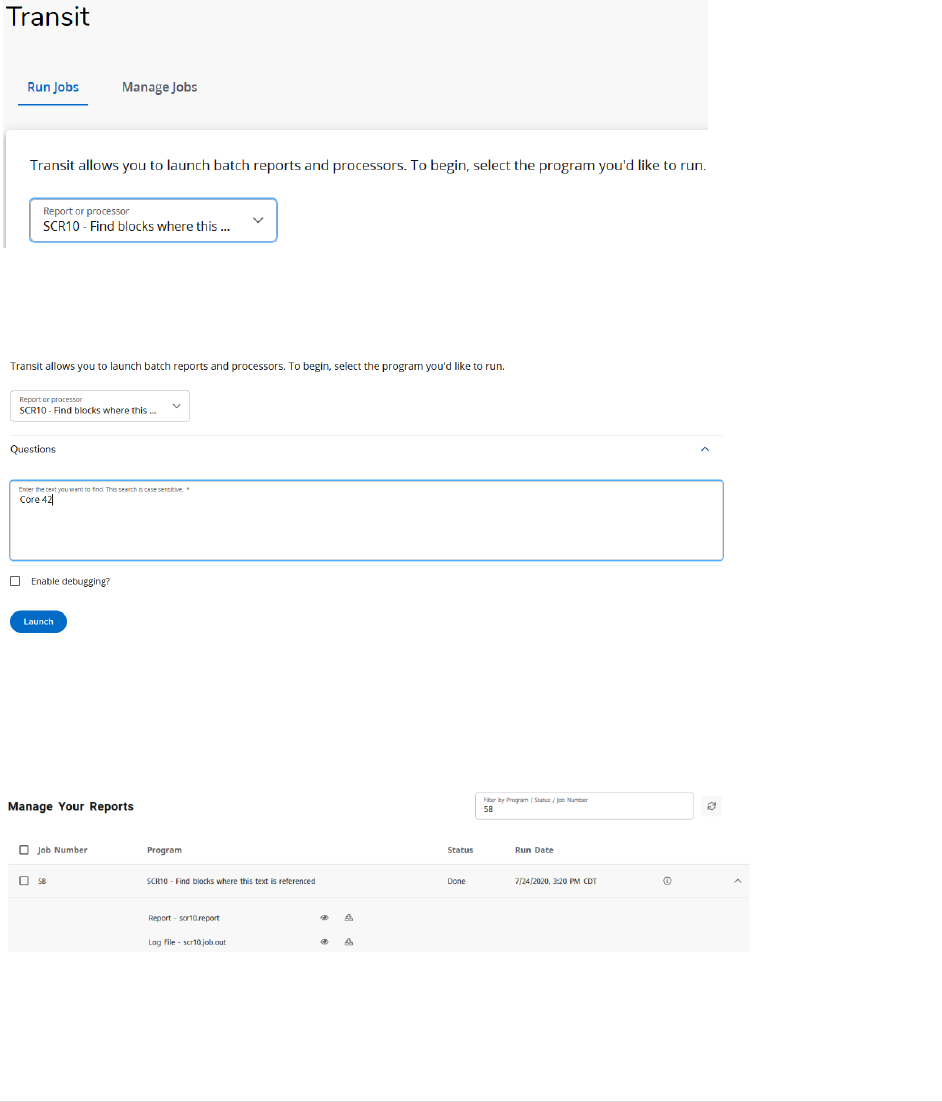
59 | P a g e
Finding Text Usage Within Degree Audit Scribe Programming
Another useful function within Transit is the ability to run a report to find the Scribe blocks in which a
particular piece of text is used. This can be helpful in situations where a text term has been changed that
might be in the audit outside of a particular course requirement.
After logging into Degree Works, on the Run Jobs tab, select SCR10 in the “Report or processor” drop-
down menu.
Below the selection menu, enter the text you wish to find in the “Enter test you want to find. This search
is case sensitive” box. Click the “Launch” button.
At this point, it will automatically go to the Manage Jobs tab. At first your job will appear in the Manage
Your Reports with a status of Pending. You can refresh the page using the refresh icon to the right of the
Filter by Program box. Refresh until the job appears with a Done status. Click the arrow at the end of the
job row to open the report menu. Click View (the eye icon) for the Report line.
This will open the report. The report will list the block ID, block type, block value, and block title of each
Scribe block where the course is used. If you need to print, it is recommended to copy and paste the
data into a Word document. Examples of situations where this report is used can be found in the
Curricular Processing section of this guide.
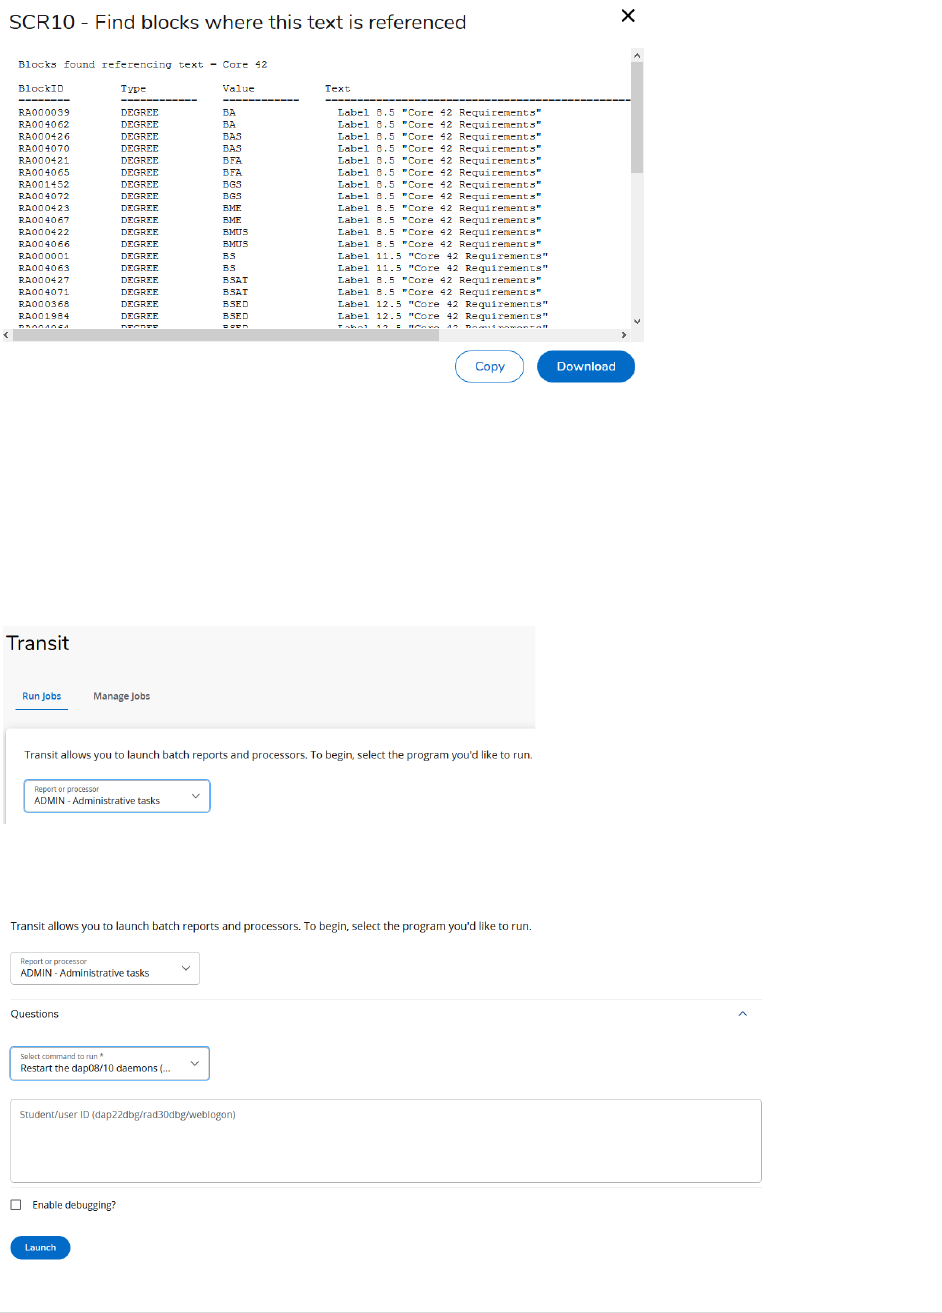
60 | P a g e
Running a DAPRESTART and WEBRESTART
For a small number of administrative tasks, it may be necessary to restart the Degree Works dap jobs
and web jobs. To do this, a functional user can run a DAPRESTART AND WEBRESTART through Transit
without needing to contact the technical lead.
After logging into Degree Works, on the Run Jobs tab, select Admin in the “Report or processor” drop-
down menu.
Below the selection menu, Step 1 will open. Select “Restart the dap08/10 daemons (daprestart)” in the
“Select Command to Run” drop-down menu. Click the “Launch” button.
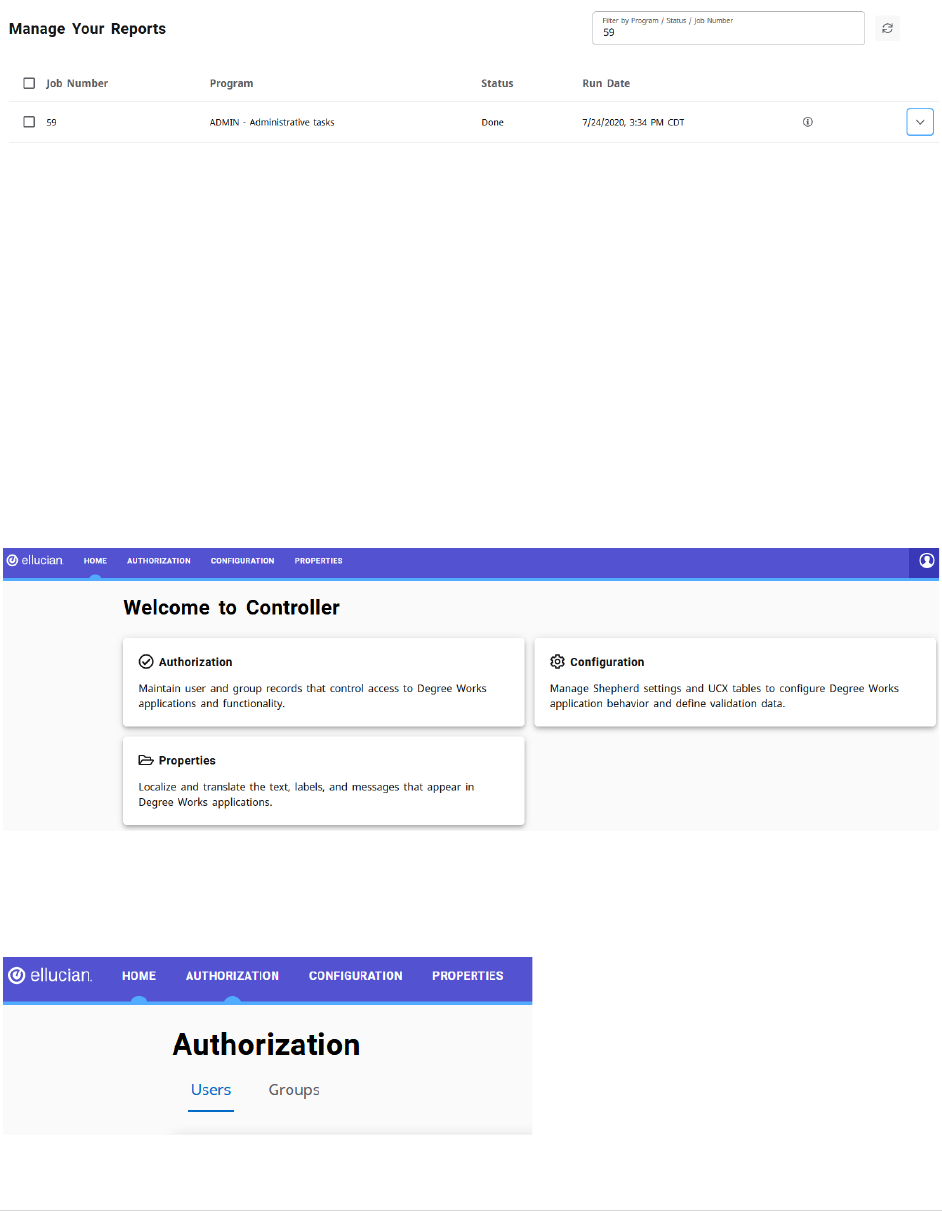
61 | P a g e
At this point, it will automatically go to the Manage Jobs tab. At first your job will appear in the Manage
Your Reports with a status of Pending. You can refresh the page using the refresh icon to the right of the
Filter by Program box. Refresh until the job appears with a Done status.
Repeat the above process a second time only this time select “Restart the Web07 daemons
(webrestart)” instead.
Section 7: Controller Functions
Starting in Degree Works 5.0.3, the former Degree Works Maintenance tool, which housed Shepentry
(the module for assigning user keys) and Surecode (the module for housing various data validation
tables), is replaced by Controller. Access to Controller is restricted to Office of the Registrar supervisors
and Computer Services staff who have functional oversight and/or technical responsibilities with Degree
Works.
Controller has three sub-menus consisting of Authorization, Properties, and Configuration. Each of these
functional areas are described below:
Authorization-Users
This is where a user and group Degree Works security level is maintained. First, select whether you wish
to search for a specific user or group.

62 | P a g e
You can search for a user using a “last name, first name” format, but it is recommended to search by
their BearPass number (m-number).
After searching, you will see a list of individuals that match your search. Find the user you wish to edit
and click the Edit icon (pencil) located on the right side of the row.
To change the user role, you change the “User Class” field in the User Access portion of the page. When
finished, scroll to the bottom and click “Save”.

63 | P a g e
There are five user roles in Degree Works. They are as follows:
Students (STU)
Access given to all students on campus.
• Ability to view own degree audit
• Ability to edit own Student Educational Planner
Access is provided by the creation of a curricular record the evening following the date of admission.
Student Workers/Graduate Assistants (STUW)
Access given to student workers and graduate assistants in selected offices where a high volume of
degree audits access is needed
• Ability to view own degree audit
• Ability to view audits for any student
• Ability to edit their own Student Educational Planner
• Ability to view Student Educational Planner for any student
Access is provided by the respective department submitting a request to Information Security, who asks
the Office of the Registrar to assign the role through Controller.
Advisor without Exceptions (ADVX)
Access given to all advisors on with standard access needs.
• Ability to view own degree audit if they are also student
• Ability to view audits for any student
• Ability to edit own Student Educational Planner if they are also student
• Ability to view and edit Student Educational Planner for any student
Access is provided overnight by default upon the assignment of the advisor role by Information Security.
Advisor (ADV)
Access given to some advisors, deans, department heads on campus and advisors/program coordinators
with advanced access need (with permission of dean or department head)
• Ability to view own degree audit if they are a student
• Ability to view audits for any student
• Ability to edit own Student Educational Planner if they are also student
• Ability to view and edit Student Educational Planner for any student
• Ability to add course exceptions
Access is provided at the point of assignment for department heads and to their designees upon their
request. Graduate program coordinators are provided access at the request of the Graduate College.
These requests are made to the Office of the Registrar. Access is granted through the process described
in section 4 (Exception Processing) of this guide.
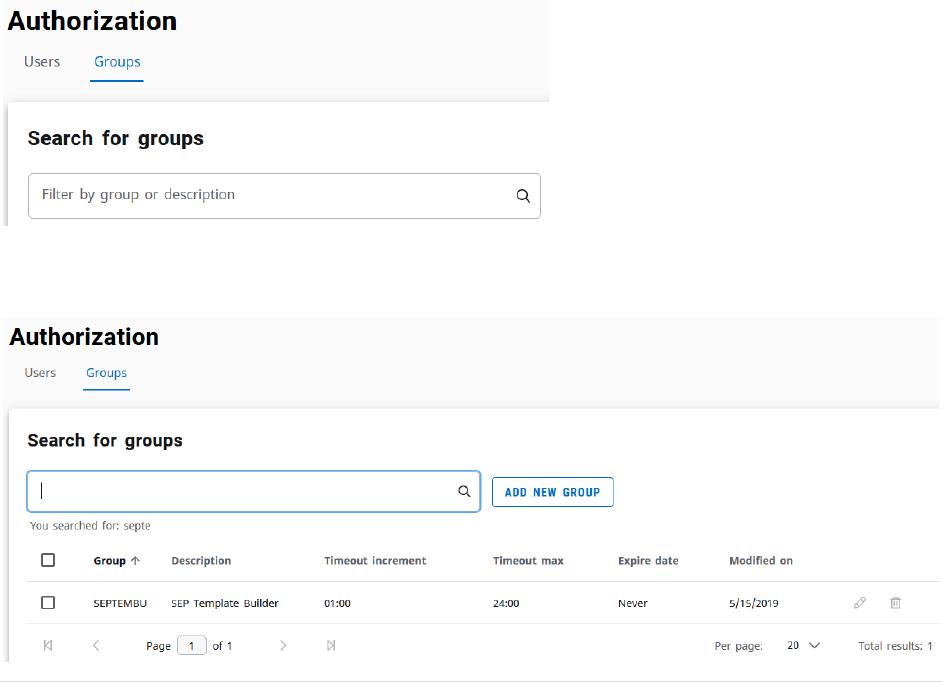
64 | P a g e
Registrar (REG)
Access given to the Office of the Registrar Staff.
• Ability to view own degree audit if they are a student
• Ability to view audits for any student
• Ability to edit own Student Educational Planner if they are also student
• Ability to view and edit Student Educational Planner for any student
• Ability to add course exceptions
• Ability to control access
• Access to diagnostic audits and additional Degree Works tools
Access is granted upon hire to the Office of the Registrar through Controller. If there is a change in role
where de-escalation of role is required, we are notified by Information Security and make the change
through Controller. The role is scaled back to Student or Advisor without Exceptions as appropriate
based on the user’s new role and responsibilities. If the role was Advisor (meaning they have exception
access), they will need to be additionally removed via the process described in Section 4 of this guide.
Authorization-Groups
This module is where the user keys for each group are managed. The keys are the various types of view
and edit permissions maintained in each user group. There is seldom an occasion where this needs to be
edited or added. To open a group, use the Search for Groups field. After finding the group you wish to
open, click the title of the group from the drop-down menu that will form.
This will open your group search detail. To edit the group, click the Edit icon (pencil) at the end of the
search row.
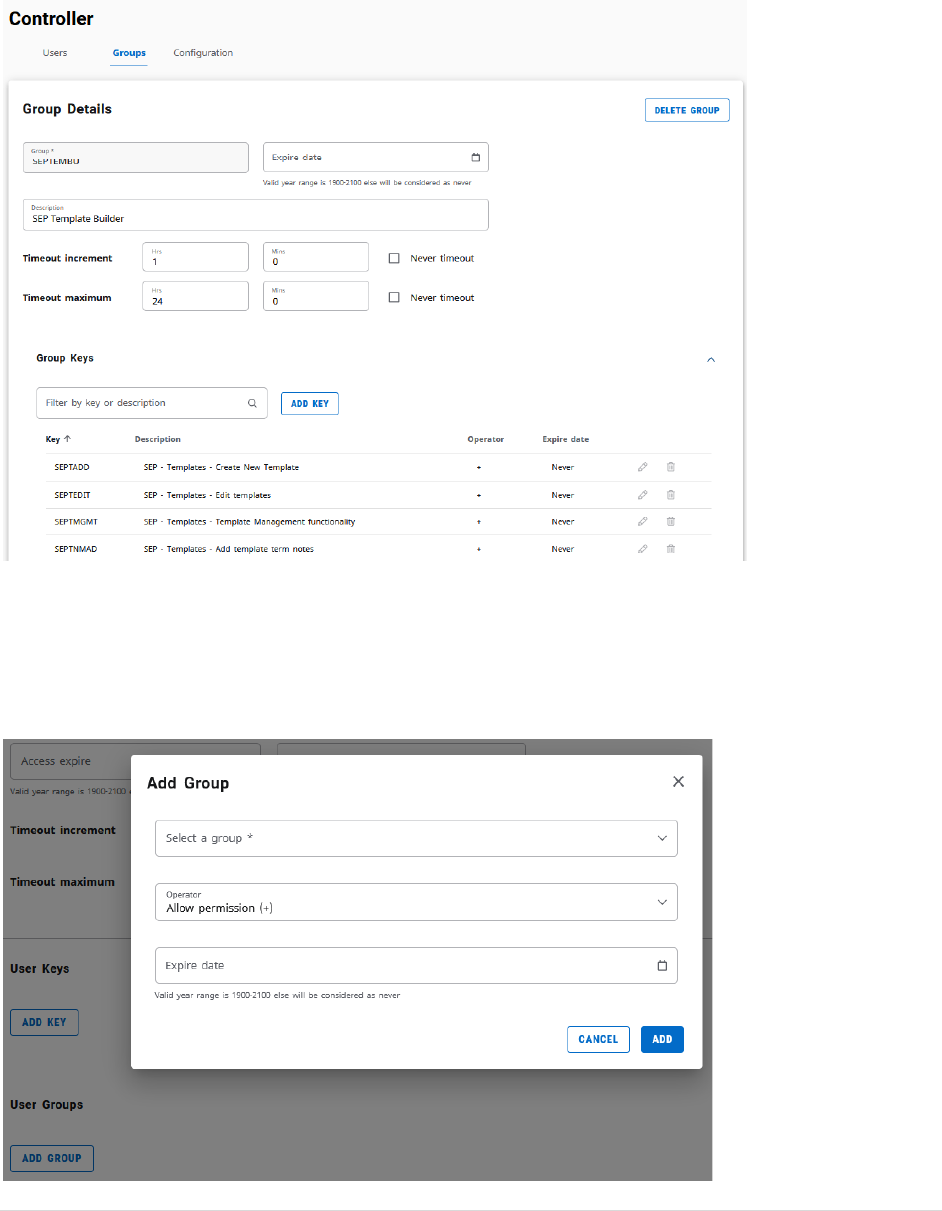
65 | P a g e
To add an additional key to a group, click the Add Key button in the Group Keys section. To edit an
existing key, click the Edit icon beside that key. To delete a key, click the Delete icon (trash can) at the
end of the key role. When finished, scroll down and click Save.
One group that is manually added in addition to a user role on occasion is SEPTEMBU (SEP Template
Builder). This group is assigned to users who have participated in SEP template management training.
Because there are users in multiple user classes who need this access, it is provided as a group. To add
this group role to a user, you would go to the user’s record, scroll to the bottom to the User Groups
section, click the Add Group button, and add the SEPTEMBU user group.
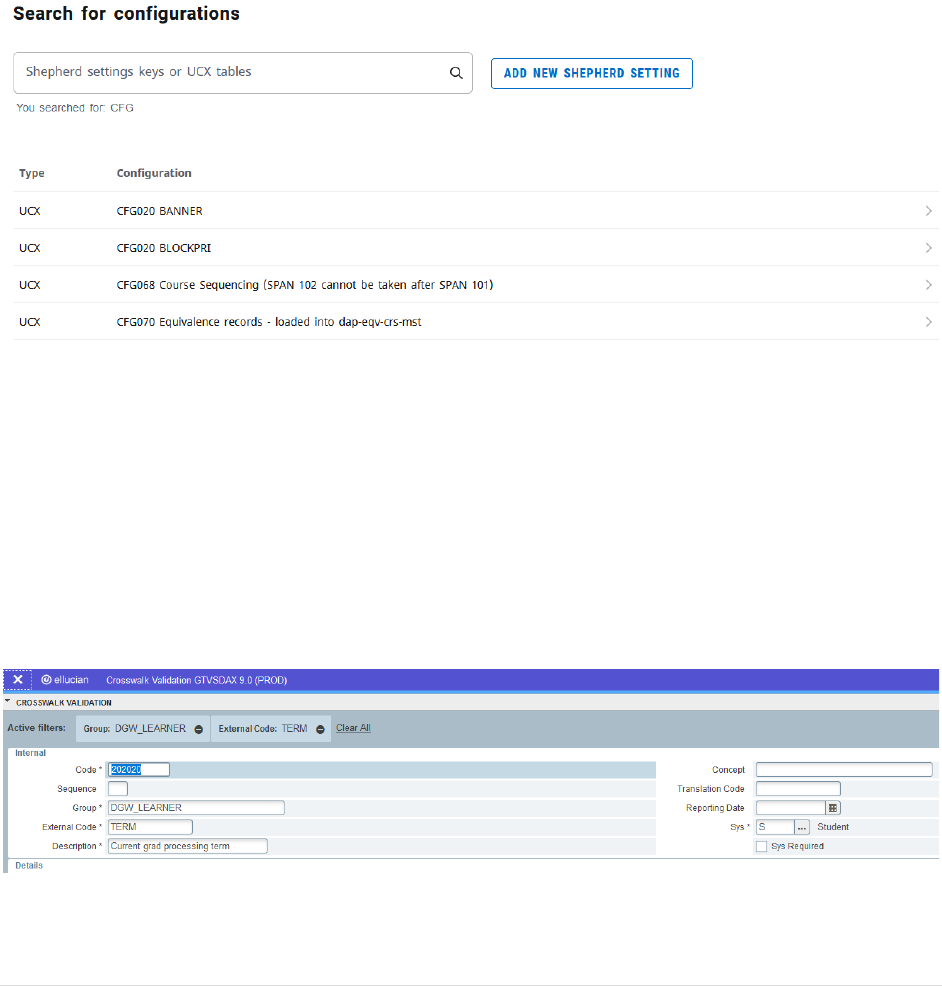
66 | P a g e
Configuration
This is where the SHP (shepherd) settings and UCX validation tables are managed. These are rules and
validation tables that are necessary in the administration of Degree Works. This section will go over
some of the most common and/or important tables to update for changes not related to the curricular
update process. Tables related to curricular updates will be covered in the Curricular Processing portion
of this report.
To search for a UCX table (or SHP setting), click on the Configuration tab and type your search criteria in
the “Search for configurations” search box located just under the Controller tabs. This will yield a list of
options that meet your search criteria. When you find the one you want, click the right arrow on the
right side of the row to open your selection.
Semester Transition Configuration Updates
There are a series of updates that must be done ranging from right after end of term processing through
the official closing of a graduation cycle. These processes are explained below:
Banner GTVSDAX
This is not technically a UCX validation table update, but is an administrative necessity to make the
current and future program information work correctly in the degree audit system.
Go to Banner form GTVSDAX. Use filter to find the record with “DGW_LEARNER” as Group, “TERM” as
External Code. Change the code to the next graduation processing semester as you officially close a
graduation class.
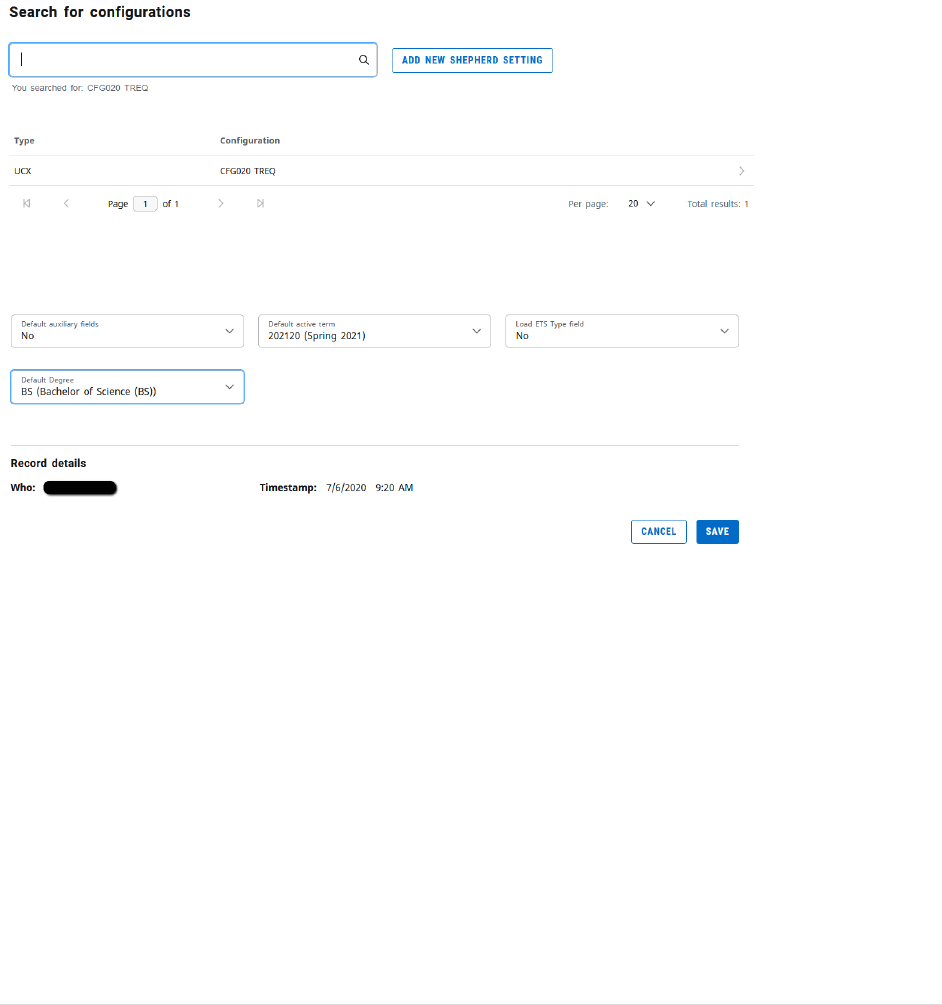
67 | P a g e
CFG020-TREQ
This table setting is to control the semester default in Degree Works Transfer Equivalency (or TREQ),
which is a module of Degree Works not currently in use. However, in the effort to be mindful about the
future need to update this setting once this module is in future use, we have made the decision to go
ahead and add this to the semester update cycle. This update should occur just prior to the opening of a
new semester.
Open Controller, click on the Configuration tab, and search for the table by using search criteria
“CFG020 TREQ.” Open the result using the right-pointing arrow at the end of the row.
Find the “Default active term” drop-down menu and update it to the upcoming semester. Click the
“Save” button at the bottom of the page.
CFG020-What-If
This is no longer used with the Responsive Dashboard. Instead, the core.whatif SHP settings are used to
control what-if functionality.
Other Configuration Tables
BAN080-Dynamic SQL Definitions
This table is used when you wish to pull a data element from Banner and utilize it within Scribe
programming. While it is not very common to add to this table, it is important to remember this step in
the instances where it is needed.
Open Controller, click on the Configuration tab, and search for the table by using search criteria
“BAN080.” Open the result using the right-pointing arrow at the end of the row.

68 | P a g e
You will likely have to work with your technical lead to get the SQL information to supply here. Using
prior entries as an example, gather all necessary information and enter each key using the Add record
button at the top of the table block. Enter each key and click Save on each corresponding entry.
Before an BAN080 entry goes into effect, you must make a corresponding SCR002 (Custom Data) entry
and perform a webrestart and daprestart.
CFG020-COURSELINK
This table is used when you wish to change a display criterion in the Degree Works CourseLink display.
Open Controller, click on the Configuration tab, and search for the table by using search criteria “CFG020
COURSELINE.” Open the result using the right-pointing arrow at the end of the row.
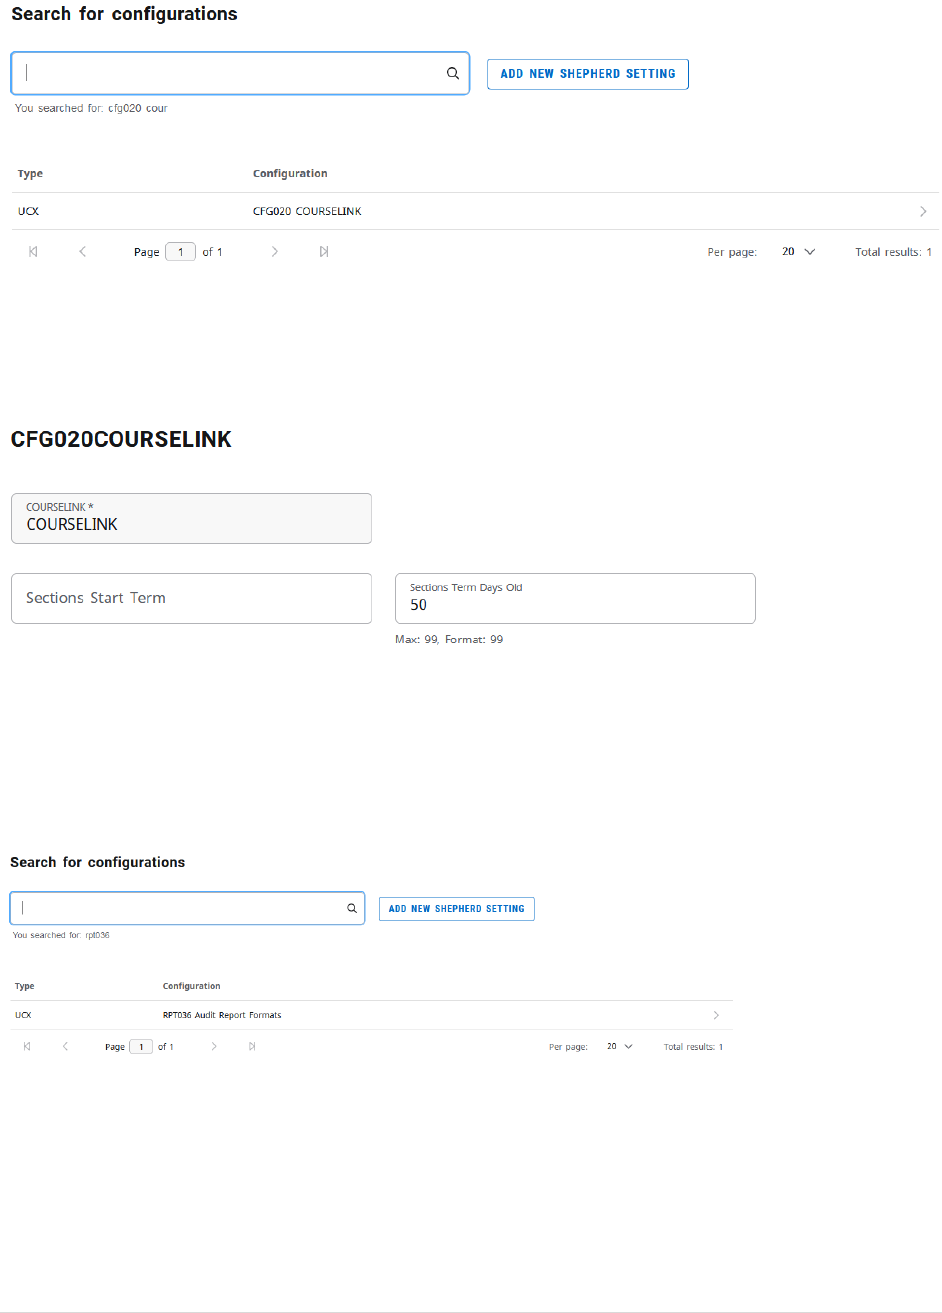
69 | P a g e
The Sections Start Term is left blank as MSU has CourseLink configured to show all semesters in which
there is a publicly visible class schedule. We set the “Section Term Days Old” to 50 as this generally is a
good default number to show the current semester’s classes up through the beginning of second-block
courses.
RPT036-Audit Report Formats
This table is used when you wish to change a display criterion in the various types of Degree Works
degree audits.
Open Controller, click on the Configuration tab, and search for the table by using search criteria
“RPT036.” Open the result using the right-pointing arrow at the end of the row.
This will open the list of keys available in the Audit Report Format listing. To open one, click the Edit icon
(pencil) located at the right side of the key row.
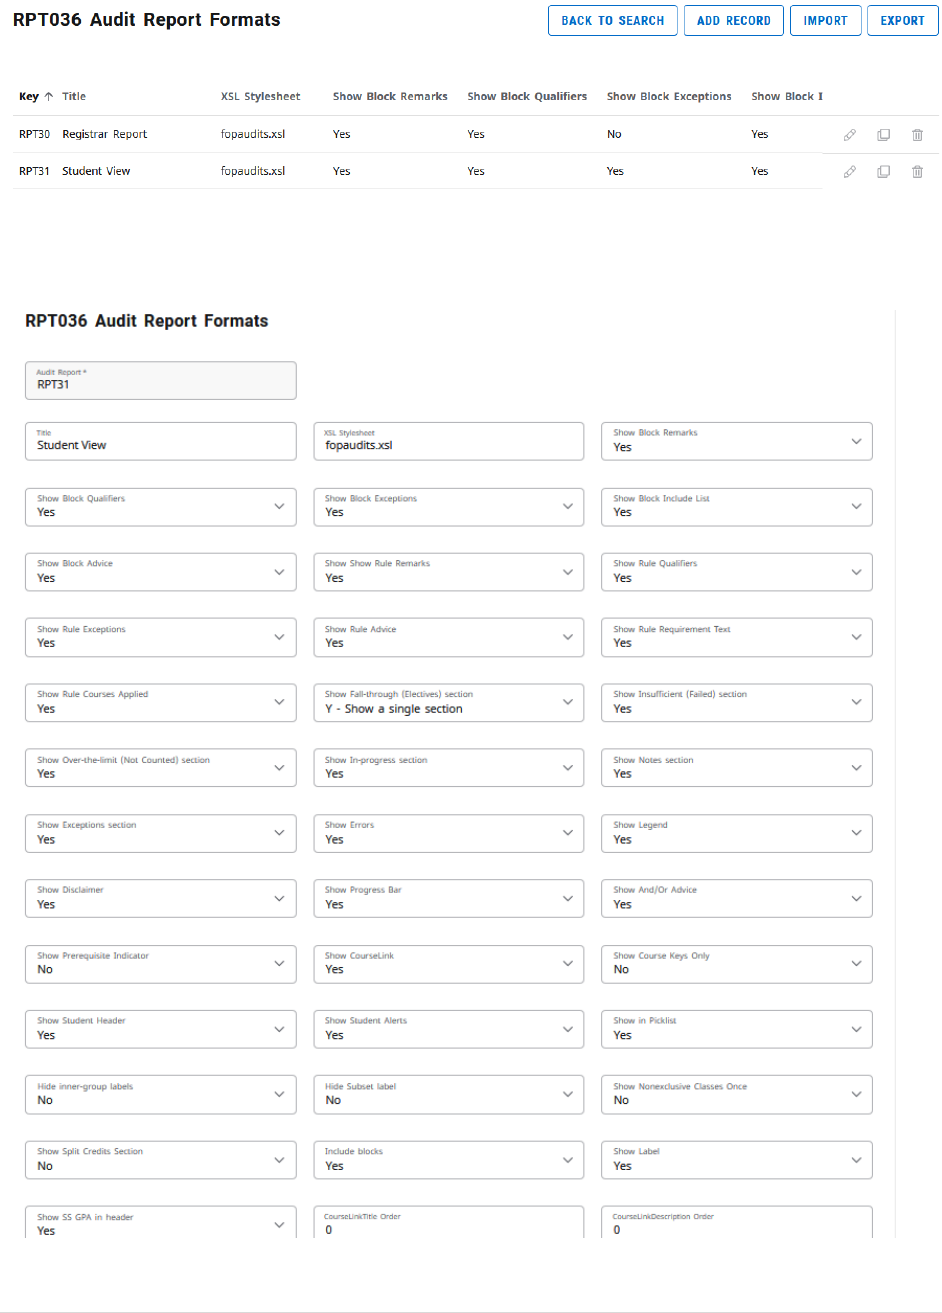
70 | P a g e
This will open the display option for that key’s specific audit template. Make any needed changes in the
corresponding drop-down menu and click the “Save” button at the bottom of the page. Some of these
are long pages where you will need to scroll to reach the bottom.
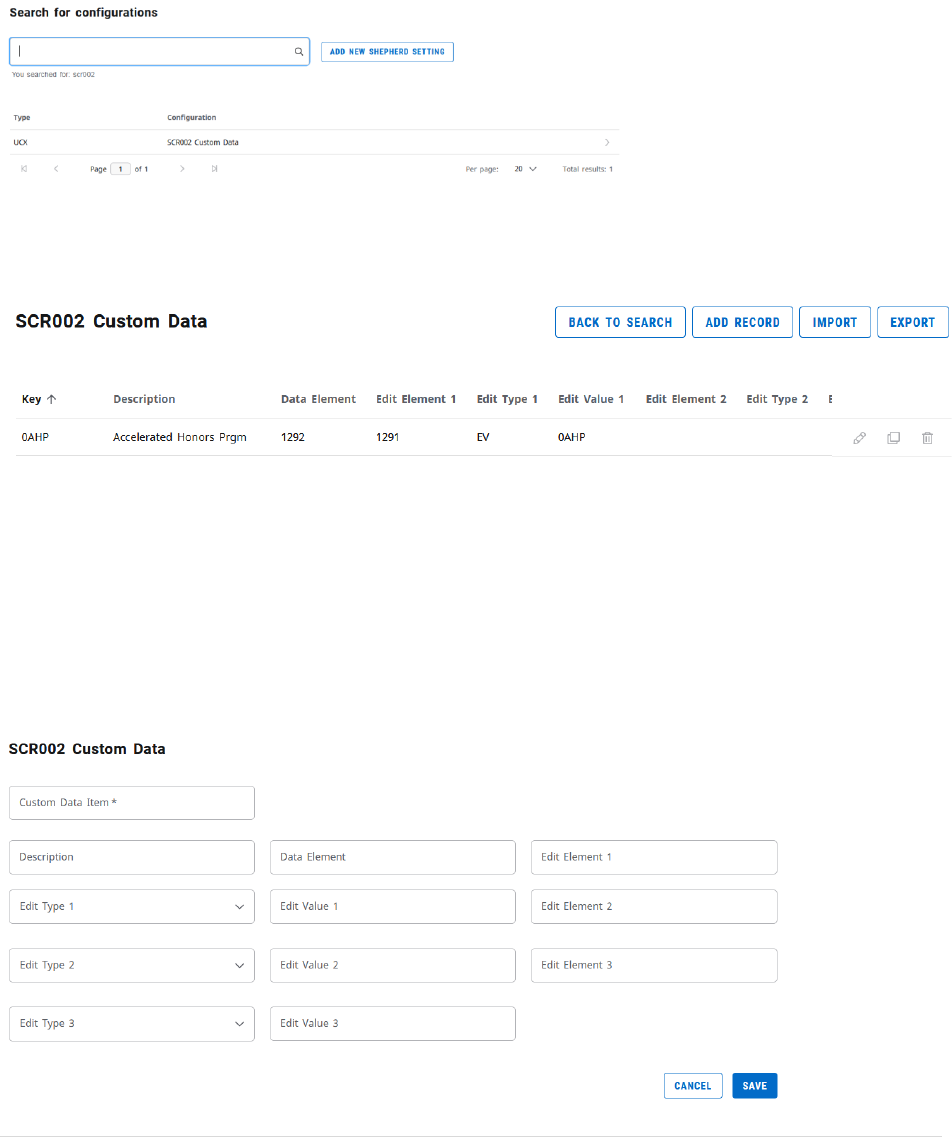
71 | P a g e
SCR002-Custom Data
This table is used when you wish to use a Banner data element to Scribe against that is outside of the
default extracted Banner data elements.
Open Controller, click on the Configuration tab, and search for the table by using search criteria
“SCR002.” Open the result using the right-pointing arrow at the end of the row.
Information added to this table is traditionally either a test score or an SQL element from BAN080. You
can use prior entries as your guide in terms of what to enter. To enter a new key, click the “Add Record”
button at the top.
Once it’s open, enter the following data items. Click the “Save” button when finished.
Key (Custom Data Item): This is either the 4-digit test code value or the key from BAN080.
Description: This is just a text description of the key.
Data Element: Enter 1292 for a test score or R323 for a BAN080 entry.
Edit Element 1: Enter 1291 for a test score or R322 for a BAN080 entry.
Edit Type 1: Enter EV.
Edit Value 1: Enter the same entry from the key.
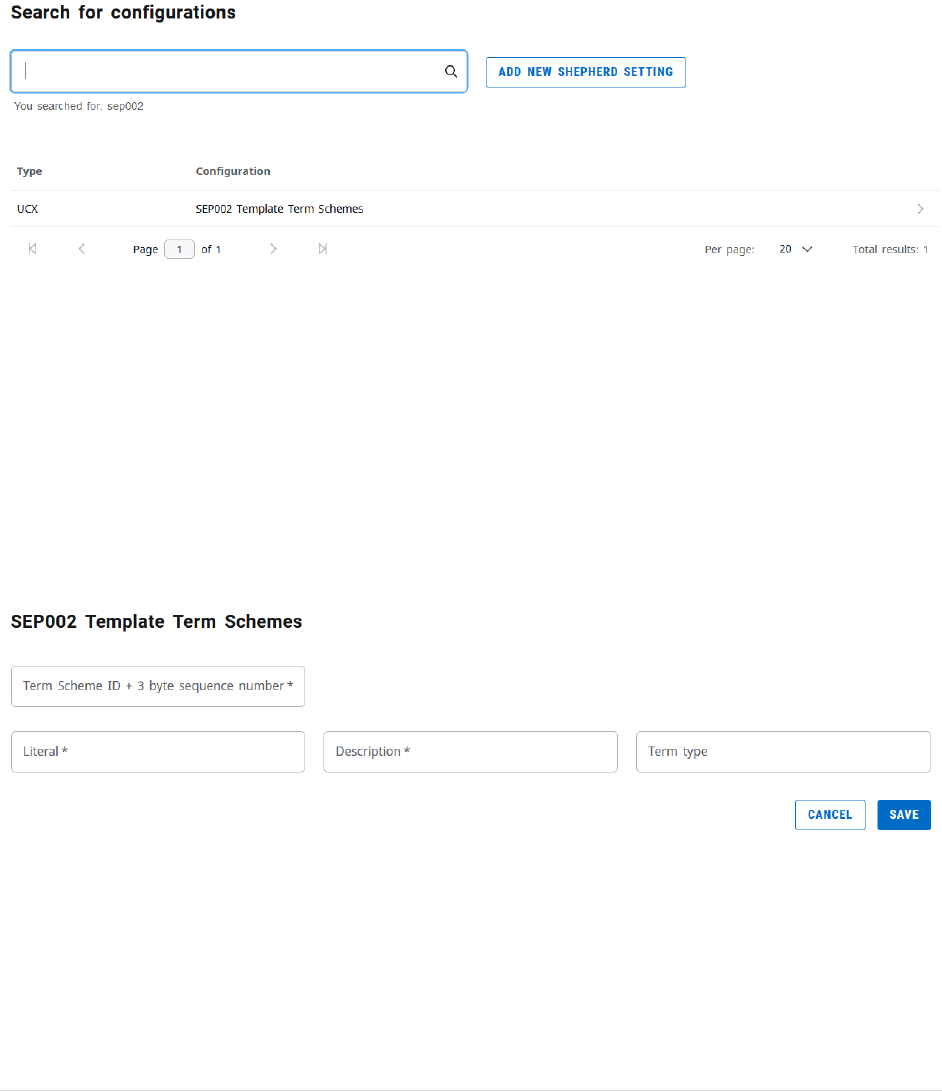
72 | P a g e
SEP002-Template Term Schemes
This table is used when you wish to build a new term scheme for the Student Educational Planner.
Open Controller, click on the Configuration tab, and search for the table by using search criteria
“SEP002.” Open the result using the right-pointing arrow at the end of the row.
The key naming convention is very important on this table as having an inconsistent number of
characters in the key will through off the corresponding values. Therefore, the format must start with an
8-digit description followed by “_SCHEDULE_SEMESTERS) and conclude with a 3-digit number (Example:
001). User previous term schemes as a guide. You will add a record (using the “Add record” button) for
each semester you need to create for the term scheme. Enter the data and click the “Save” button when
finished.
Term Scheme ID: <8-Digit Description>_SCHEDULE_SEMESTERS<3-Digit Number>
Literal: <Type of semester>Term<Sequence Number> (Example: Fall Term 1)
Description: Same as Literal
Term Type: <Term in capital letters> (Example: FALL)
SEP006-Test Codes and SEP007-Test Score Sort Order
These tables are used when you wish to add a new test code for use in SEP programming.
Open Controller, click on the Configuration tab, and search for the table by using search criteria
“SEP006.” Open the result using the right-pointing arrow at the end of the row.
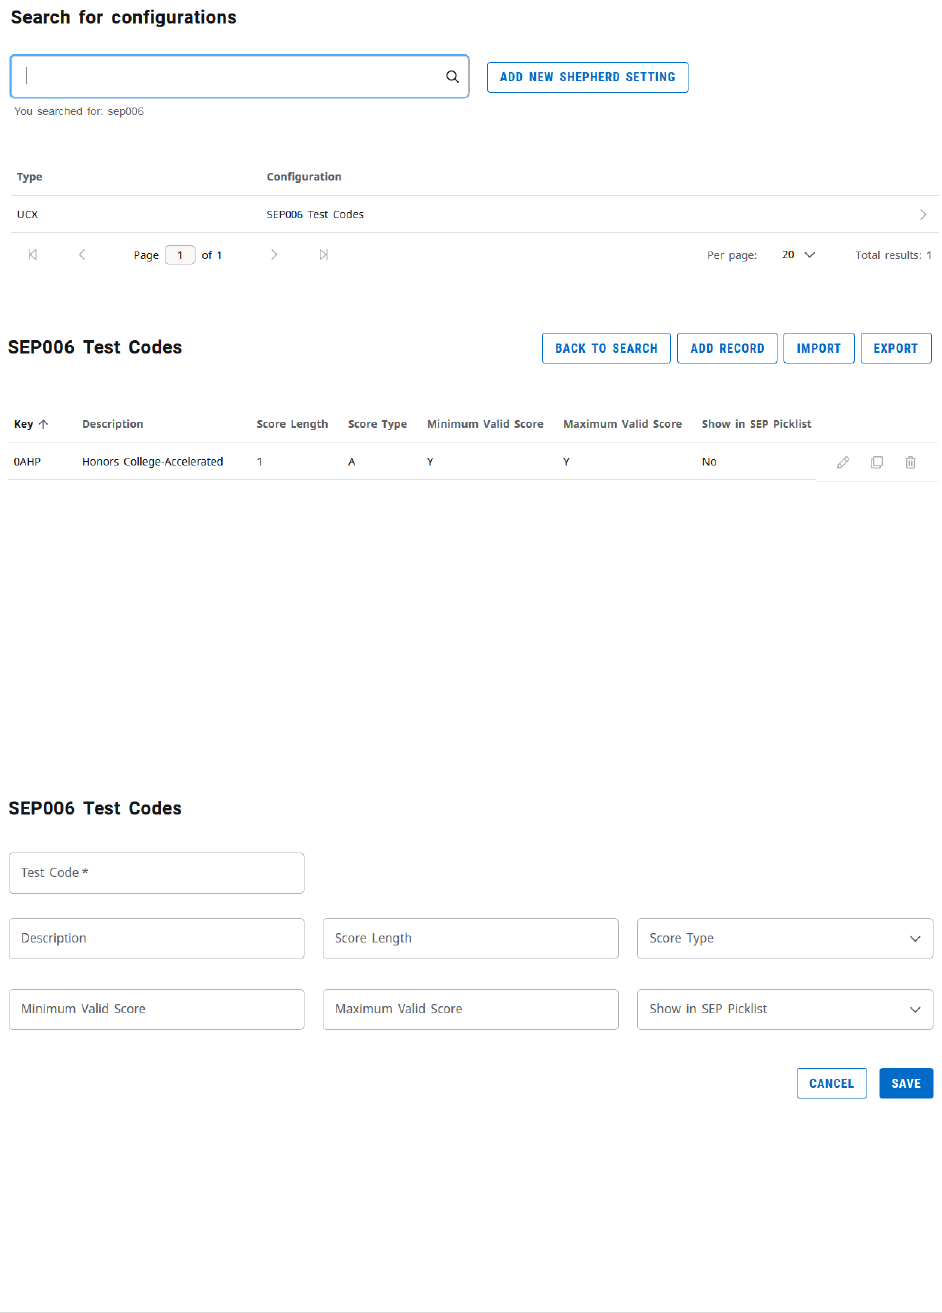
73 | P a g e
This will open the test code block. To add a new test code, click the “Add Record” button.
This will open the record box to add a new test code. Enter the following values. Click the “Save” button
when finished.
Test code: The 4-digit test code created on STVTESC.
Description: Text description of the test code purpose.
Score length: 1
Score type: A
Minimum valid score: Y
Maximum valid score: Y
Show in SEP picklist: Yes or no depending on whether you wish this to be selectable in SEP
Click on the Configuration tab, and search for the table by using search criteria “SEP007.” Open the
result using the right-pointing arrow at the end of the row.
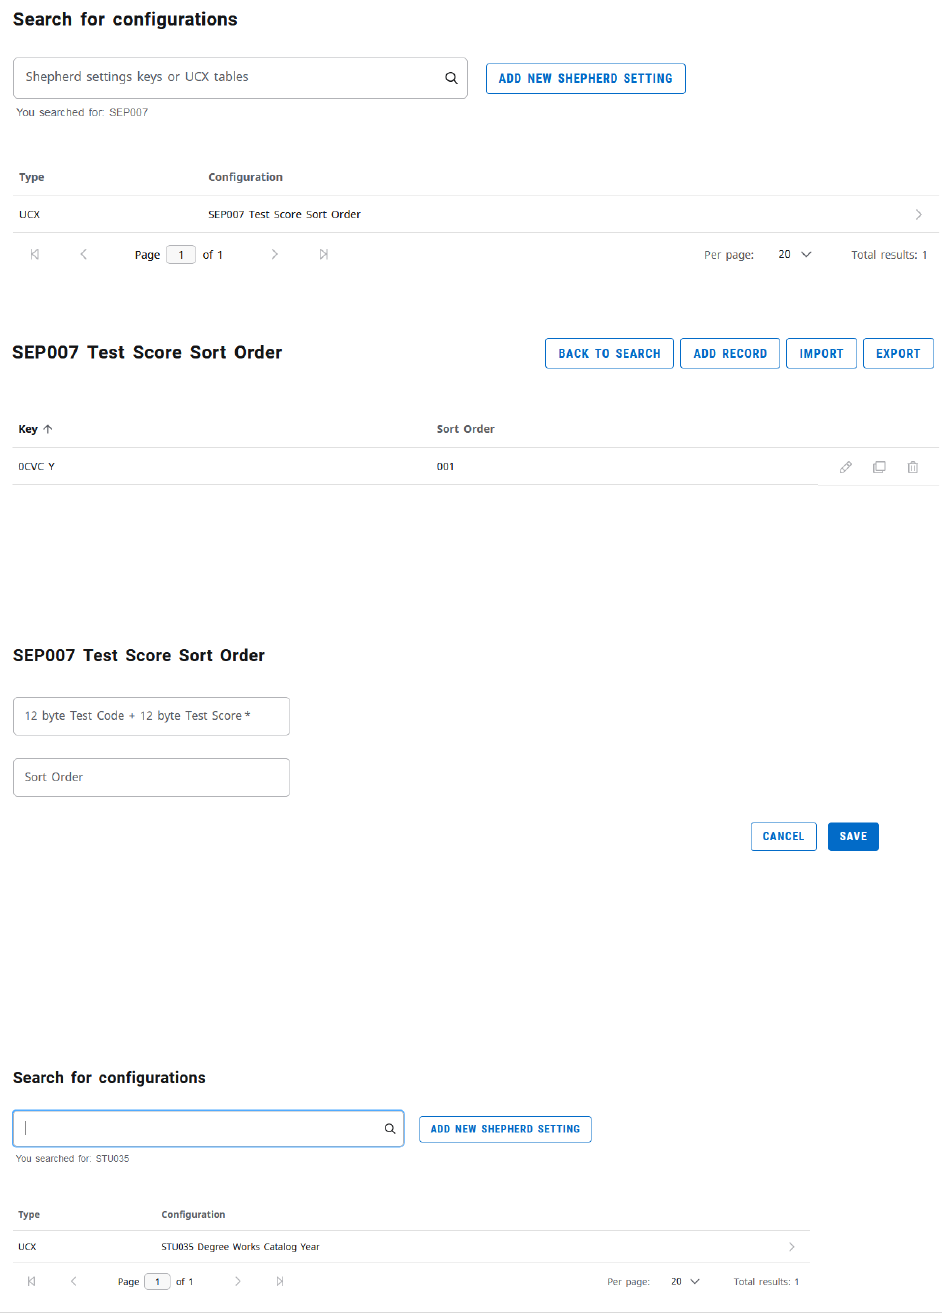
74 | P a g e
This will open the test code sort order block. To add a new test code, click the “Add Record” button.
This will open the record box to add a new test code. Enter the following values. Click the “Save” button
when finished.
Test code: The 4-digit test code followed by 8 spaces followed by a Y.
Sort Order: 001
NOTE: There must be a corresponding SCR002 entry as well.
STU035-Degree Works Catalog Year
This table is used to control the available catalog terms found in Degree Works.
Open Controller, click on the Configuration tab, and search for the table by using search criteria “STU035
Degree Works.” Open the result using the right-pointing arrow at the end of the row.
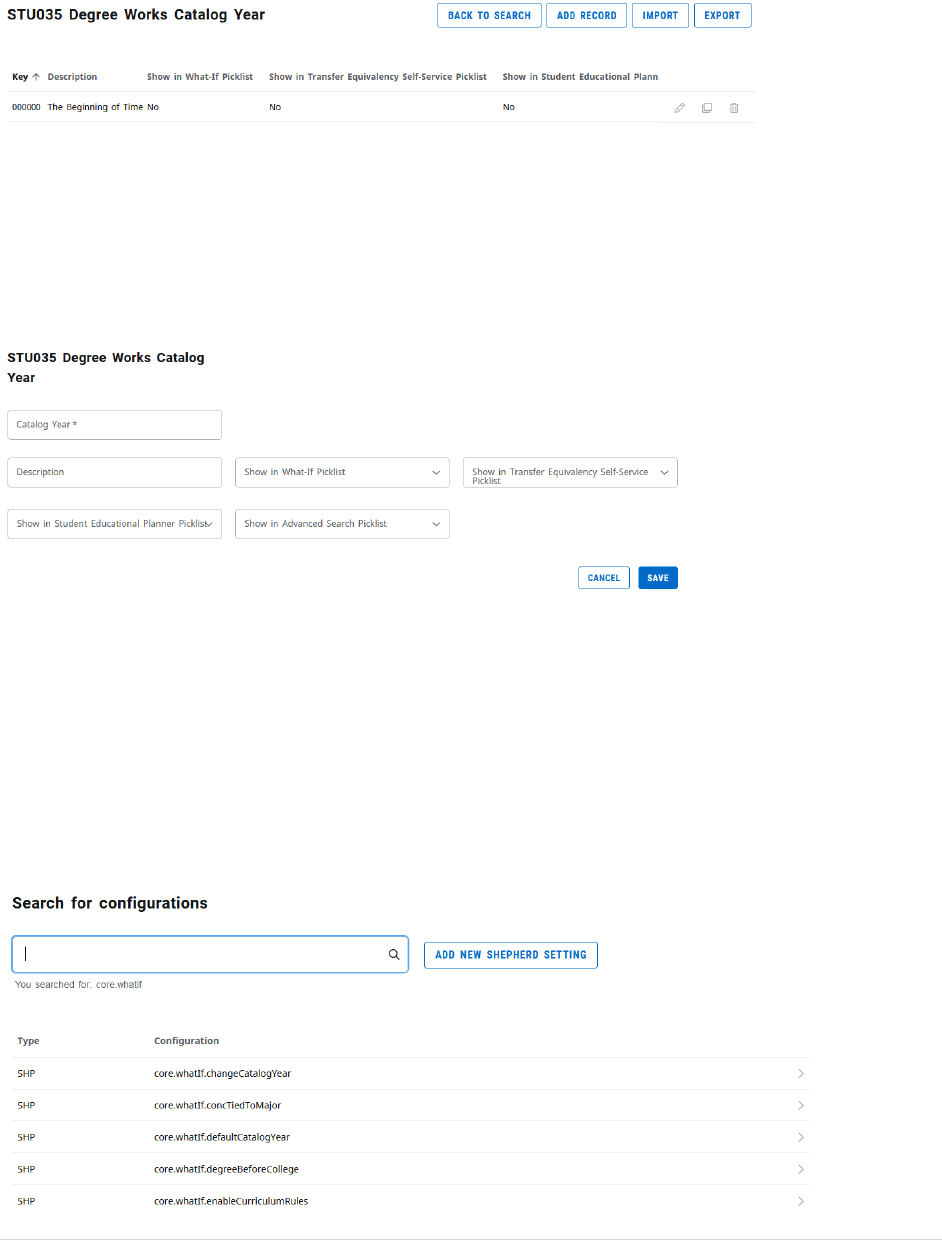
75 | P a g e
This will open the record box to the catalog year terms. To add a new catalog term, click the “Add
Record” button.
Enter the following values. Click the “Save” button when finished.
Catalog year: 4-digit year followed by 20-spring, 30-summer, or 40-fall
Description: Term and Year (Example: Fall 2020)
Show in Web What-If Picklist: Yes
Show in TESS Picklist: Yes
Show in SEP Picklist: Yes
Shephard (SHP) Settings
These are some additional rule settings utilized in Degree Works. It is rare that there is a need to change
one as most of them were set up during the original Degree Works implementation. However, there
may be times during an upgrade or at the suggestion of an Ellucian Action Line employee where there is
a need to alter one of these settings. They can be updated as follows:
Open Controller, click on the Configuration tab, and search for the table by using search criteria that
contains part of the title of the SHP setting you need to change. Open the result using the right-pointing
arrow at the end of the row.
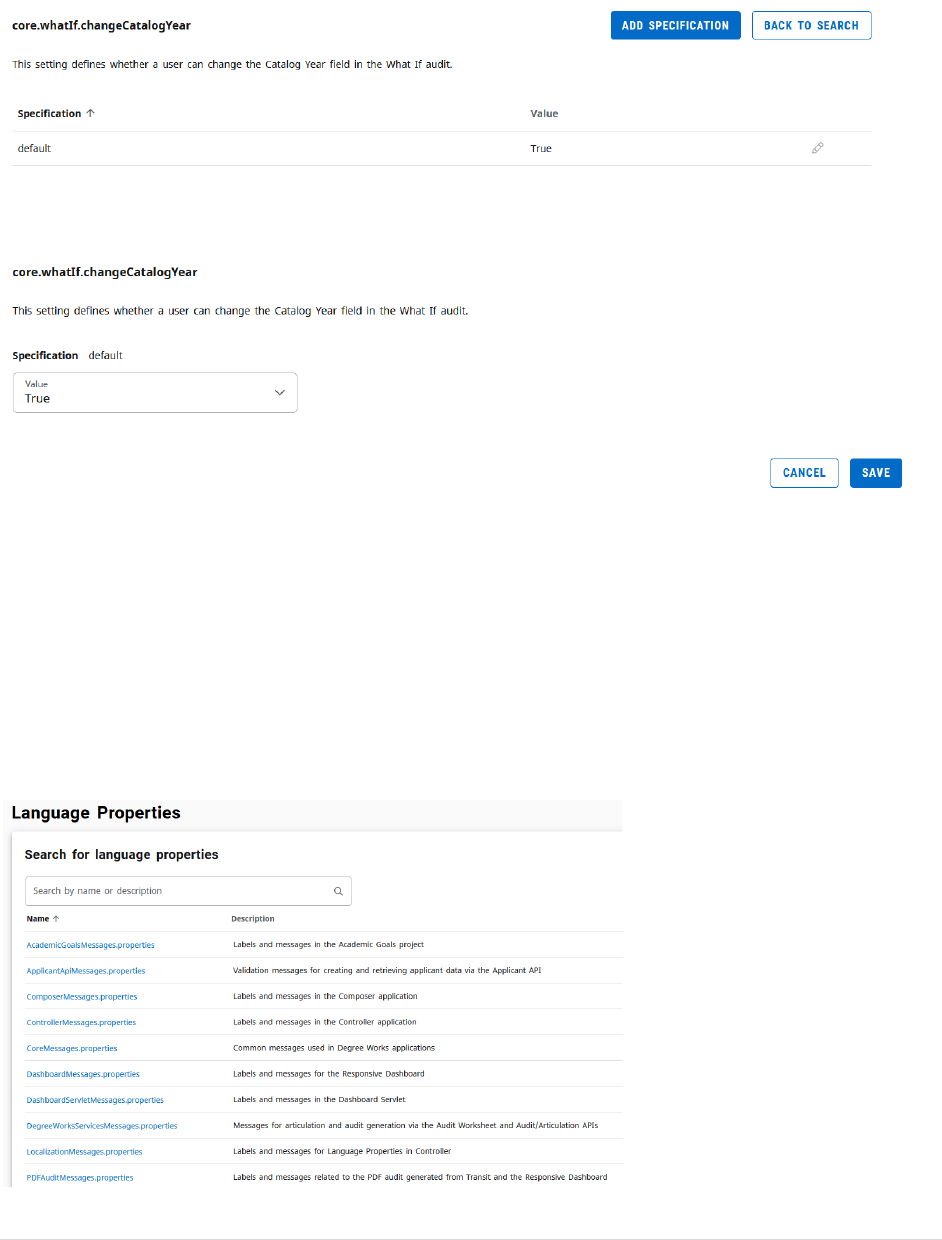
76 | P a g e
This will open the corresponding SHP rule’s value box. Change the value if necessary using the Edit
button (pencil icon) located at the right side of the row.
Change the value to one of the value choices found in the drop-down menu and click the “Save” button
when complete.
Commonly used shephard settings sets are the following:
• Core.whatif-These are what-if degree audit settings.
• Dash.audit-These are responsive dashboard audit display settings.
• Dash.studentHeader-These are responsive dashboard student header settings.
Properties
This is new to Controller effective 5.0.6.1. These controls are where text, labels, and messages are
localized. This was formerly part of Controller, which is used by Computer Services. Please consult with
the Systems Analyst and DBA who support Degree Works before making changes in Properties.
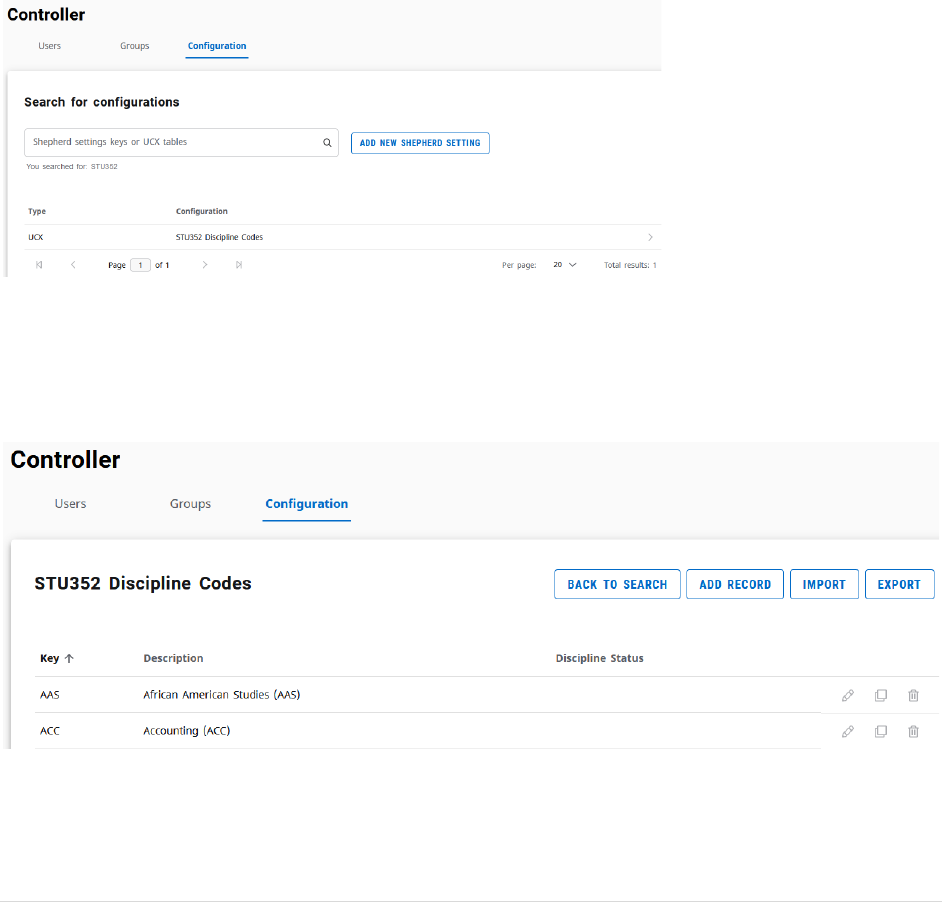
77 | P a g e
Section 8: Curricular Processing
This section of the user’s guide focuses on the Degree Works-related responsibilities related to the
curricular updates that occur each academic year. During the academic year, there is a curricular
disposition released each month. This disposition serves as a guide to the curricular submissions that
have been approved and that should be reviewed for impact on Degree Works. There are a number of
different types of changes, each of which is outlines below.
Course-Level Changes
New Course (including new discipline/prefix)
• If the new course includes a new discipline (prefix), the discipline code needs to be added to
Controller table STU352 (Discipline Codes). If there is no new discipline, this step may be skipped.
The only values to be added are as follows:
Key: The three letter discipline/prefix that is being added.
Description: The title of the new discipline followed by the discipline code in paranthesis.
• Run SCR02 in Transit to ensure that the course number has not been used previously.
• Review to see if the new course description contains an “Identical with” or “Can only receive credit
for 1 of ___ towards graduation” statement. If so, it needs to be added to the list of credit
restrictions found in each Scribe degree block.
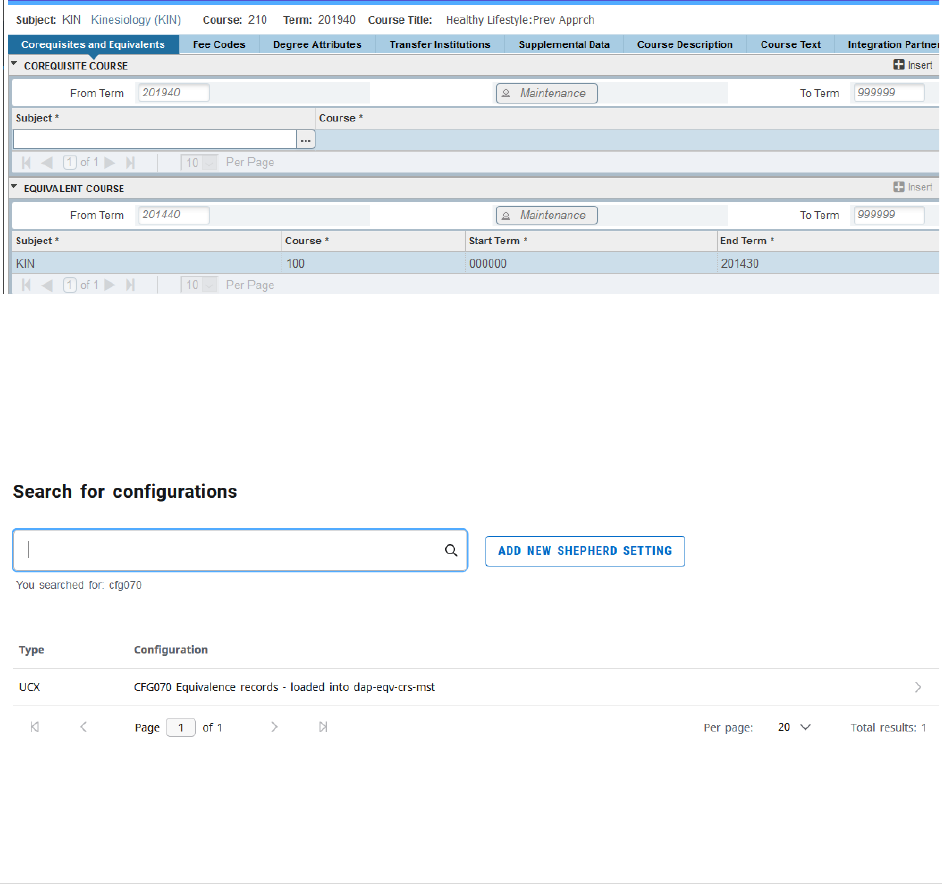
78 | P a g e
• Review to see if the new course is graded “pass/not pass only”. This will affect potential program
programming if the new course is used in any majors/minors as the programming will need to be
done in a way that allows a pass/not pass course to apply to the requirement.
Changed Course-Course Number or Discipline Change
NOTE: In this situation, degree audits will not function correctly in relation to the processing of the
affected courses until the day following the completion of all of the below steps. If a particular
department or college will be affected, it is advised to make the corresponding department heads
and/or advising center coordinator aware in advance.
• Before beginning the Degree Works course code or number conversion process, ensure that the
change has already been recorded in Banner. To look for course code or number changes, go to
SCADETL and look the course up under the new number for the upcoming fall semester. If this has
been completed, you will find the former number in the equivalent course section under the
Corequisites and Equivalents tab. Below is an example from KIN 210, which was previously KIN 100.
• Run SCR02 in Transit to find all Scribe block locations using the course under its current discipline
and number.
• Open Controller, click on the Configuration tab, and search for the CFG070 (Equivalence records-
loaded into dap-eqv-crs-mst) table. Open the result using the right-pointing arrow at the end of the
row.
• Scroll to the end of the report using the arrows at the bottom to see what the last key number is
(they are in numerical order). Make note of this as you will need to know it. Click the Add Record
button.
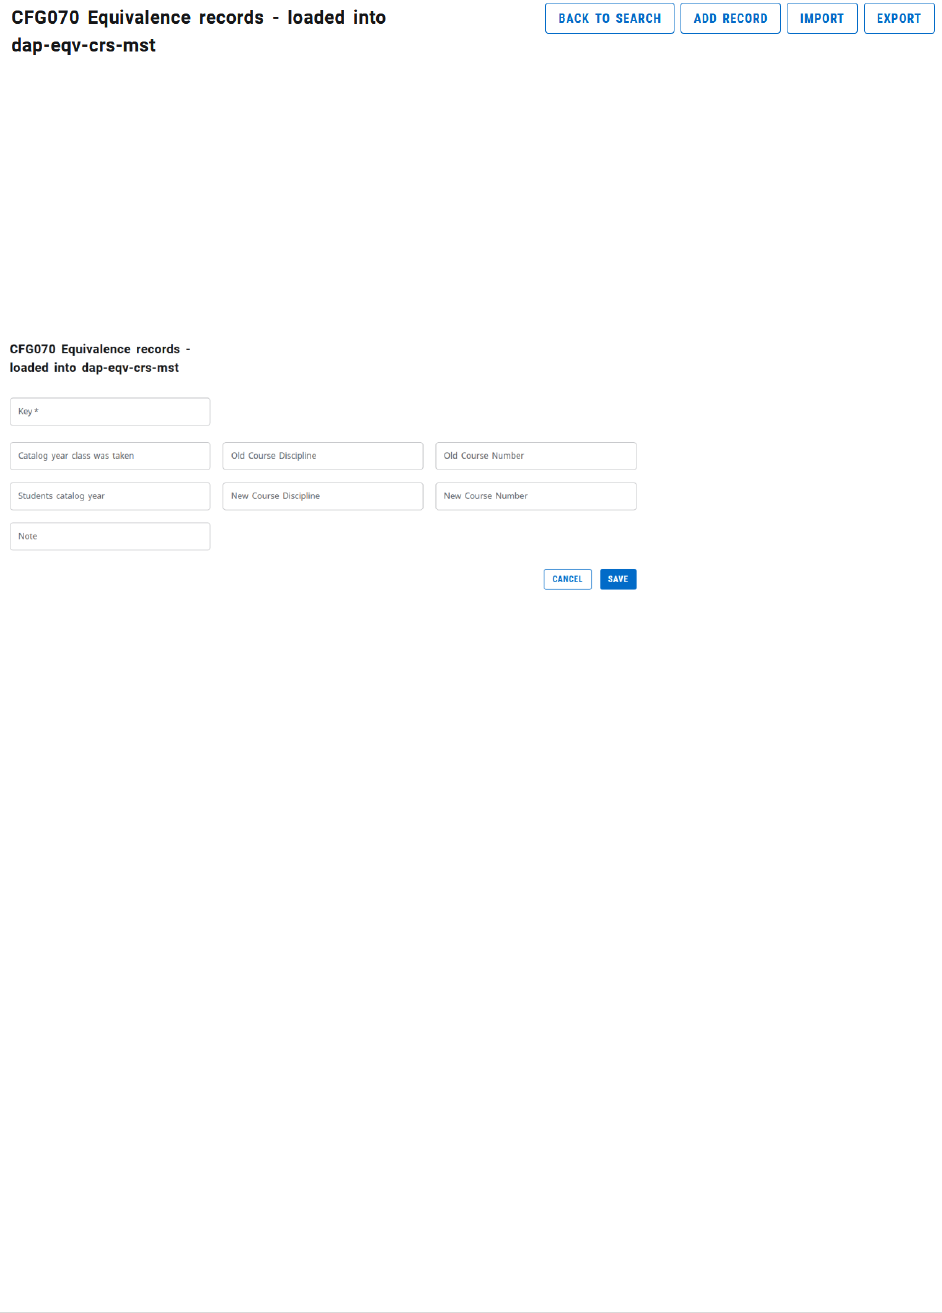
79 | P a g e
• Fill in the record values as follows. Click the “Save” button when finished.
Key: The last key number currently being used + 1
Catalog year class was taken: @
Old course discipline: The old 3-digit course discipline/prefix
Old course number: The old 3-digit course number
Students catalog year: @
New course discipline: The new 3-digit course discipline/prefix
New course number: The new 3-digit course number
• Sort CFG070 by old course discipline or number to make sure that there are no existing conversion
entries where an older conversion was converting to a new number that is now the old number. If
there are, update those as well.
• If this is a course number conversion when the course is moving from lower-division to upper-
division or upper-division to lower-division, additional degree audit programming will be needed to
handle how the course applies to the upper-division process. To begin this, login to Scribe. Click
“Search Blocks.” Once in, select “Degree” as the Block Type. Start with the first BA block.
Find the “40 Hour Upper Division Requirement” section. If the course was upper-division previously
and will be lower-division now, it needs to be added to the list of courses near the top of the
programming (before the word Except). This list contains courses that are now lower-division but
counts them as upper-division based on the term information supplied. If the course was lower-
division previously but is now upper-division, it needs to be added to the list courses in the lower
portion of the programming (after the word Except). This list contains course that are now upper-
division but are excluded from counting as they were lower-division at the time the course was
completed based on the term information supplied.
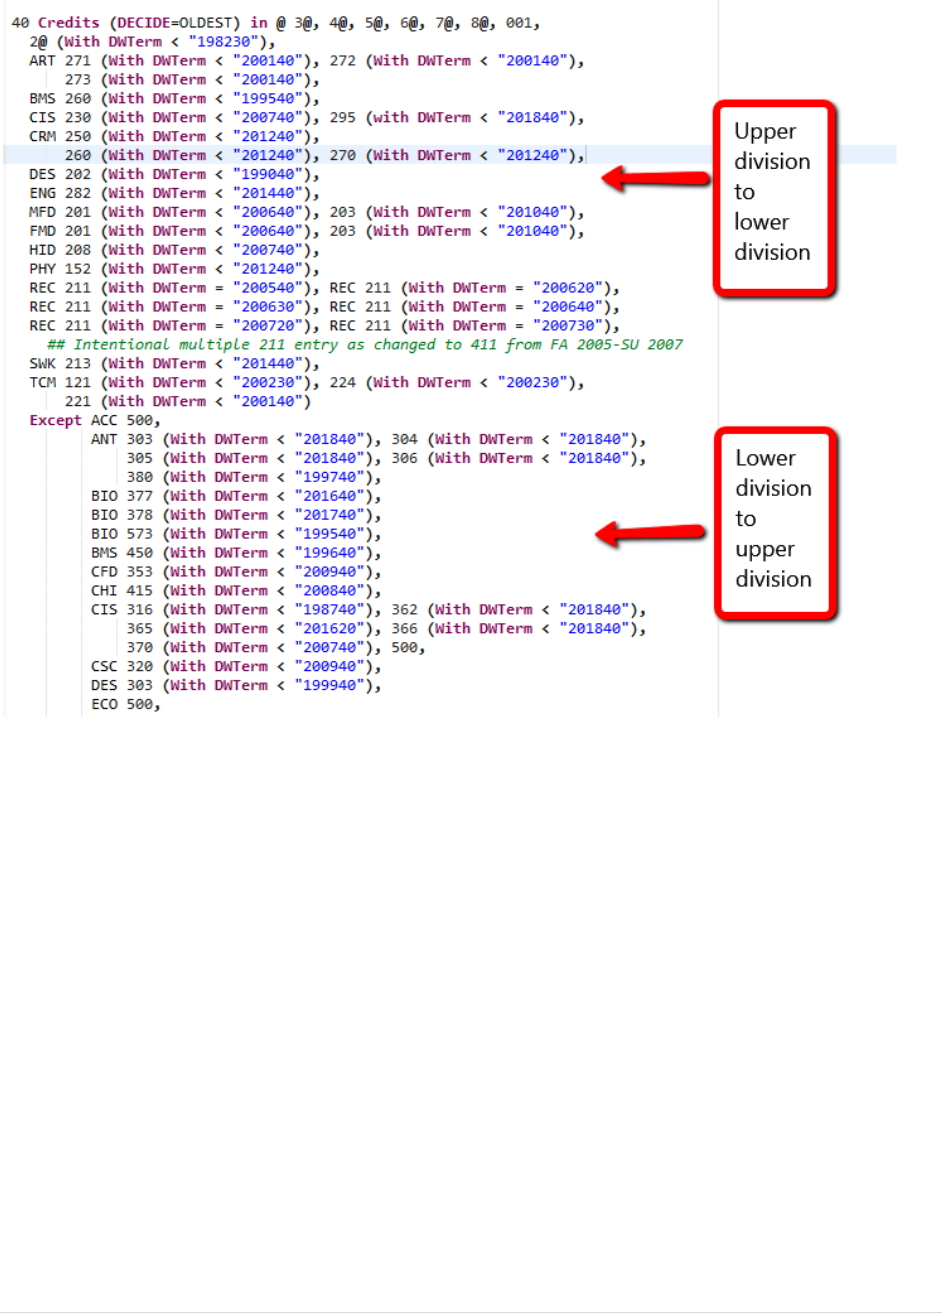
80 | P a g e
Repeat these steps for each programming block associated with one of the undergraduate degree
(BA, BS, BSED, BFA, BMUS, BME, BSN, BSW, BAS, BSAT, BGS) as well as block RA002793
(Administrative 120 Credit and 40 UD Credit Check-Major ZWPA) so that it will reflect in the
Administrative Audit as well.
• The table entry does not finish the process. It will not be picked up until a nightly UCX12JOB runs.
Until this occurs, the degree audit will not recognize the old course code/number and the new
course code/number as the same. You will want to check the following morning to ensure the
conversion is working correctly. Do this by a) making sure the audits are reflecting the new number
when not met and b) is accepting the old number for a student who has already completed the old
number. You can find a student if necessary by looking on a previous class roster (SFASLST) for a
student who passed the old class number.
Changed Course-Course Title Change
• For course title changes, go to SCACRSE in Banner for the upcoming fall semester. Assuming the
course title has been updated (which you’ll know the new title from reviewing the curricular change
form), you can get the title abbreviation that will be used in Banner from this screen, which is what
you will also use in Degree Works.
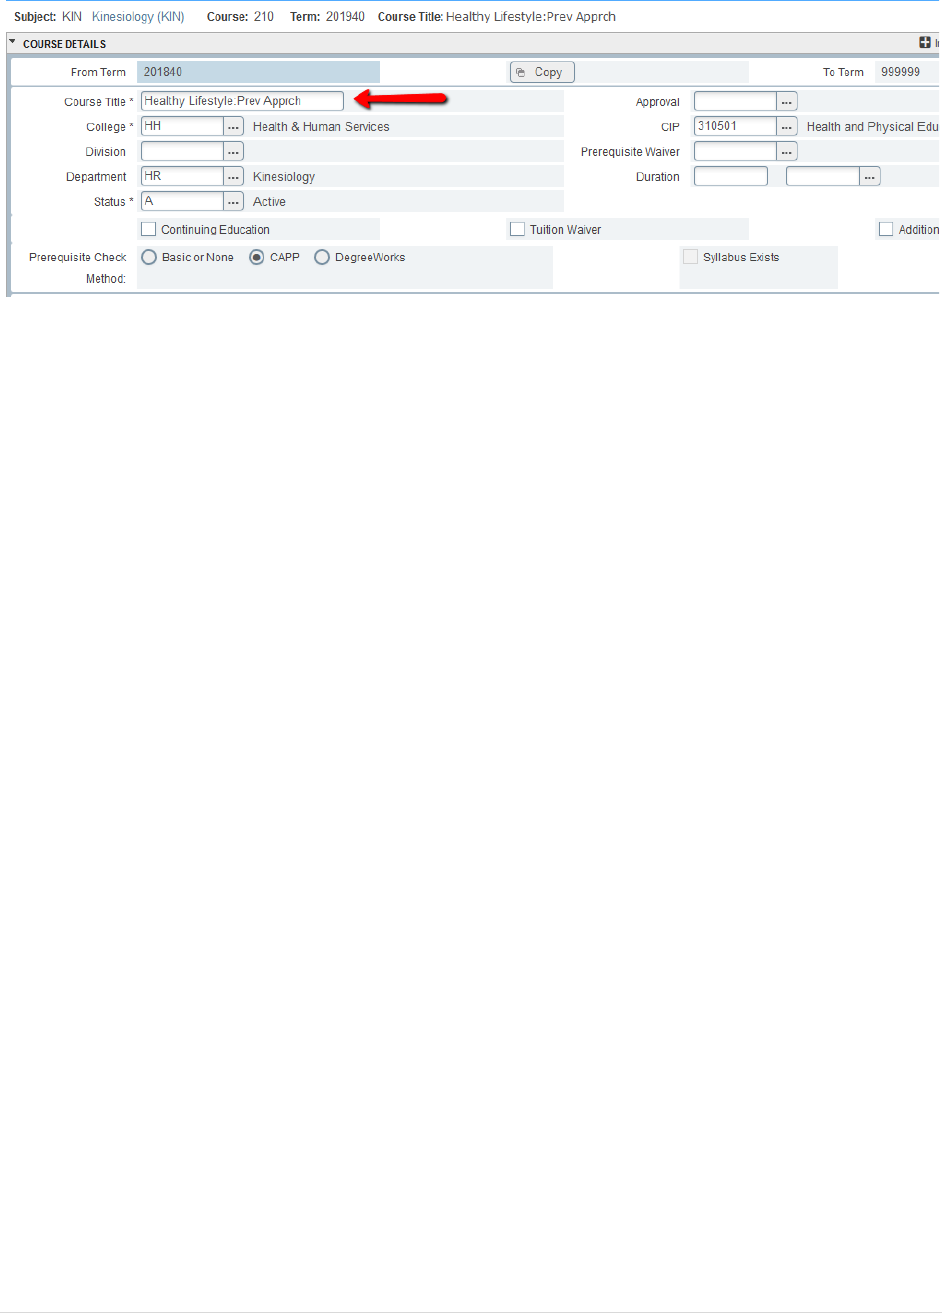
81 | P a g e
• Run SCR02 in Transit to find all Scribe block locations using the course. Review each scribe block to
see if the old title is used in a requirement title. If so, replace it with the new title copied from
SCACRSE.
Changed Course- “Identical with” or “Can only receive credit for 1” Statements
• If the changes include the addition of “Identical with” or “Can only receive credit for 1 of ___
towards graduation” to the description, it needs to be added to the list of credit restrictions found in
the Scribe degree blocks. It will need to include date range programming so only those attempts
taken post-change are affected.
• If the changes include the removal of “Identical with” or “Can only receive credit for 1 of ___
towards graduation” to the description, it needs to be edited in the Scribe degree blocks. It will need
to have date range programming added so only those attempts taken during the restriction are
affected.
Changed Course- “Pass/Not Pass” Only Statements
• If the changes include the additional or removal of a “pass/not pass only” statement, the
programming of majors/minors using this course will need to be edited in a way that facilitates the
change allowing the course to apply to the requirement.
Changed Course- Other Changes
• If credit hour are changing, this does not generally affect Scribe unless a Scribe rule is written to look
for “_ credits” instead of “1 course.” Other changes such as contact hours, periodicity, and
prerequisites generally do not affect degree audit Scribe programming, but should be reviewed to
confirm.
Deleted Course
• Run SCR02 in Transit to find all Scribe block locations using the course.
• If the course was a specified requirement, you cannot change the programming. However, if any
such blocks are active blocks, you will want to confirm that a corresponding program change has
gone through to delete the requirement since the course has been deleted.
• If the course was part of a list of choices, hide the course in the Scribe so that it will continue to
apply for those who completed it, but no longer be in the visible choice list. Hiding does not have to
occur if part of a degree-level credit restriction.
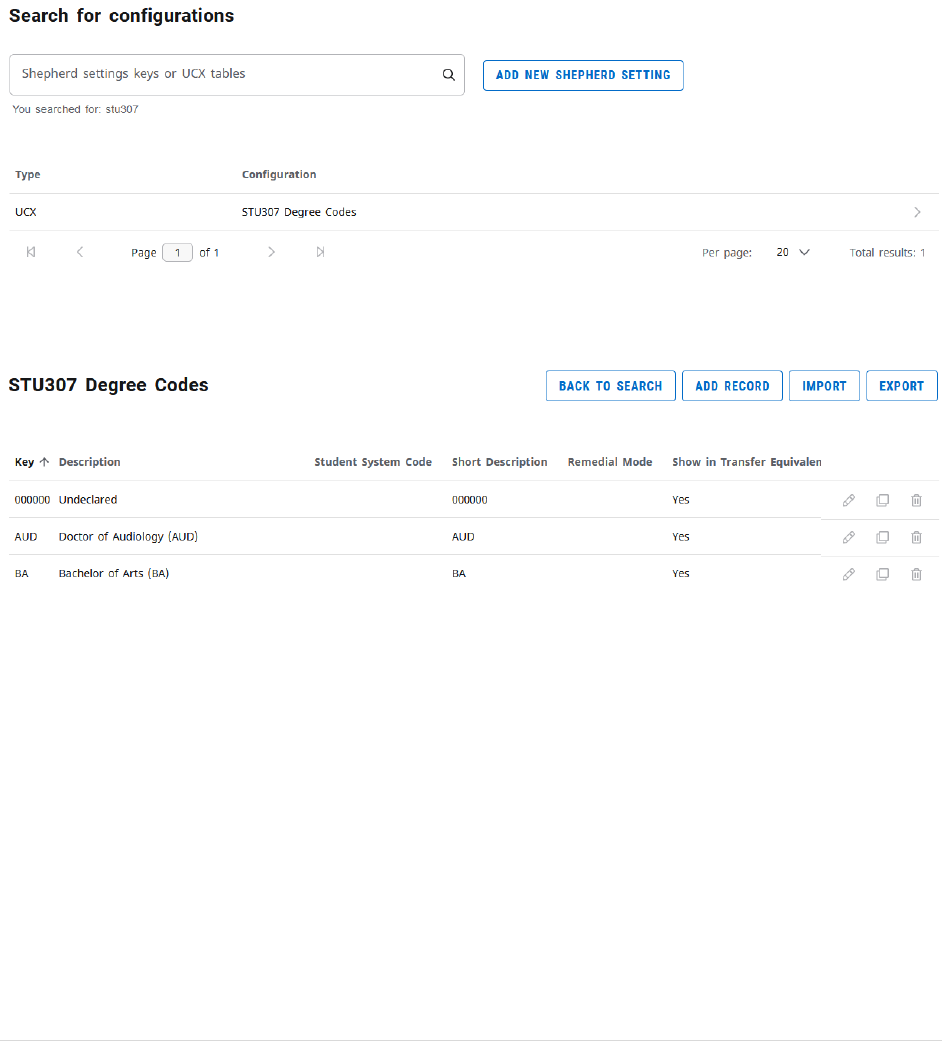
82 | P a g e
Program-Level Changes
On a curricular disposition, it does not delineate directly between a major, certificate, or minor.
Everything is listed under a heading of New, Change, or Delete “Program.” To delineate between a
major/certificate versus a minor, look for a “-<NAME OF DEGREE OR CERTIFICATE>” at the end of the
program name. A major or certificate will have this appendage and a minor will not.
New Degree
• Open Controller, click on the Configuration tab, and search for the STU307 (Degree Codes) table.
Open the result using the right-pointing arrow at the end of the row.
• Check the table to ensure the degree code is not already listed on the table. To add the new degree
code, click the “Add Record” button at the top of the block.
• Fill in the record values as follows. Click the “Save” button when finished.
Key (Degree Code): The letter code that represents the new degree.
Description: The title of the new degree with the key in parathesis behind it.
Short description: The same letter code as the degree code.
Show in TESS Picklist: Yes*
Show in What-If Picklist: Yes*
Show in SEP Picklist: Yes*
Show in Advanced Search Picklist: Yes*
*Notes: You may wish to temporarily indicate No if entered in advance of formal approval.
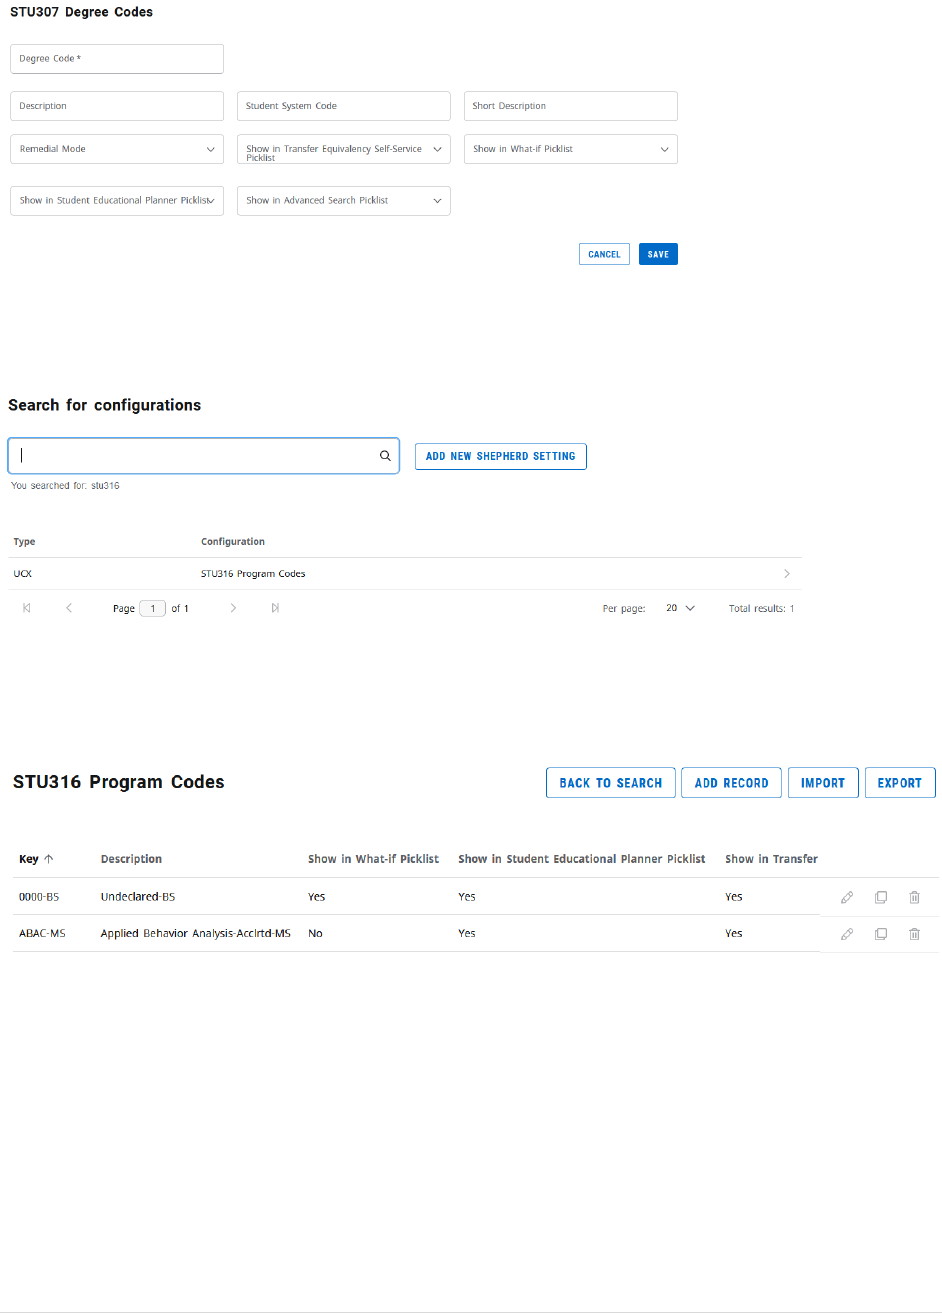
83 | P a g e
New Major, Graduate Program or Certificate
• Open Controller, click on the Configuration tab, and search for the STU316 (Program Codes) table.
Open the result using the right-pointing arrow at the end of the row.
• Check the table to ensure the program code is not already listed on the table. To add the new
degree code, click the “Add Record” button at the top of the block.
• Fill in the record values as follows. Use previous entries as Click the “Save” button when finished.
Key (Program Code): The 4-digit program code followed by appendage code.
Description: The title of the new degree followed by applicable appendages.
Short description: The same letter code as the degree code
Show in What-If Picklist: Yes*
Show in SEP Picklist: Yes*
Show in TESS Picklist: Yes*
Show in Advanced Search Picklist: Yes*
*Notes: You may wish to temporarily indicate No if entered in advance of formal approval.
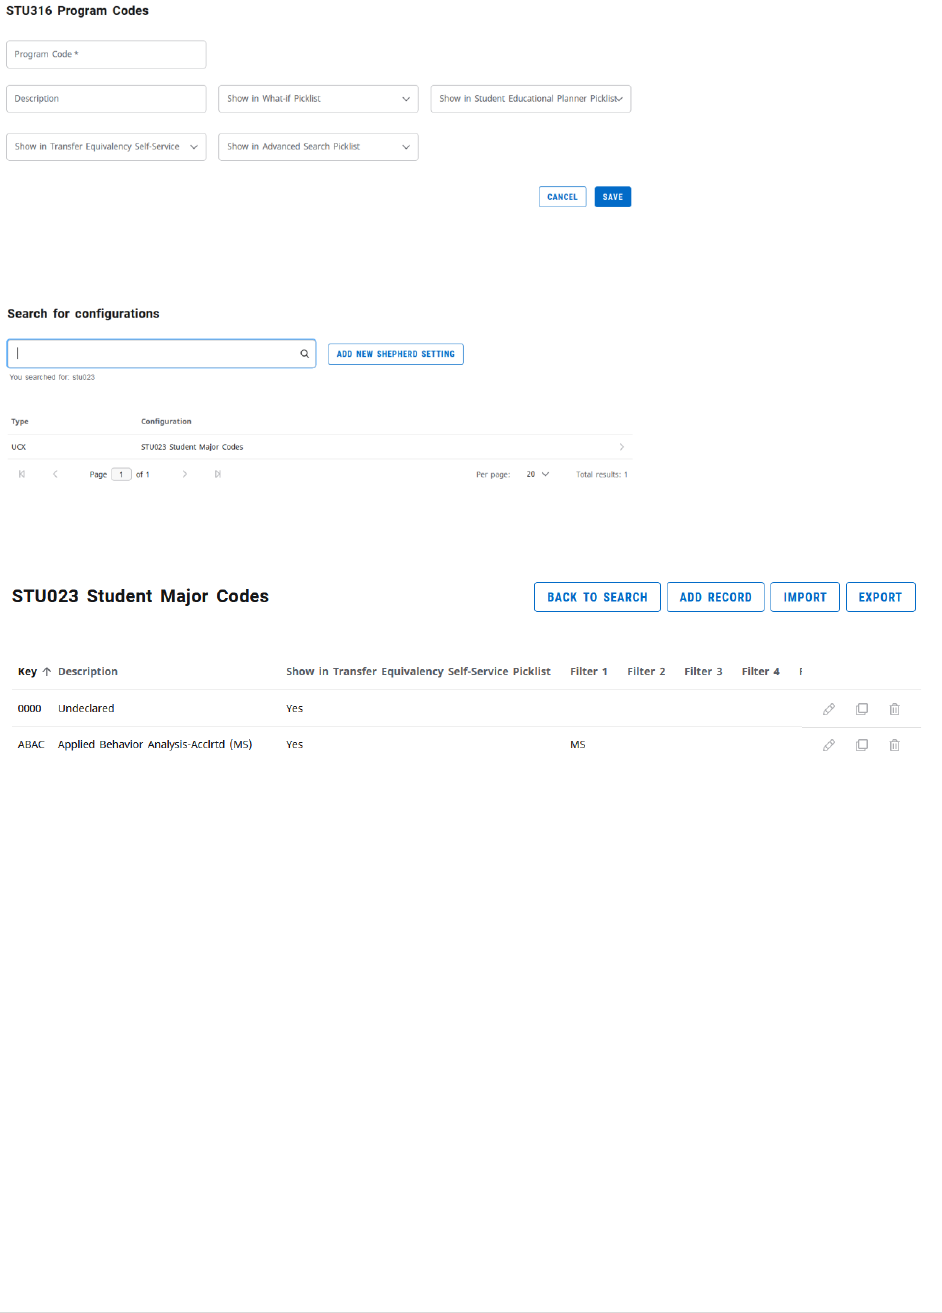
84 | P a g e
• Click on the Configuration tab, and search for the STU023 (Student Major Codes) table. Open the
result using the right-pointing arrow at the end of the row.
• Check the table to ensure the major code is not already listed on the table. To add the new degree
code, click the “Add Record” button at the top of the block.
• Fill in the record values as follows. Use previous entries as examples. Click the “Save” button when
finished.
Key (Program Code): The 4-digit major/graduate program/certificate code
Description: The title of the new degree followed by degree in parenthesis
Show in TESS Picklist: Yes*
Show in SEP Picklist: Yes*
Show in Advanced Search Picklist Yes*
*Notes: You may wish to temporarily indicate No if entered in advance of formal approval.
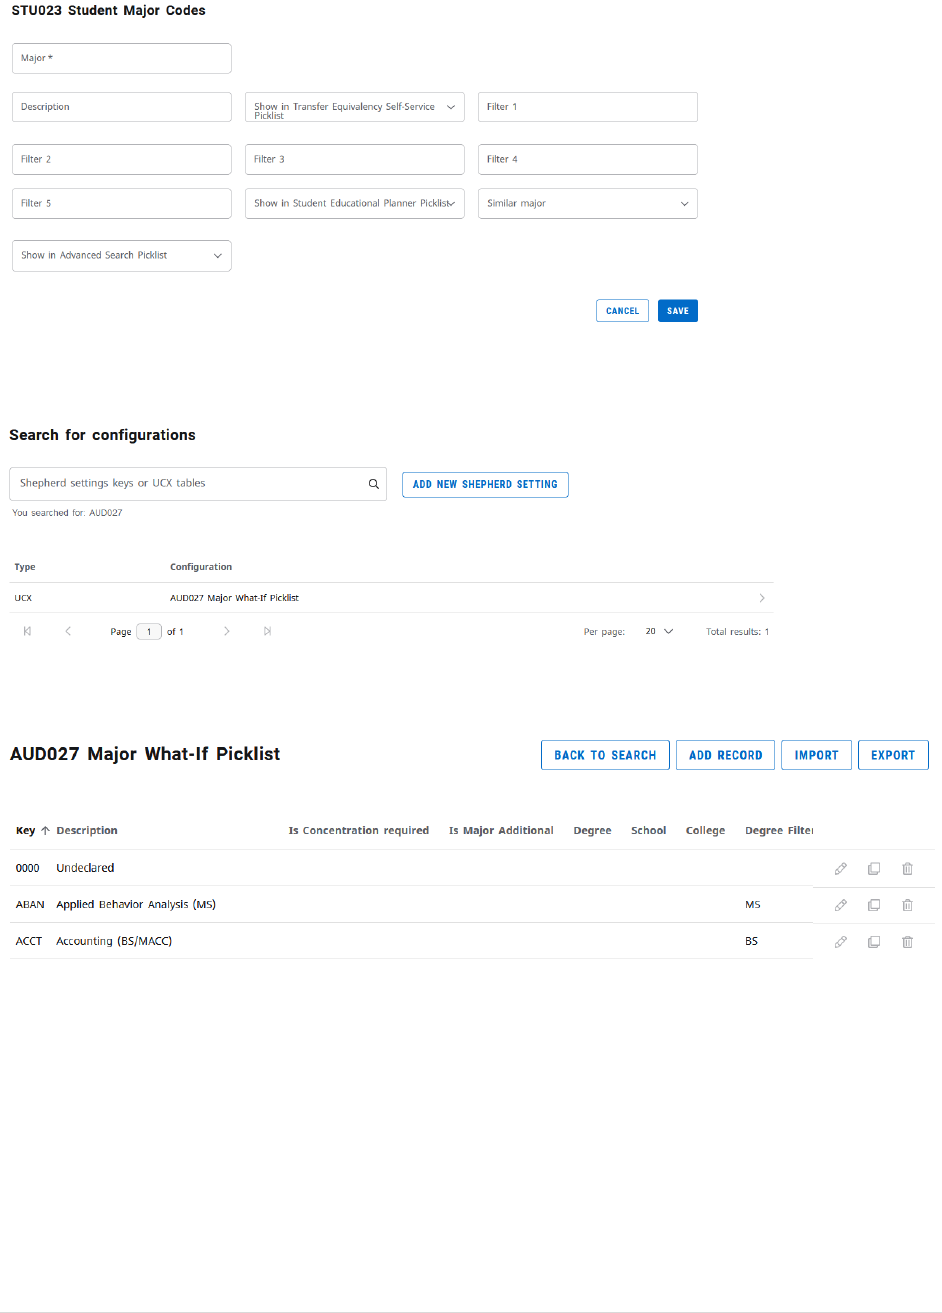
85 | P a g e
• Click on the Configuration tab, and search for the AUD027 (Major What-If Picklist) table. Open the
result using the right-pointing arrow at the end of the row.
• Check the table to ensure the major code is not already listed on the table. To add the new degree
code, click the “Add Record” button at the top of the block.
• Fill in the record values as follows. Use previous entries as Click the “Save” button when finished.
Since this table does not contain a “Yes/No” display option, it should only be completed if the
program has been officially approved by all levels of the curricular approval process, including state
approval as appropriate.
Key (Major Code): The 4-digit major/graduate program/certificate code
Description: The title of the new program.
Degree Filter: Enter the degree for each degree type the major is available under.

86 | P a g e
• Open Scribe. It must be freshly opened (versus already open) in order for the table changes
described above to be in effect. Click “Search Blocks.”
• In the first drop-down box of “Block Type and Value”, click the type of block you wish to select. In
the second drop-down box, select the name or program code you wish to clone to build your new
program. Try to select a like program (major for major, certificate for certificate, etc.) and if possible,
pick one with similar requirements. For example, if there is an unusual requirement such as “15
hours from at least 4 different areas”, see if you can find an existing program with a similar
requirement. Click the “Search for Blocks” button to get a list of search results.
• This will open the Scribe block search result screen. Click on the title of the block you wish to open.

87 | P a g e
• The next step is to clone the old block to create the new block. To do this, click “Save As” (NOT
SAVE) in the upper left portion of the page.
• The “Save As a New Block” screen will open. Change the following items and click the “Save” button
in the bottom right portion of the box when complete.
1) Change the title to “Major in” or “UG/GR Certificate in” followed by the name of the new
program including option if applicable.
2) Change the second drop down menu in Block Type and Value to the new program.
3) Change the “Start Catalog Year” to the new catalog term for when these requirements begin.
4) Change the “Stop Catalog Year” term to 999999 (The End of Time). Click “Save” in the bottom
right.
5) Change the “Degree” if necessary.
• Make all relevant Scribe changes and click “Save” (not Save As) when complete.

88 | P a g e
New Minor
• Open Controller, click on the Configuration tab, and search for the STU024 (Student Minor Codes)
table. Open the result using the right-pointing arrow at the end of the row.
• Check the table to ensure the minor code is not already listed on the table. To add the new degree
code, click the “Add Record” button at the top of the block.
• Fill in the record values as follows. Use previous entries as examples. Click the “Save” button when
finished.
Key (Program Code): The 4-digit minor code
Description: The title followed by degree type in parenthesis
Show in TESS Picklist: Yes*
Show in SEP Picklist: Yes*
Show in Advanced Search Picklist: Yes*
*Notes: You may wish to temporarily indicate No if entered in advance of formal approval.
• Click on the Configuration tab, and search for the AUD029 (Minor What-If Picklist) table. Open the
result using the right-pointing arrow at the end of the row.

89 | P a g e
• Check the table to ensure the minor code is not already listed on the table. To add the new degree
code, click the “Add Record” button at the top of the block.
• Fill in the record values as follows. Use previous entries as Click the “Save” button when finished.
Since this table does not contain a “Yes/No” display option, it should only be completed if the
program has been officially approved by all levels of the curricular approval process, including state
approval as appropriate.
Key (Major Code): The 4-digit minor code
Description: The title of the new minor.
• Open Scribe. It must be freshly opened (versus already open) in order for the table changes
described above to be in effect. Click “Search Blocks.”
• In the first drop-down box of “Block Type and Value”, click the type of block you wish to select. In
the second drop-down box, select the name or program code you wish to clone to build your new
program. Try to select a like program (minor for minor) and if possible, pick one with similar
requirements. For example, if there is an unusual requirement such as “15 hours from at least 4
different areas”, see if you can find an existing program with a similar requirement. Click the
“Search for Blocks” button to get a list of search results.
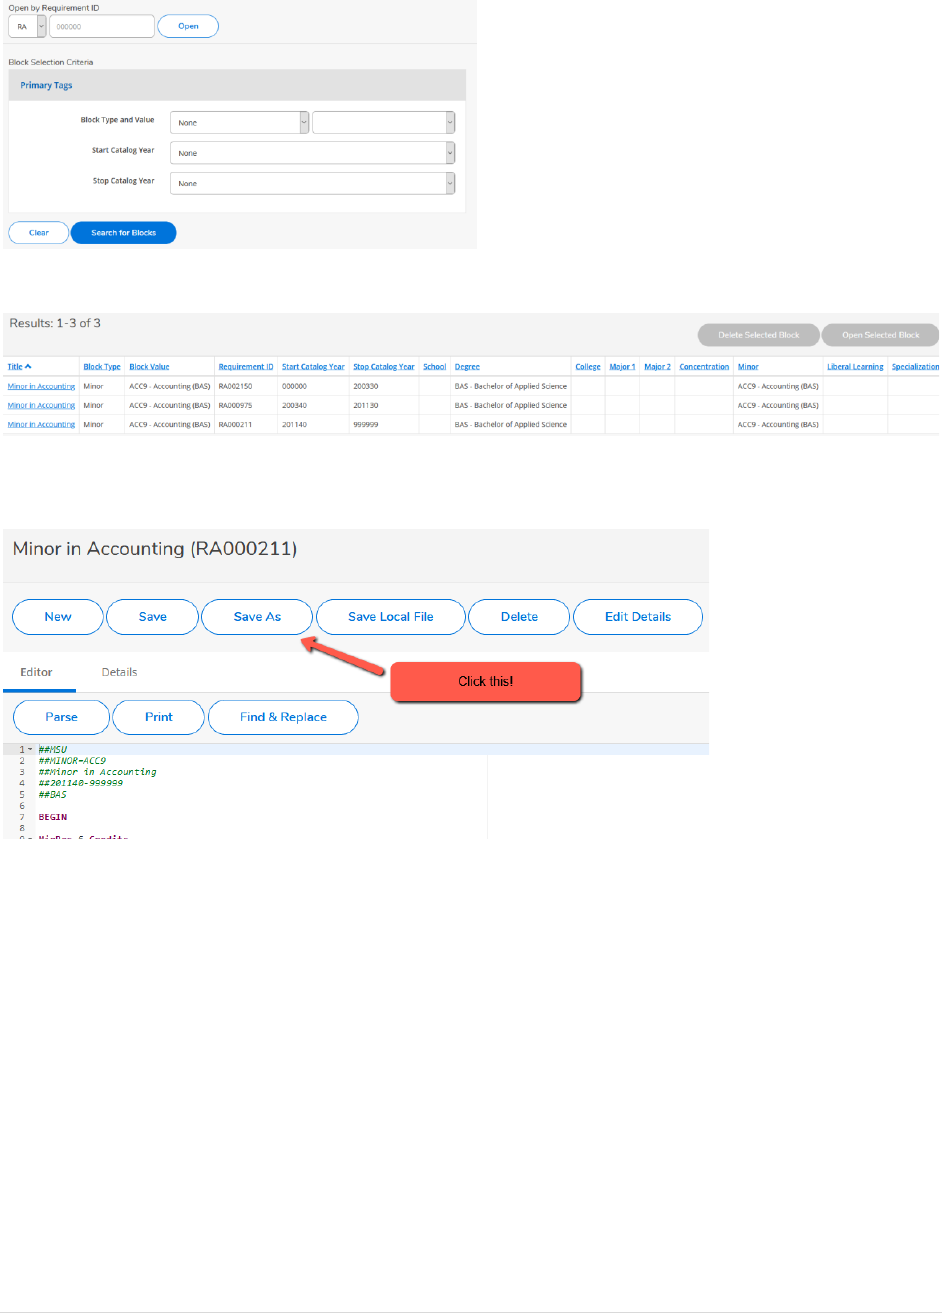
90 | P a g e
• This will open the Scribe block search result screen. Click on the title of the block you wish to open.
• The next step is to clone the old block to create the new block. To do this, click “Save As” (NOT
SAVE) in the upper left portion of the page.
• The “Save As a New Block” screen will open. Change the following items and click the “Save” button
in the bottom right portion of the box when complete.
1. Change the title to “Minor in” followed by the name of the new program including option if
applicable.
2. Change the second drop down menu in Block Type and Value to the new program.
3. Change the “Start Catalog Year” to the new catalog term for when these requirements begin.
4. Change the “Stop Catalog Year” term to 999999 (The End of Time).
5. Change the “Degree” if necessary.
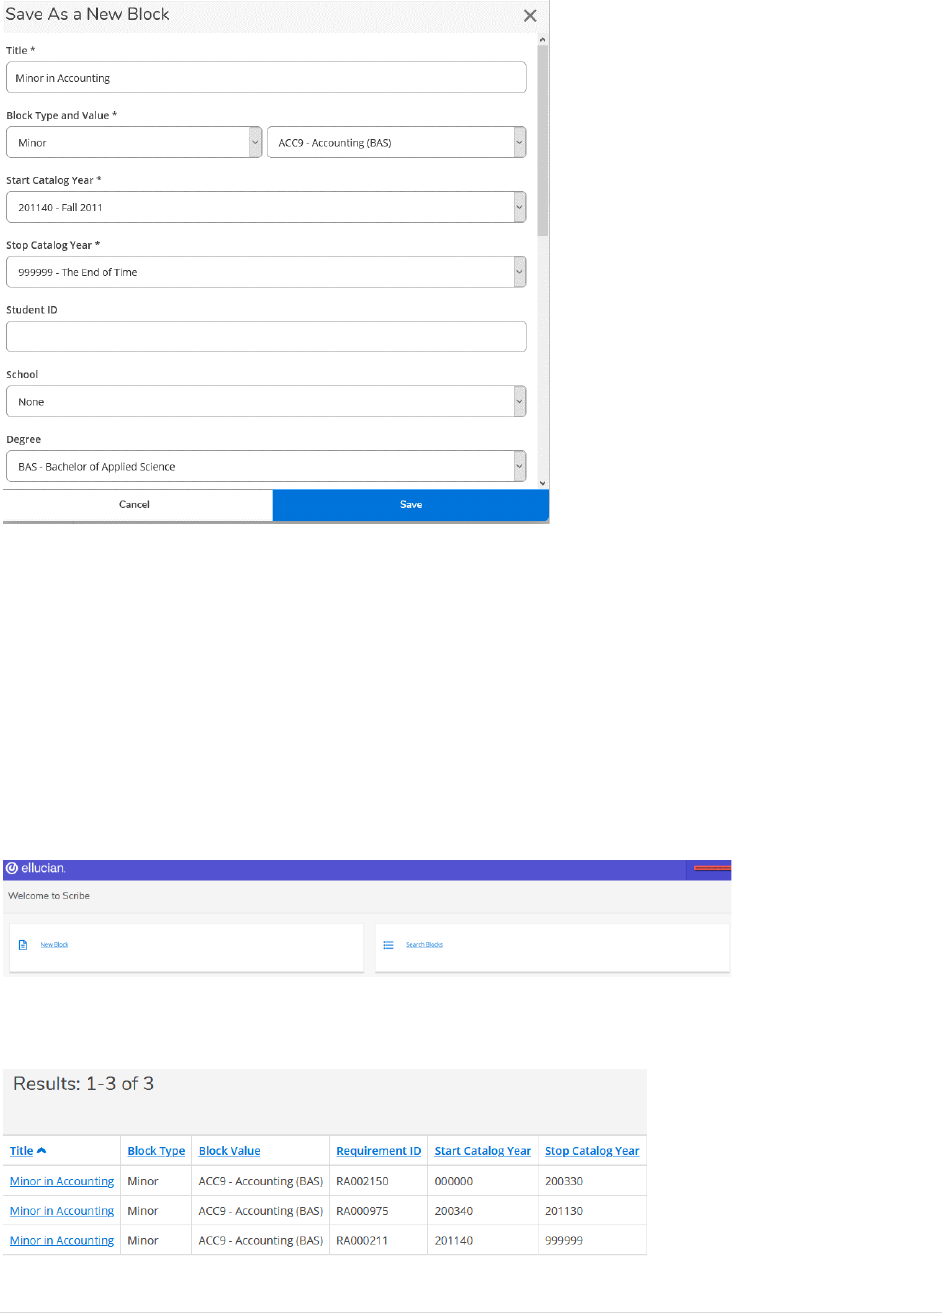
91 | P a g e
• Make all relevant Scribe changes and click “Save” (not Save As) when complete.
Changed Major, Minor, Graduate Program, or Certificate-Program Name Change or
Comprehensive/Non-Comprehensive Change
If an existing program’s only change is to change the program name or move from comprehensive to
non-comprehensive (or vise-versa), a new program code is required. The new program code would
follow the New Major, Graduate Program, or Certificate protocol and the old program code would
follow the Deleted Major, Graduate Program or Certificate protocol.
Changed Major, Minor, Graduate Program, or Certificate-Catalog Program Changes
• Open Scribe and click “Search Blocks.”
• Find the current programming block (will have a stop catalog year of 999999) and open it by clicking
on the block title.
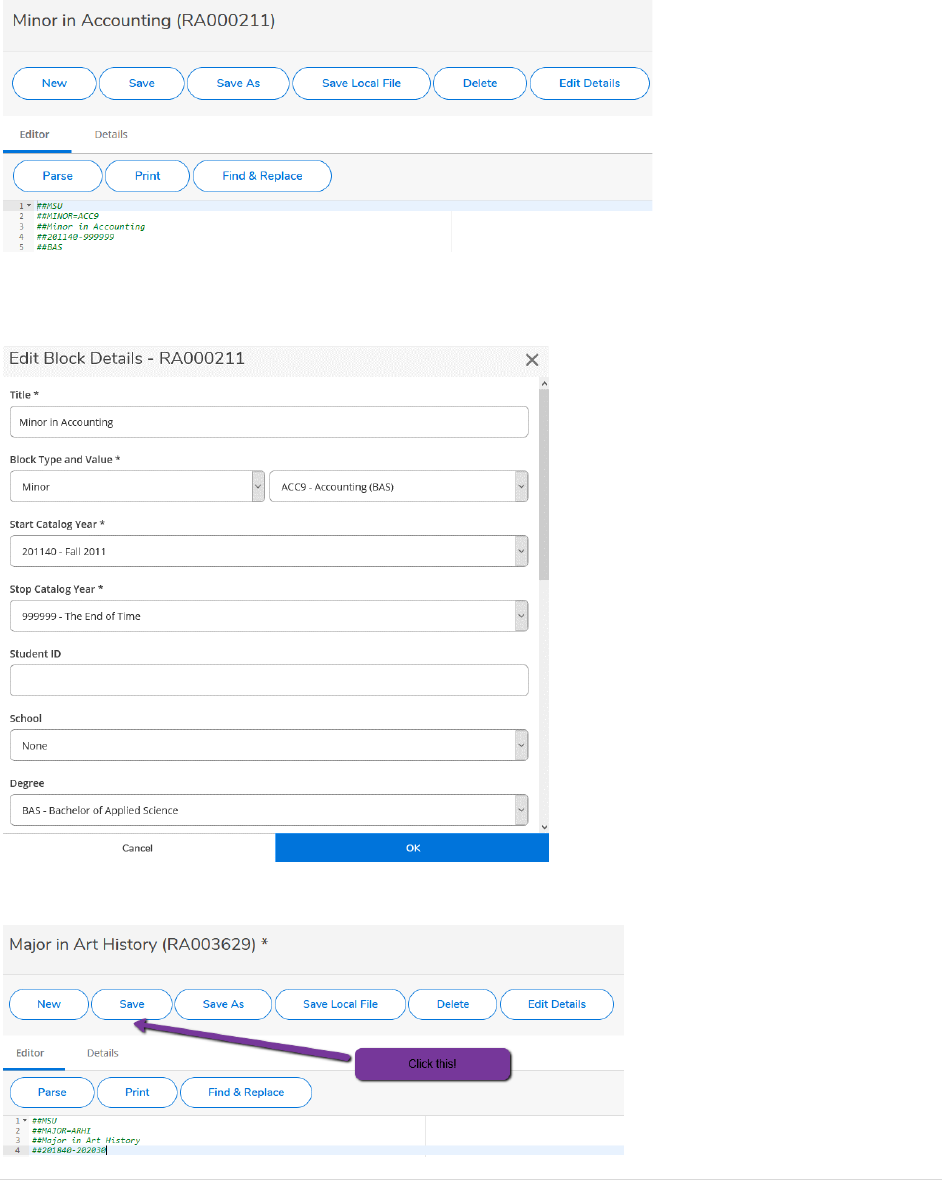
92 | P a g e
• Change the “999999” on line 4 to the last semester that the current program requirements will be
active. For example, if the changed program requirements were to begin in fall 2020 (202040), you
would change this to summer 2020 (202030). Click the “Edit Details” button near the top of the
block.
• Change the “Stop Catalog Year” to the last semester that the current program requirements will be
active. Click the “OK” button to close the Edit Block Details box.
• Click “Save” (not Save As) when complete.
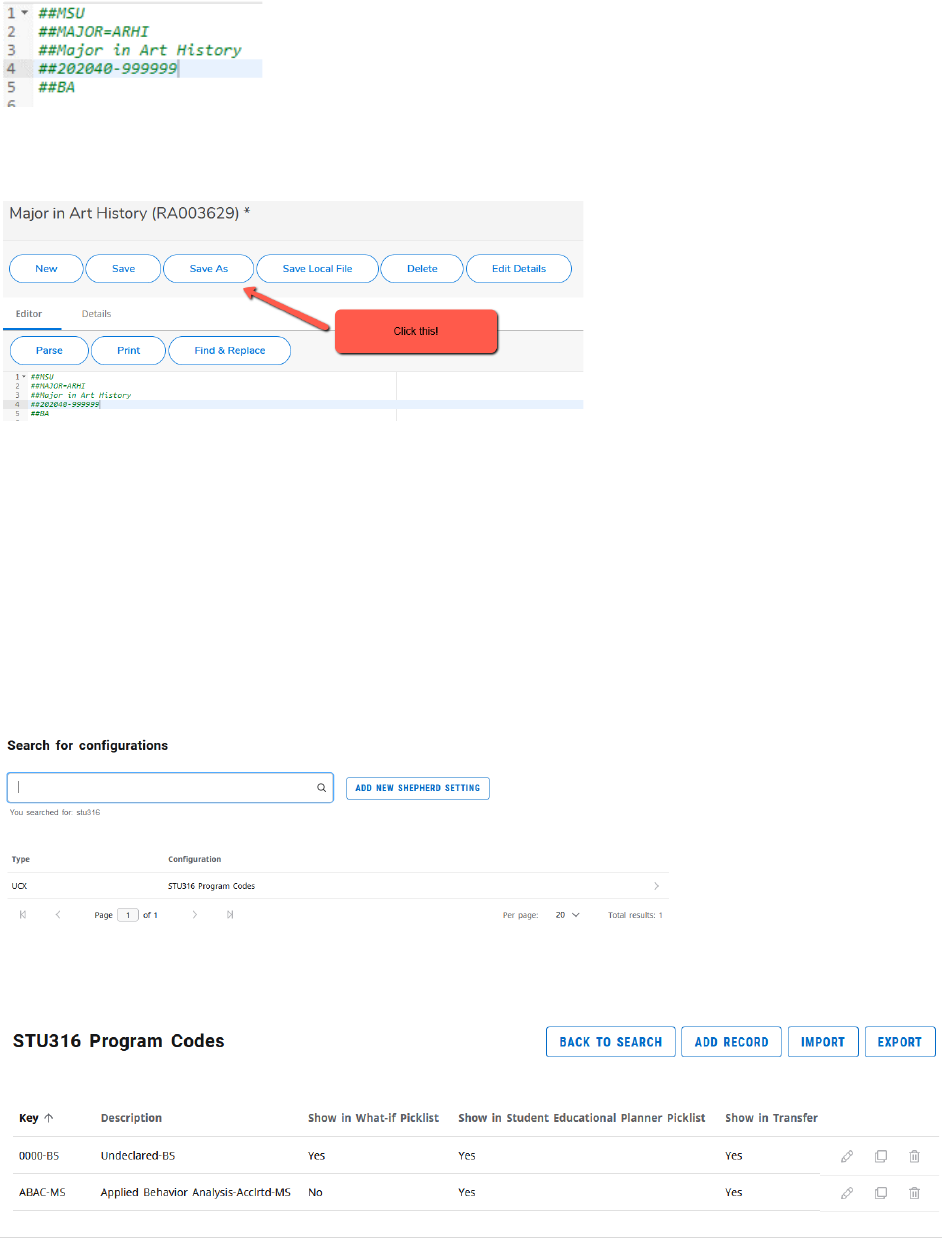
93 | P a g e
• Change the date range on line 4 to start with the semester that the new requirements go into effect
and ending with 999999 (representing the end of time.
• The next step is to clone this block to create the new block. To do this, click “Save As” (NOT SAVE) in
the upper left portion of the page.
• The “Save As a New Block” screen will open. Change the following items and click the “Save” button
in the bottom right portion of the box when complete.
1. Change the “Start Catalog Year” to the semester in which the new requirements will begin.
2. Change the “Stop Catalog Year” term to 999999 (The End of Time).
• Make all relevant Scribe changes and click “Save” (not Save As) when complete.
Deleted Major, Graduate Program, or Certificate
• Open Controller, click on the Configuration tab, and search for the STU316 (Program Codes) table.
Open the result using the right-pointing arrow at the end of the row.
• Find the program code that is being ended. Click the Edit (pencil) icon on the right side of the
corresponding row.

94 | P a g e
• In the description field, add a “z-“ in front of the existing title. This will cause it to sort alphabetically
to the bottom of any corresponding Degree Works drop-down menus. Click the “Save” button when
finished.
• Click on the Configuration tab, and search for the STU023 (Student Major Codes) table. Open the
result using the right-pointing arrow at the end of the row.
• Find the program code that is being ended. Click the Edit (pencil) icon on the right side of the
corresponding row.
• In the description field, add a “z-“ in front of the existing title. This will cause it to sort alphabetically
to the bottom of any corresponding Degree Works drop-down menus. Click the “Save” button when
finished.
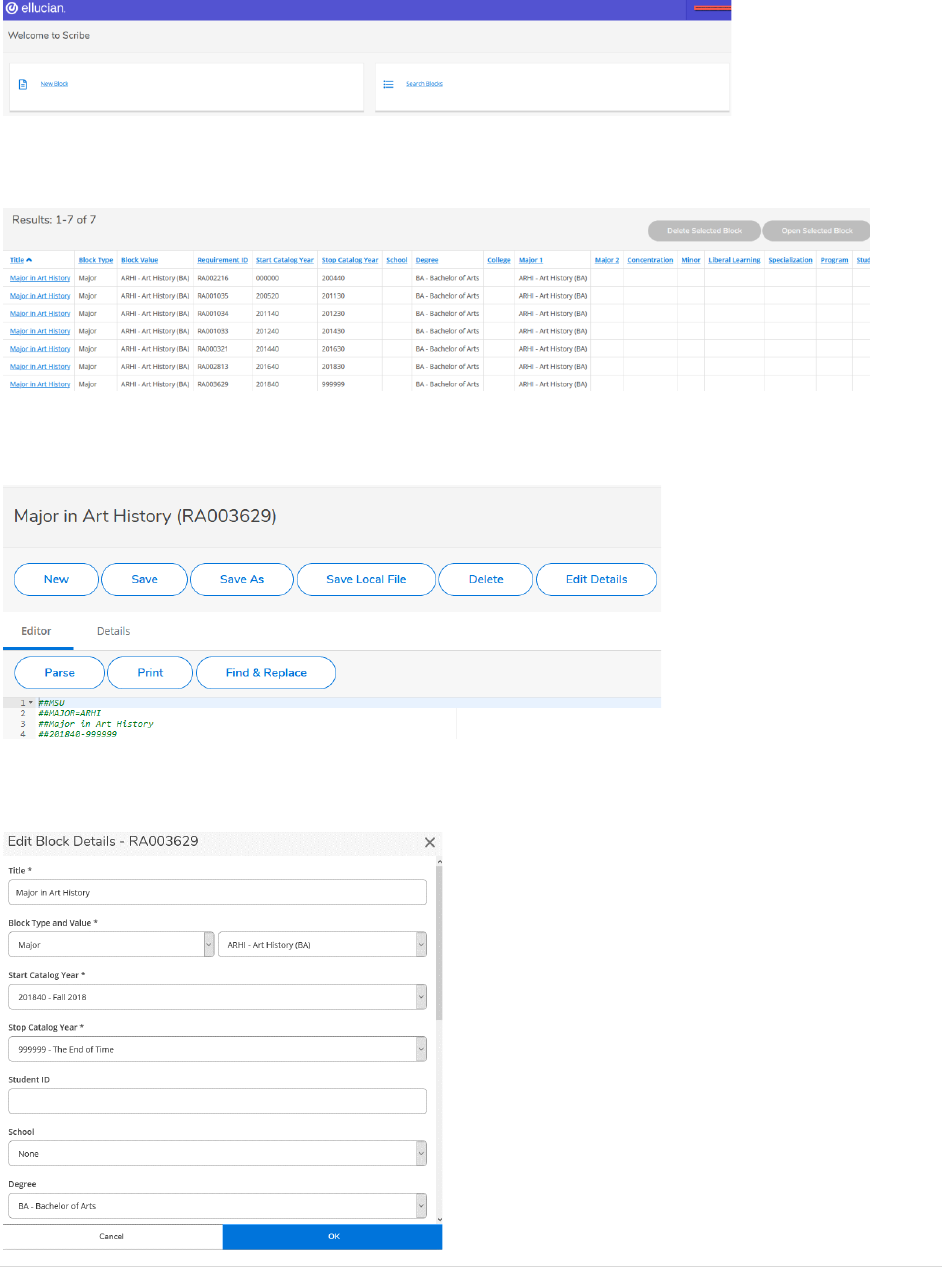
95 | P a g e
• Open Scribe. Click “Search Blocks.”
• Find the current programming block (will have a stop catalog year of 999999) and open it by clicking
on the block title.
• Change the “999999” on line 4 to the last semester that the program will be active. Click the “Edit
Details” button near the top of the block.
• Change the “Stop Catalog Year” to the last semester that the program will be active. Click the “OK”
button to close the Edit Block Details box.
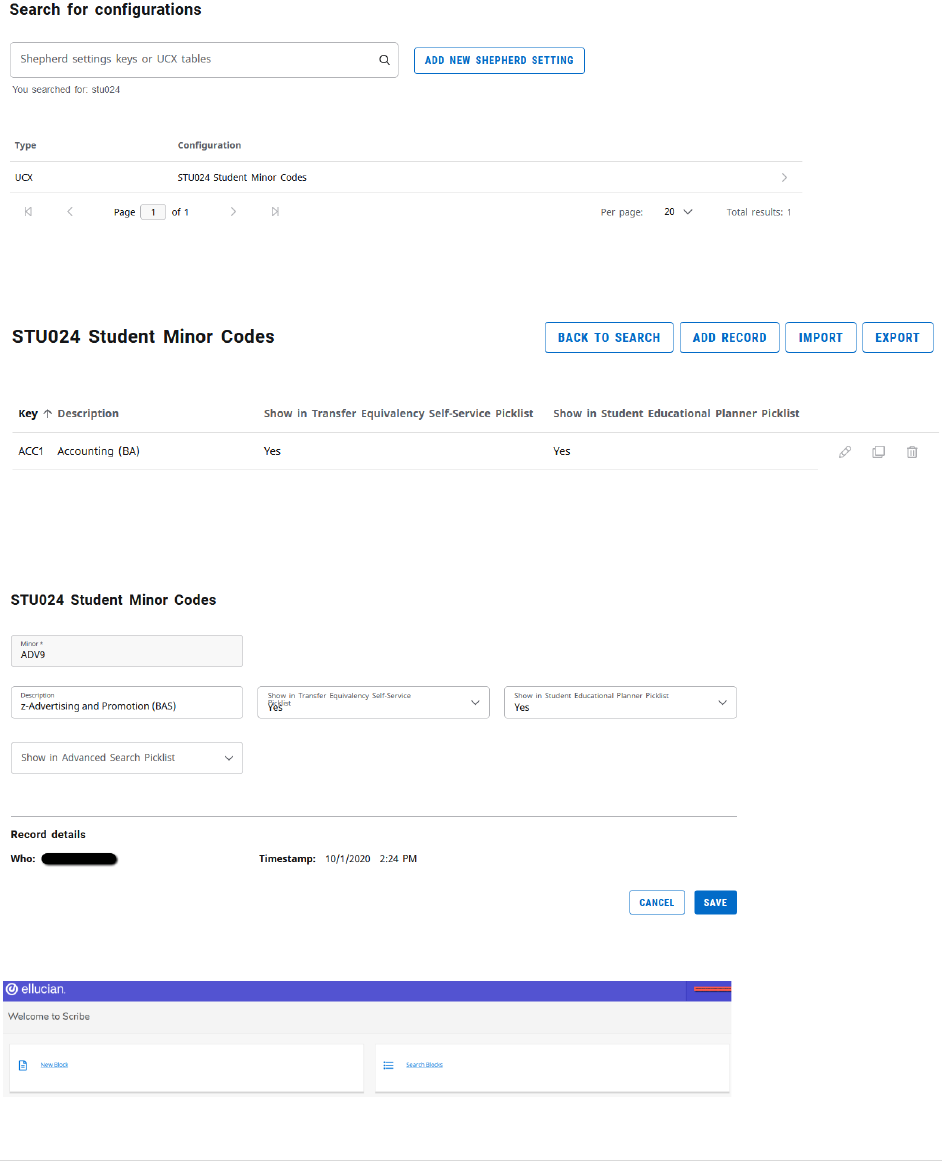
96 | P a g e
• Click “Save” (not Save As) when complete.
Deleted Minor
• Open Controller, click on the Configuration tab, and search for the STU024 (Student Minor Codes)
table. Open the result using the right-pointing arrow at the end of the row.
• Find the program code that is being ended. Click the Edit (pencil) icon on the right side of the
corresponding row.
• In the description field, add a “z-“ in front of the existing title. This will cause it to sort alphabetically
to the bottom of any corresponding Degree Works drop-down menus. Click the “Save” button when
finished.
• Open Scribe. Click “Search Blocks.”

97 | P a g e
• Find the current programming block (will have a stop catalog year of 999999) and open it by clicking
on the block title.
• Change the “999999” on line 4 to the last semester that the minor will be active. Click the “Edit
Details” button near the top of the block.
• Change the “Stop Catalog Year” to the last semester that the minor will be active. Click the “OK”
button to close the Edit Block Details box.
• Click “Save” (not Save As) when complete.
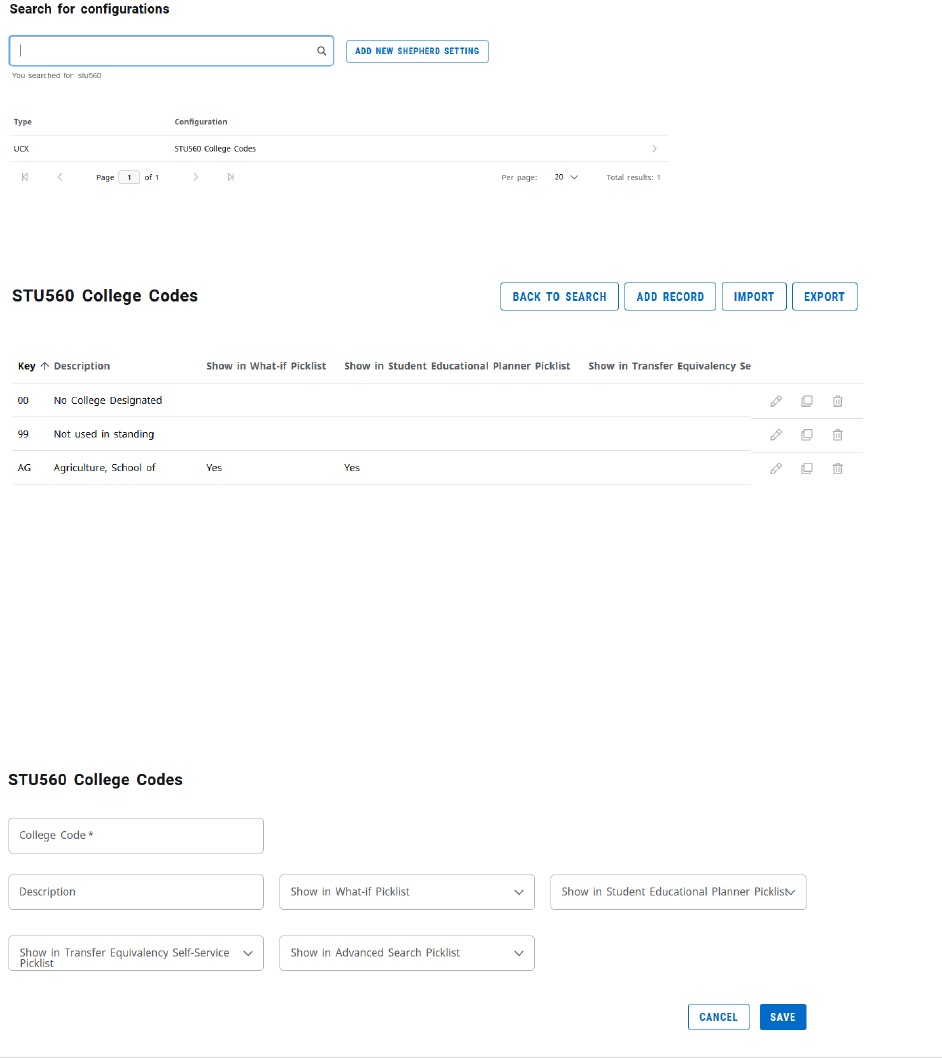
98 | P a g e
Other Table Changes
Department Code or Assignment Changes
These types of changes do not require any Degree Works table changes.
New College
• Open Controller, click on the Configuration tab, and search for the STU560 (College Codes) table.
Open the result using the right-pointing arrow at the end of the row.
• Check the table to ensure the college code is not already listed on the table. To add the new degree
code, click the “Add Record” button at the top of the block.
• Fill in the record values as follows. Use previous entries as examples. Click the “Save” button when
finished.
Key (Program Code): The 2-digit college code
Description: The title of the new college
Show in What-If Picklist: Yes
Show in SEP Picklist: Yes
Show in TESS Picklist: Yes
Show in Advanced Search Picklist: Yes
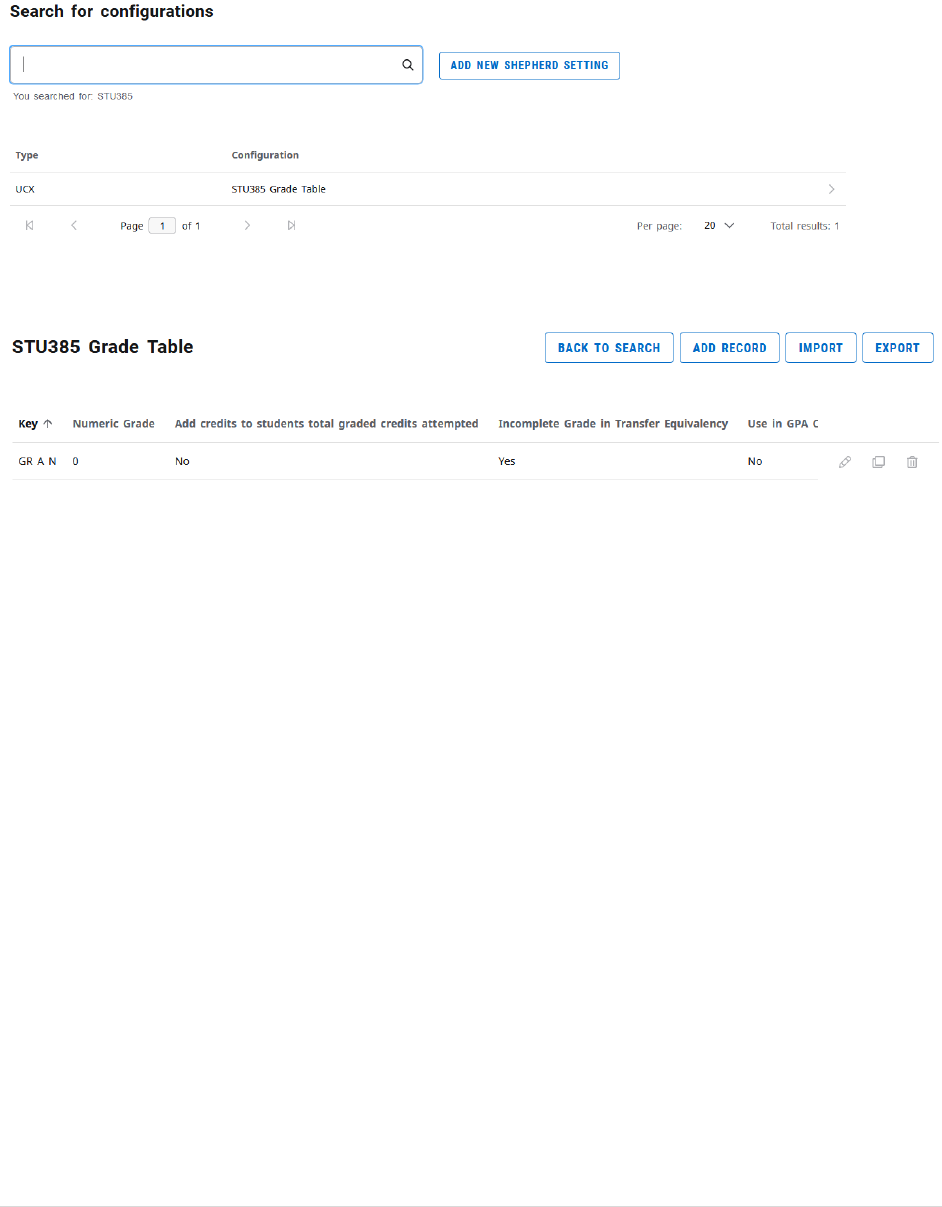
99 | P a g e
New Grade
• Open Controller, click on the Configuration tab, and search for the STU385 (Grade Table) table.
Open the result using the right-pointing arrow at the end of the row.
• Check the table to ensure the grade is not already listed on the table. To add the new degree code,
click the “Add Record” button at the top of the block.
The keys in this table are specific about spacing, which looks misleading without opening an existing
entry to see where the letters should line up. The key will consist of the school code (UG/GR), the grade
type code (grade mode), and the final grade. The fields used will vary depending on the characteristics
of the grade, including the numeric value of the grade. There are a variety of override flags that can be
used to help direct how grades should be treated, such as whether they should be considered in
progress, insufficient, incomplete, or like pass/fail. There is also an override value to tell it to “treat it
like a particular final grade number” even when the grade has no numeric value itself (such as treating
institutional exam credit as a “C” or better value). Please consult Ellucian documentation for this table if
you have questions about what values should be selected.
Currrule Extract for New Majors, Graduate Programs, Certificates, and Minors
When a new major, graduate program, certificate, or minor is added, there are steps outside of the
table updates that must occur for the new code to become active in Degree Works. This cannot take
place until the corresponding code has been built in Banner. Once the new code is built in Banner, you
must request a currrule extract to be run. This is requested through an email to the technical lead and
takes them generally less than two minutes to run. Once the currrule extract is run, the new codes
added to Degree Works in these various processes will begin to show up in the corresponding what-if
degree audit drop-down menus.
Curricular Program Changes Spreadsheet Usage
As part of the annual Undergraduate Catalog update process, there is a Program and Course Changes
spreadsheet created. This document is a very helpful supplement to the Degree Works curricular
updates process. It allows for the tracking of where programs are at in terms of official approval. The
document includes the following sections:

100 | P a g e
• New Undergraduate Programs (including the new program code)
• New Graduate Programs (including the new program code)
• Deleted Undergraduate Programs (including the program codes to be deleted)
• Deleted Graduate Programs (including the program codes to be deleted)
• Program Title and Other Changes (including all affected program codes)
• New Alternate Pathway Program Codes
• Course Code/Number Changes
• Other Significant Changes and/or Reorganizations
This document will be shared with appropriate Office of the Registrar staff through Office 365. It is
recommended to use this document to code programs that you may be proactively adding to Degree
Works tables so that you can begin building, but that may not be completely through all steps of the
official approval process yet. Below is a chart of the symbols traditionally used in this tracking. The
spreadsheet is updated monthly, so you can update your coding accordingly.
For use on the left side of the code
For use on the right side of the spreadsheet
NA=Not activated (updates to be made)
1=STU 316 (Majors/certificates only)
A=Activated (Controller updates complete)
2=STU 023/024 as applicable
3=AUD 027/029 as applicable
Test Code Programming
• Come up with a four-digit test code to represent the desired test. Look on Banner form STVTESC to
see test score codes already used.
• Ask for someone with edit access to Banner form STVTESC to build the code as follows:
a. Test code: The four-digit test code you desire
b. Description: A short description of the test
c. Maximum Number of Positions: 1
d. Data Type: Unchecked
e. Minimum Score: N
f. Maximum Score: Y
g. System Required: Unchecked
• Write the related Scribe programming using the example below. Save it below the log so it will parse
until the other steps are complete.
If (ACSM = "Y") Then
Rule-Complete
Label 46 "ACSM Certified Exercise Physiologist Exam Passed"
Else
If (NSCA = "Y") Then

101 | P a g e
Rule-Complete
Label 47 "NSCA Certified Strength and Conditioning Specialist Exam Passed"
Else
If (EMFE = "Y") Then
Rule-Complete
Label 48 "Major Field Achievement Exam 70th Percentile Achieved"
Else
Rule-Incomplete
Proxy-Advice "Exercise and Movement Science majors must pass the ACSM"
Proxy-Advice "Certified Exercise Physiologist"
Proxy-Advice "Exam, or the NSCA Certified Strength and"
Proxy-Advice "Conditioning Specialist Exam, or score at least at the 70th"
Proxy-Advice "percentile on a major field achievement exam."
Label 49 "Exercise and Movement Science Exam Requirement";
• Enter the code in the Degree Works Controller table SCR002: Custom Data as outlined in that
section of this guide.
• Enter the code in the Degree Works Controller table SEP006: Test Codes as outlined in that section
of this guide.
• Enter the code in the Degree Works Controller table SEP007: Test Score Sort Order as outlined in
that section of this guide.
• Go back to your Scribe and copy the test score programming into the proper place, saving it to make
sure it parses.
• Test it as follows:
1. Run a what-if audit to make sure the rule appears correctly when unmet.
2. Test each applicable test code (going from bottom to top if there is more than one) to ensure
that the test code is being picked up and in the proper sequencing. You can do this by assigning
the test code to a sample student and deleting it at the conclusion of the test.
• Send a request to Information Security requesting edit access to SOATEST for those who will be
responsible for entering these.
• Provide the following SOATEST entry instructions to those who will enter these scores.
1. Login to Administrative Banner.
2. Go to the form SOATEST.

102 | P a g e
3. Enter the student’s BearPass number (M-number) in the ID field. Click the “Go” button.
4. Click the “Insert” button on the right side of the Test Score Information block.
5. A blank row will open. Fill in the information as follows:
a. Test Code: Enter the test code (Tab and the description will automatically fill in).
b. Test Score: Y
c. Test Date: The date the exam was passed (mm/dd/yyyy).
6. Click “Save” in the bottom right.
Individualized Majors
• The approving department will send in an Individualized Major form with all of the corresponding
approval signatures along with an Application to Degree Program form. Look to see if there is a
corresponding program code already built in Banner for an Individualized Major from that
department as you go to process their major change. If you don’t find a corresponding Individualized
Major code, one will need to be built as described in the next bullet.
• This bullet contains the steps necessary to build the program code in Banner. If you need this built,
ask the Associate Registrar-Degree Programs and Advisement Support to build this. If the program
code is already built in Banner, you can proceed to the next bullet.
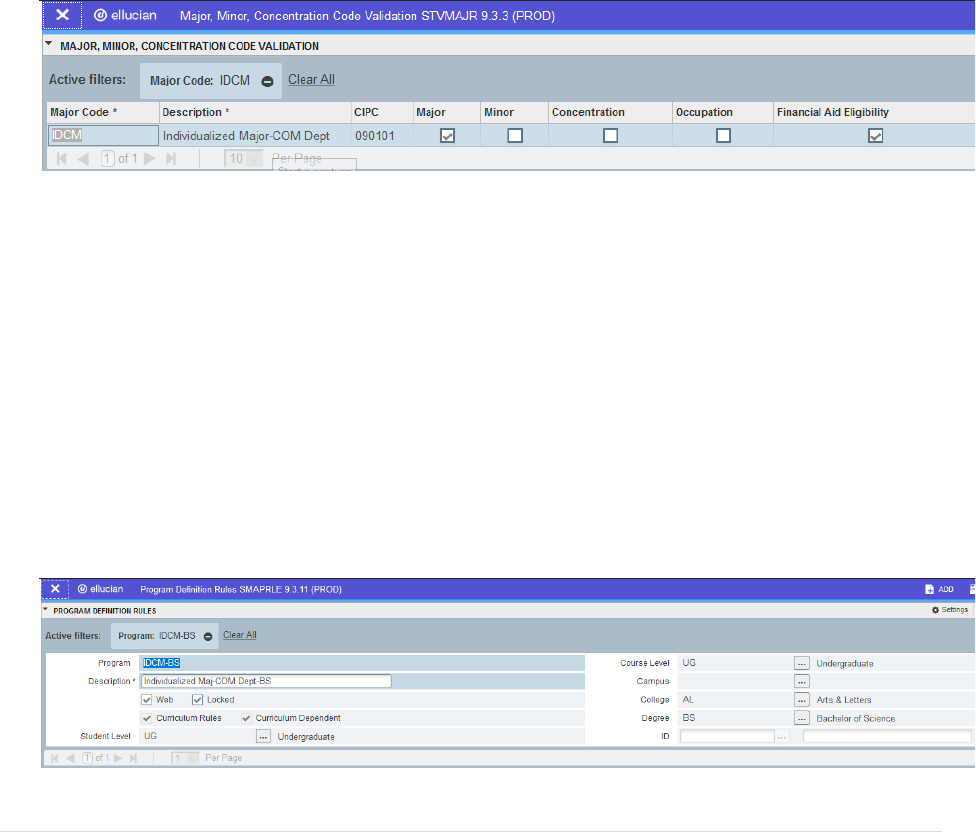
103 | P a g e
1. Open INB Banner and go to STVMAJR.
2. In order to fill out STVMAJR, you will need to get some information in advance. One piece you
will need is a CIPC code. To determine this, you will want to find the CIPC of the most closely
related major from the corresponding department. You can do this by finding the CIPC code
from that code’s entry on STVMAJR. You can scroll through the list or query it. Write this down-
it is a 6-digit number.
3. Once you have this, you can enter the code on STVMAJR. You will want to click on the first row,
go to the “Record” menu, and click “Insert” (or keyboard shortcut F6). This will create a blank
row. You will want to fill this in as illustrated in the example below. The “Major Code” is the first
four letters (omit the “-BS/BA”). The “Description” is “Individualized Major-___ Dept”. The “___”
should be three letters that best abbreviate the department’s name. You should check the
“Major” and “Financial Aid Eligibility” checkboxes. When finished, click the “save” icon.
4. Next, you will go to SMAPRLE. You will want to click on the first row, go to the “Record” menu,
and click “Insert” (or keyboard shortcut F6). This will create a blank row. You will want to fill this
in as illustrated in the example below. The “Program” is the full code (e.g. ID__-BS). The
“Description” is “Individualized Maj-___ Dept-B_.” Check the “Web” and “Locked” check boxes.
The “Curriculum Dependent” box should be checked by default and the “Curriculum Rules” will
self-check later. The first blank is for the same three letter abbreviation you used on STVMAJR.
The second blank is for an “A” or “S” depending on the degree type. Mark the “Student Level”
and “Course Level” as “UG”. Mark the “College” with the two-digit code for the college in which
the associated department resides. In “Degree”, enter “BS” or “BA” as applicable. Do not make
a mistake on this screen as it is very difficult if not impossible to correct. Click the “Save” icon
when complete.
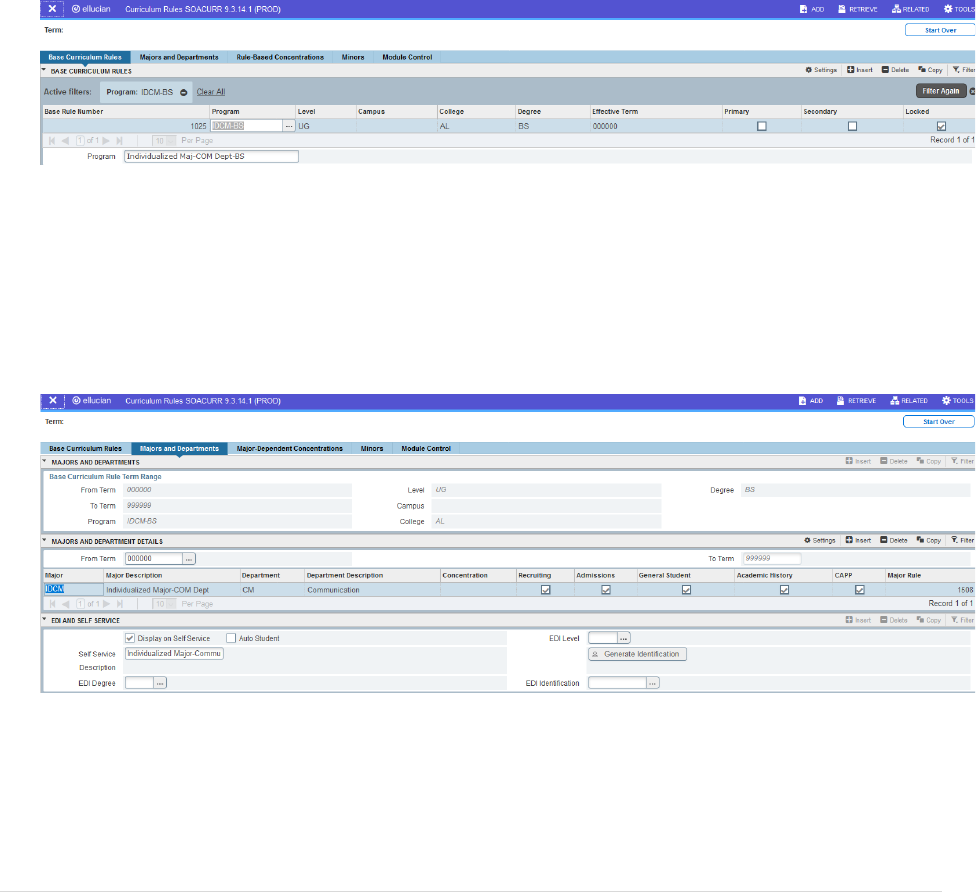
104 | P a g e
5. Next, you will go to SOACURR. You will want to leave the “Term” field blank. Next block and click
in the empty “Program” field. Hit the “F8” key to generate a list of programs. You will want to
click on the first row, go to the “Record” menu, and click “Insert” (or keyboard shortcut F6). This
will create a blank row. You will want to fill this in as illustrated in the example below. The first
tab to complete is “Base Curriculum Rules.” You will leave “Base Rule Number” blank. This will
fill in by default later. Enter the program code (e.g. ID__-BS). Enter the “Level” as “UG.” Enter
the “College” as the two-digit code for the college in which the associated department resides.
The Degree“ is the two digit degree code from the end of the program code. The “Effective
Term” should always be entered as “000000.” Make sure the “Primary” and “Secondary” boxes
are not checked and that “Locked” is checked. This is very important or it will cause “sought”
SHADEGR records to be created which are very difficult to remove once created. The
“Program” name will fill in by default from previous screens. You must hit the “save” icon before
proceeding to the next tab.
6. Next you will go to the “Majors and Departments” tab. In this box, you should enter the major
code in the major field about halfway down (see circled). Ensure that all five check boxes
(Recruiting, Admissions, General Student, Academic History, CAPP) are checked. In the next
block, check the “Display on Self Service” check box and provide the Self-Service Description. It
will be “Individualized Major-____________ Dept-BS.” The blank will be the name of the
department spelled out. You must click the “save” icon before proceeding to the next tab.
7. There is nothing to enter on the “Major-Dependent Concentrations”, and we do not attach the
various minors by default on the “Minors” tab to individualized majors due to the amount of
work. Students can still have a minor if manually entered. On the “Module Control” tab, you will
want to make sure the Recruiting and Admissions module controls are changed from “On” to
“Off.” When finished, click the “save” icon and close SOACURR.
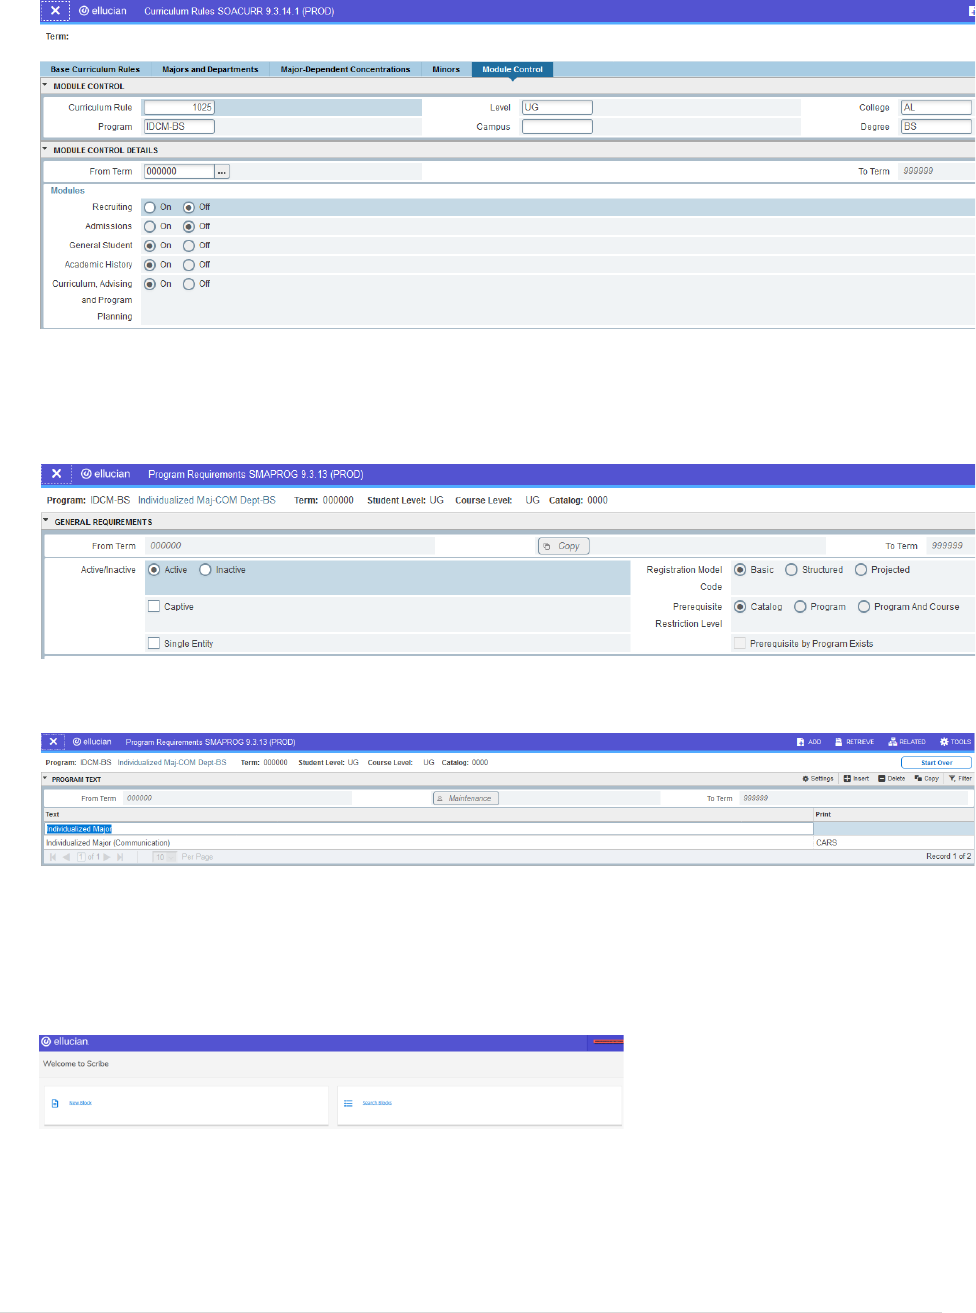
105 | P a g e
8. Next, go to SMAPROG. Enter the program code (i.e. IDPS-BA) and a term of “000000.” Next
block and click the “Active” radio button. Next block again. NOTE: Other fields completed in the
screen shot below fill in automatically when the program code is entered.
9. Enter “Individualized Major” on the first text line and save.
10. Add the new program code to the corresponding Degree Works tables using the steps described
in the “New Major, Graduate Program, or Certificate” portion of this section.
• Open Scribe. Click “Search Blocks.”
• If the program code already existed, search for a scribe block previously built from that code. If the
program did not previously exist, search for a different individualized major code. Click the “Search
for Blocks” button at the bottom.
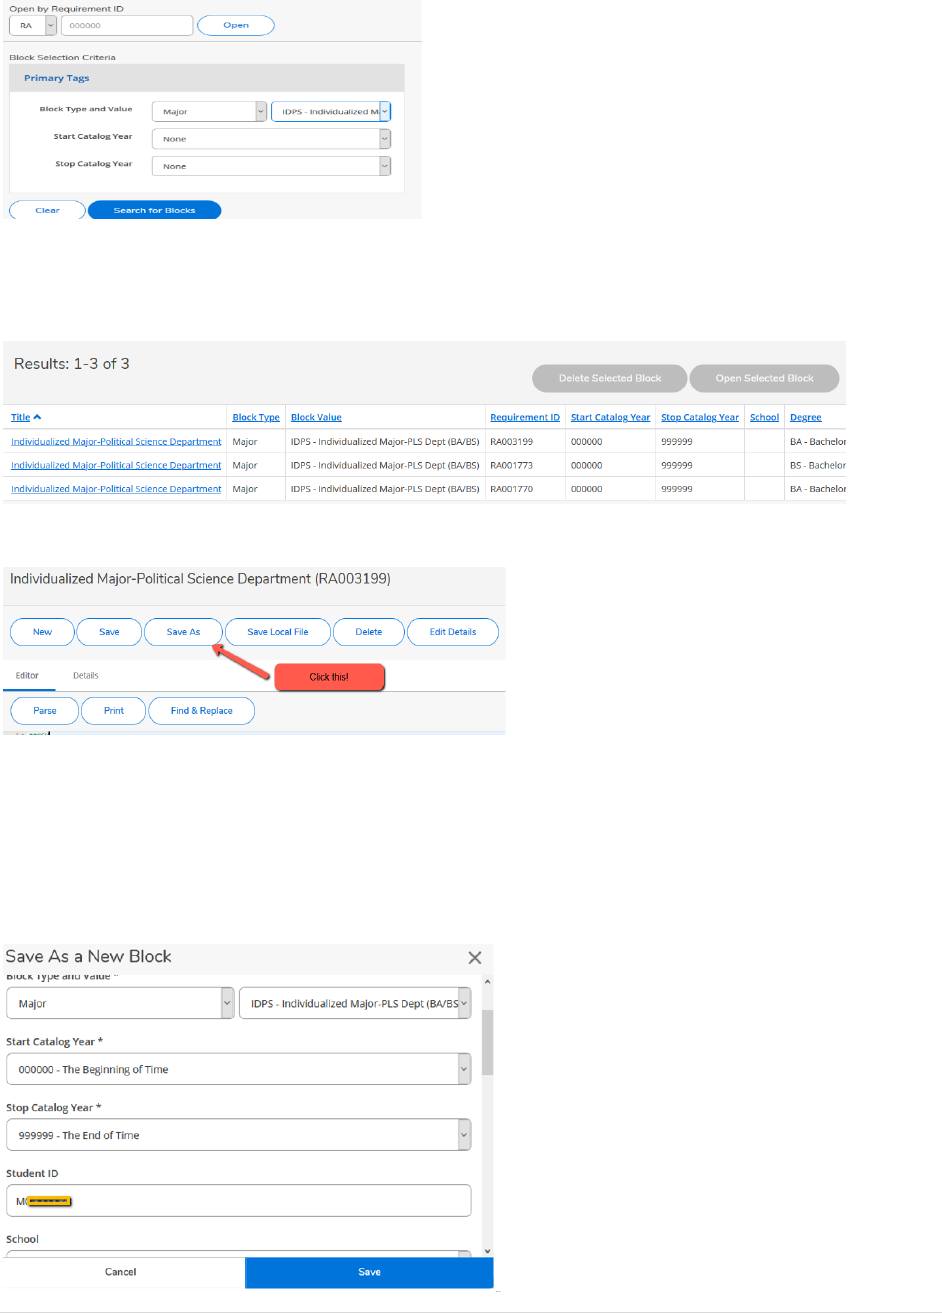
106 | P a g e
• Click the title of the block you wish to open. It is recommended to pick one that has the same
degree type (viewable in the degree column) in order to reduce the number of items that need to be
changed.
• Click the “Save As” (not Save) button as will want to create a new copy that you can edit.
• In the Save As a New Block box, you will want to change the Student ID to be the BearPass number
(M-number) of the student for whom this Individualized Major is approved. Additionally, you will
want to make sure the right major is picked in the 2
nd
Block Type and Value box (which will need to
be changed if you copied from a different individualized major program code) and you will need to
scroll down the box to make sure the Degree field is set to the correct degree of BA or BS. When
finished, click the “Save” button.

107 | P a g e
• In the block header lines at the top of the Scribe field, you will need to change the following:
o Line 2 will need the BearPass number (M-number) changed.
o Line 3 will need the department changed if you copied from a different individualized major
code.
o Line 5 may need the degree changed if it does not already match.
• The next set of text changes occur just before the start of the various course requirement texts. You
should change the number of required credits if it is different than what is required on this
individualized major. In the Remark line, you will want to change the title of the individualized major
to match the title of this individualized major.
• Next you will edit the course requirements to match those approved on this individualized major.
On an individualized major, the label is just the course prefix and number. The last entry should
always be IDS 499. Consult with the Associate Registrar-Degree Programs and Advisement Support if
you encounter any unusual requirement with which you need assistance scribing.
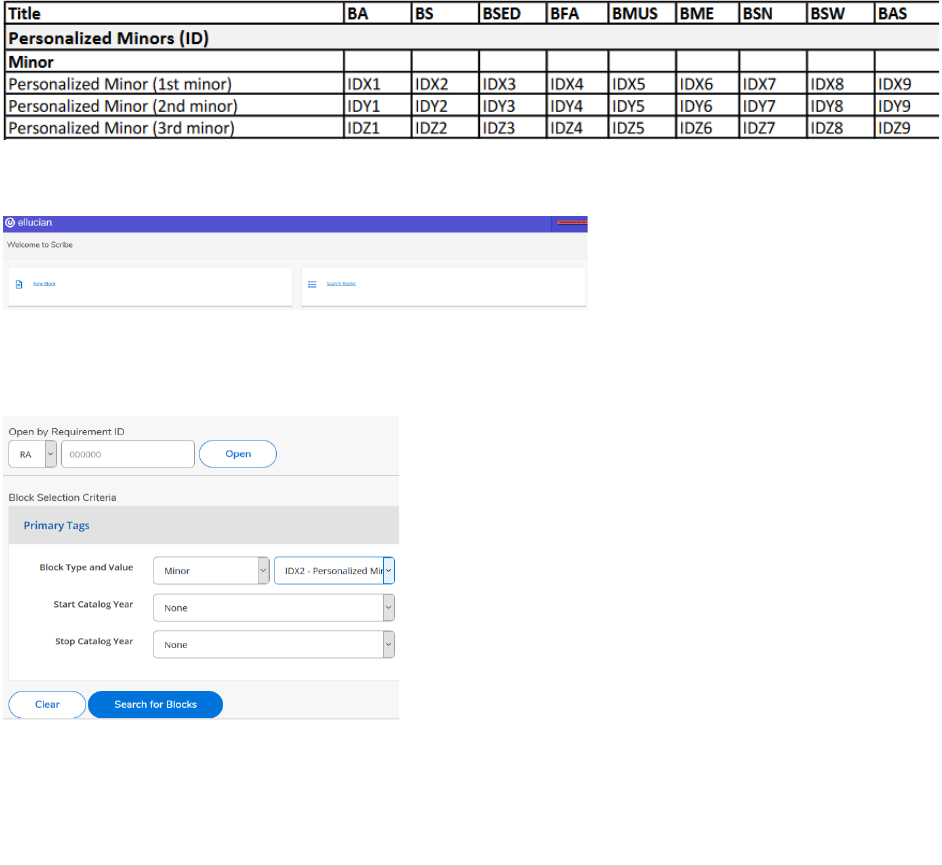
108 | P a g e
• Click “Save” (not Save As) when finished.
• Run a new degree audit for the student to ensure that the individualized major is picking up on the
degree audit and that the scribe requirements appear as intended.
Personalized Minors
• The approving department will send in a Personalized Minor form with all of the corresponding
approval signatures. Look in Banner to see if the student has any other pre-existing personalized
minors. You will need to know this to determine the appropriate minor code.
• Use the following chart to determine the appropriate minor code to use. For example, if this student
were pursuing a BS major and this was their first personalized minor, the code would be IDX2. If the
student were a BFA major and already had one personalized minor, the code for their second
personalized minor would be IDY4. Add the corresponding minor code to their curricular record in
Banner.
• Open Scribe. Click “Search Blocks.”
• Search for a scribe block previously built under that minor code. Click the “Search for Blocks” button
at the bottom.
• Click the title of the block you wish to open.
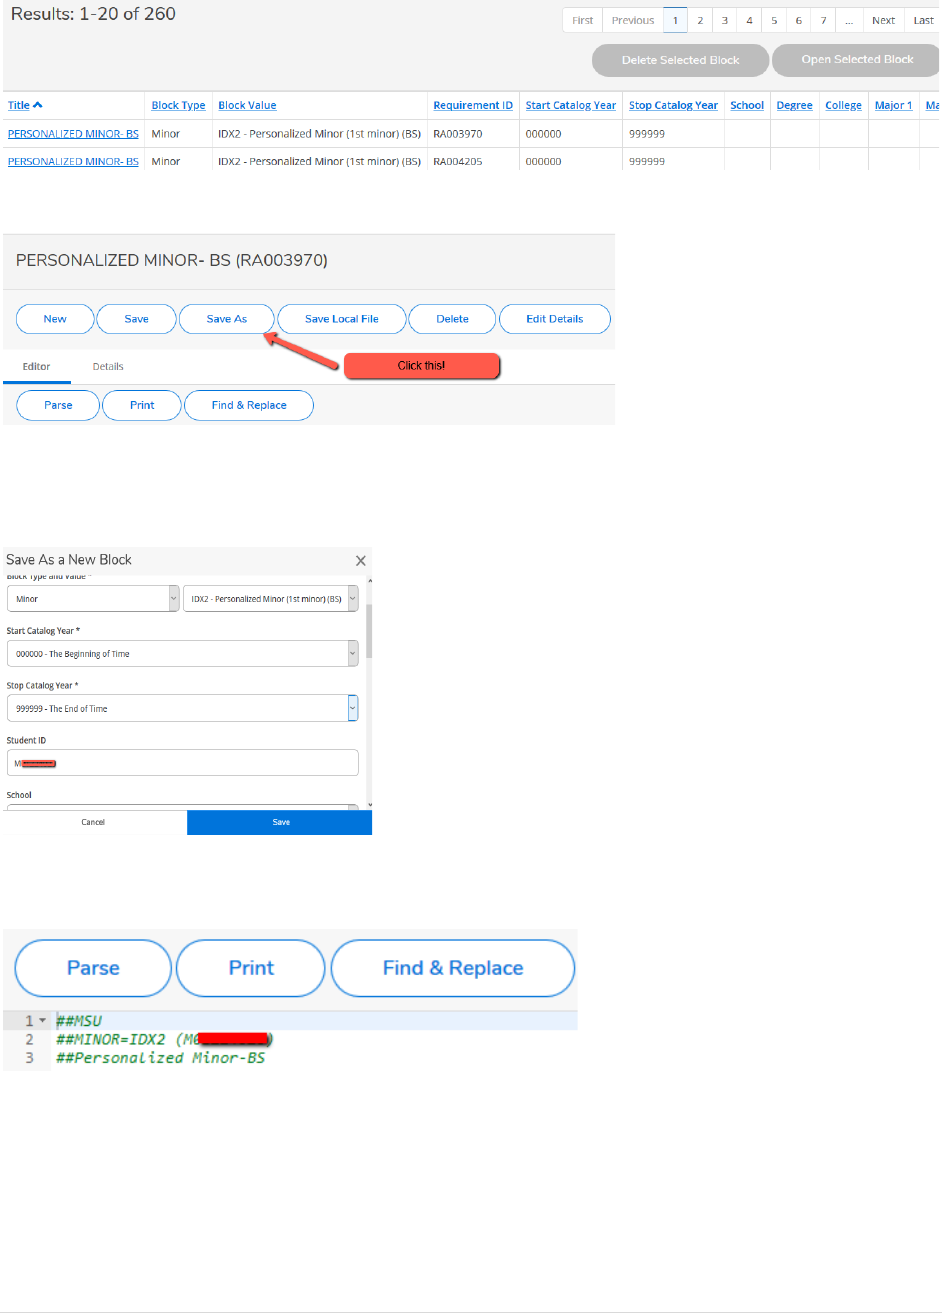
109 | P a g e
• Click the “Save As” (not Save) button as will want to create a new copy that you can edit.
• In the Save As a New Block box, you will want to change the Student ID to be the BearPass number
(M-number) of the student for whom this personalized minor is approved. When finished, click the
“Save” button.
• In the block header lines at the top of the Scribe field, you will need to change the following:
o Line 2 will need the BearPass number (M-number) changed.
• The next set of text changes occur just before the start of the various course requirement texts. You
should change the number of required credits if it is different than what is required on this
personalized minor. In the Remark line, you will want to change the title of the personalized minor
to match the title of this personalized minor.

110 | P a g e
• Next you will edit the course requirements to match those approved on this personalized minor. On
a personalized minor, the label is just the course prefix and number. Consult with the Associate
Registrar-Degree Programs and Advisement Support if you encounter any unusual requirement with
which you need assistance scribing.
• Click “Save” (not Save As) when finished.
• Run a new degree audit for the student to ensure that the personalized minor is picking up on the
degree audit and that the scribe requirements appear as intended.
Changing a Personalized Minor to a Different Degree Type
If a student changed degree types, their personalized minor would also need to change degree types.
You can do this without rebuilding the entire personalized minor.
• Change their personalized minor code in Banner.
• Open the scribe box for their personalized minor. The easiest way to find this is to search by the
Secondary Tag of Student ID for their BearPass number (M-number) rather than by the personalized
minor code.
• This should yield only blocks that are personalized to that student, so the result is usually just the
block you want unless the student has more than one personalized minor or also have an
individualized major. Open the desired scribe block by clicking on the block title.
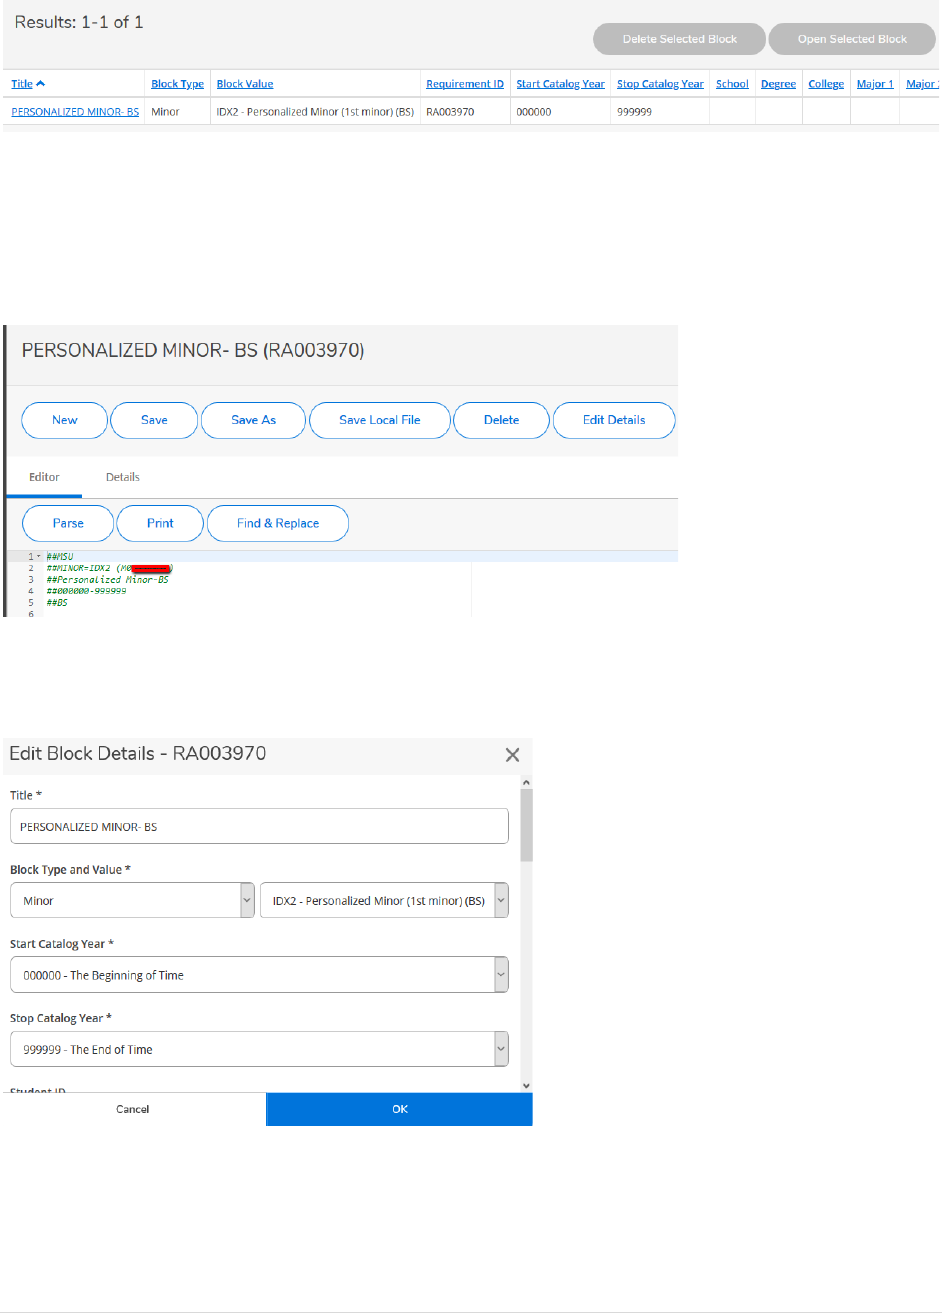
111 | P a g e
• In the block header lines at the top of the Scribe field, you will need to change the following. When
finished, click the “Edit Details” button to the upper-right corner of the box.
o Line 2 will need the minor code changed.
o Line 3 will need the degree type changed.
o Line 5 will need the degree type changed.
• In the Edit Block Details box, you will need to change the degree code at the end of the Title field.
You will need to update the minor code in the second field of Block Type and Value. When finished,
click the “OK” button.
• Click “Save” (not Save As) as you want to edit the existing block, not created an additional
personalized minor block.
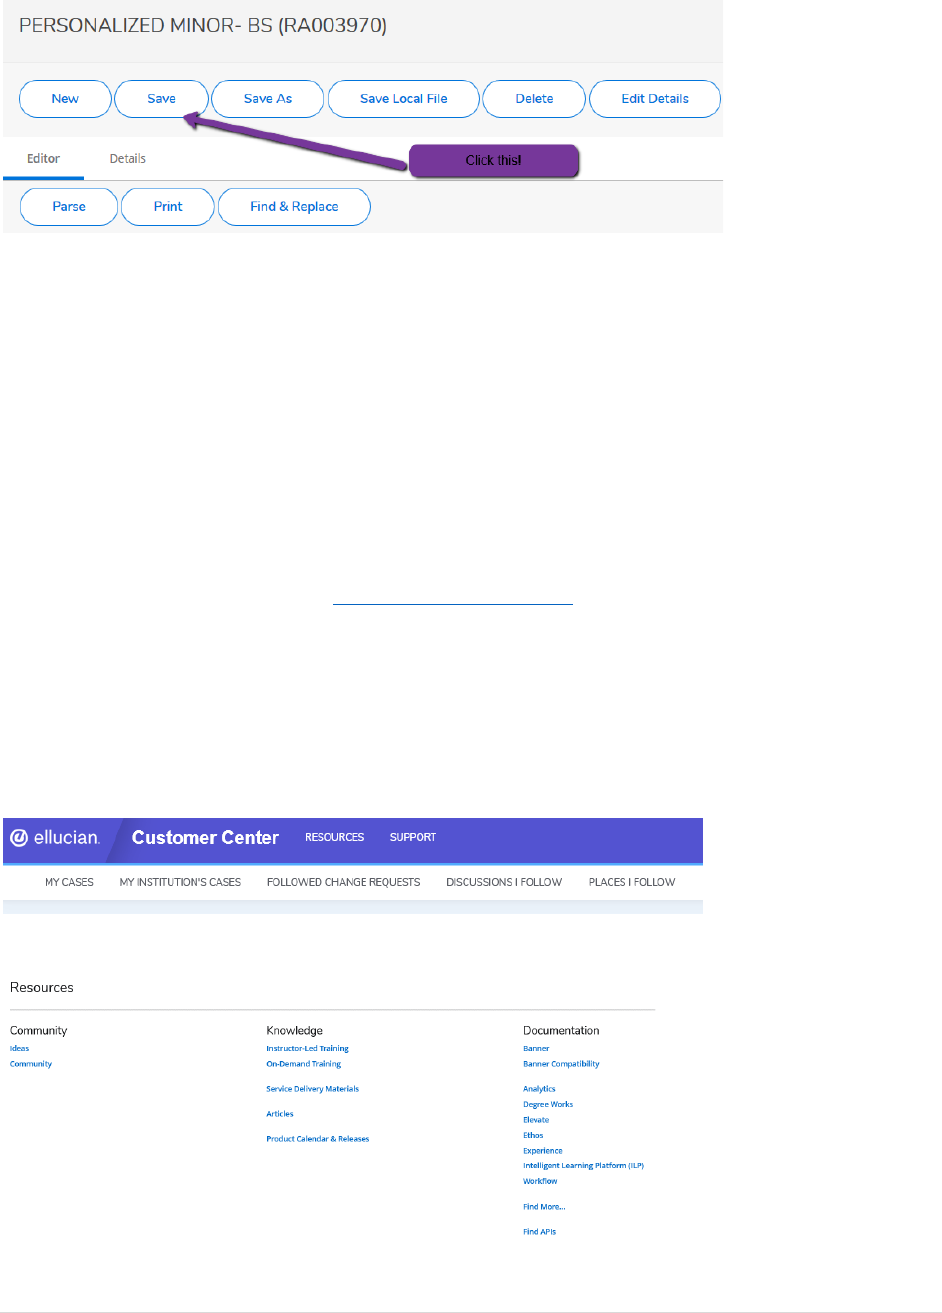
112 | P a g e
• Run a new degree audit for the student to ensure that the individualized major is picking up on the
degree audit and that the scribe requirements appear as intended.
Section 9: Additional Degree Works Tools
There are some additional tools that are very important and useful for managing Degree Works
responsibilities.
Ellucian Customer Center
Ellucian is the company that owns Degree Works as well as Banner. The Ellucian Customer Center is a
tool that provides a variety of various a In order to use these tools, users must sign up for a free Ellucian
users account, which can be done at https://login.ellucian.com/. When you log in, there is a centralized
dashboard that makes it easy to access the various features found in the Customer Center. Some of the
most useful tools are the following:
Degree Works Documentation
There is a library of available documentation about a variety of Ellucian products, including Degree
Works. After logging into the Customer Center, you can access the various user’s guide by clicking on the
Resources link at the top of the page.
Click on the Degree Works link in the Documentation column found on the right side of the page.
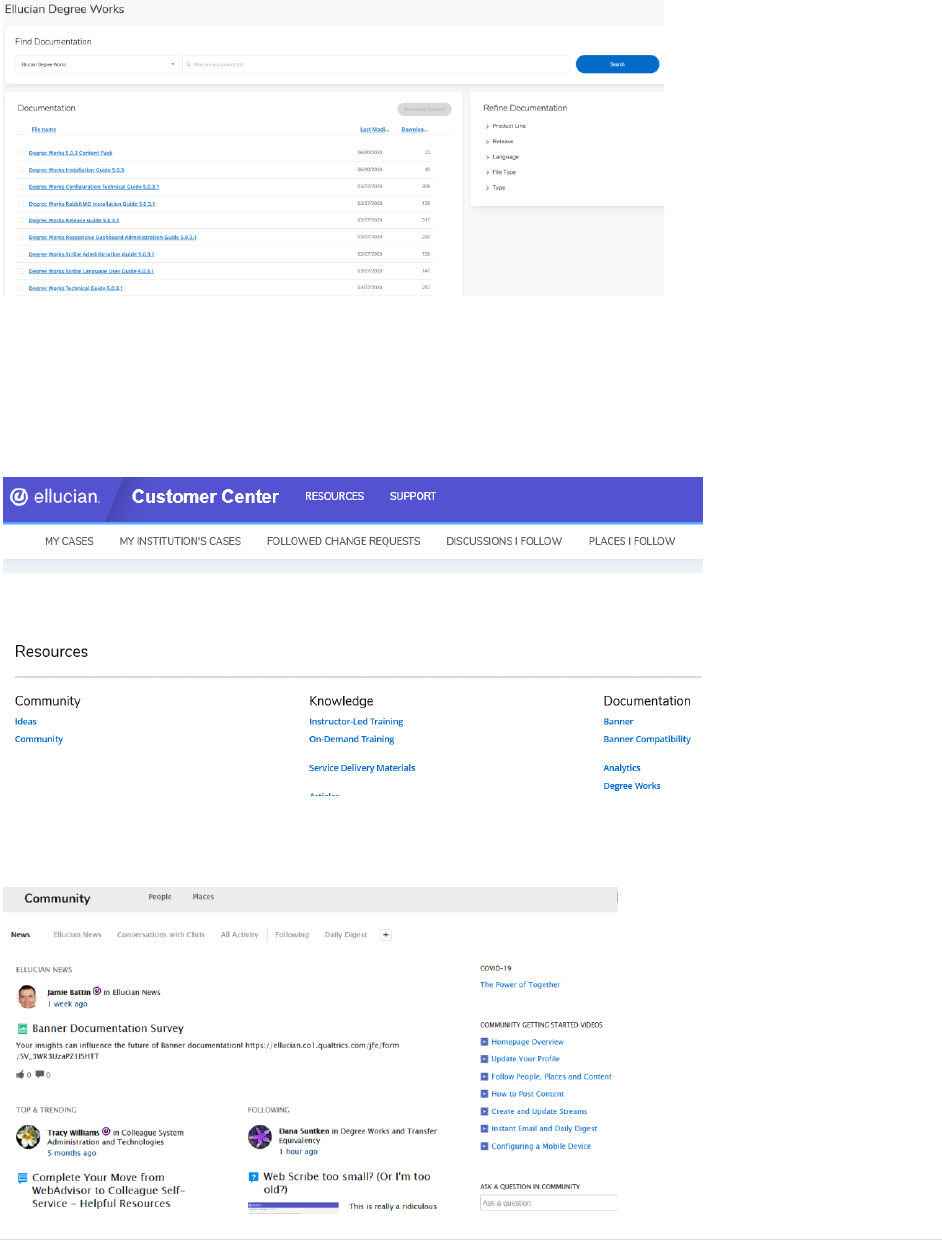
113 | P a g e
You will find numerous guides for different functions and releases of Degree Works. By clicking on the
file name, you can download the guide in .pdf format for review.
Community
Community is a resource where users can post questions to the user community. Other users and
Ellucian support staff have access to read the post and response. Users can also sign up to receive a daily
digest that summarizes all of the posts from the previous day. To access Community, on the Resources
link at the top of the page.
Click on the Community link located in the Community column on the left side of the page.
Resources include videos showing the user how to use Community and to sign up to follow specific
places and content within Community.

114 | P a g e
Ideas
Ideas is an avenue for a user to submit an idea for product improvement. Other users can review your
idea and vote whether they support your idea. Ellucian staff uses this feedback as part of their
consideration about future product updates.
To access Ideas, on the Resources link at the top of the page.
Click on the Ideas link located in the Community column on the left side of the page.
To review an idea, click on that idea’s title to open it. There is also a “Create an Idea” button at the top
of the page where the user can submit their own idea for consideration.
Action Line Cases
When users cannot find answers to their questions using the above methods, there may be occasions
where there is a need to reach out to the Action Line for product support. This electronic submission
tool allows the user to submit their request to Ellucian and communicate back and form (including
submission of attachments and screenshots) to work on solving the problem.
A case can be created directly from the Customer Center dashboard or by clicking on the Support link at
the top of the page.
Users can see a history of their own submitted cases as well as those of their institution.
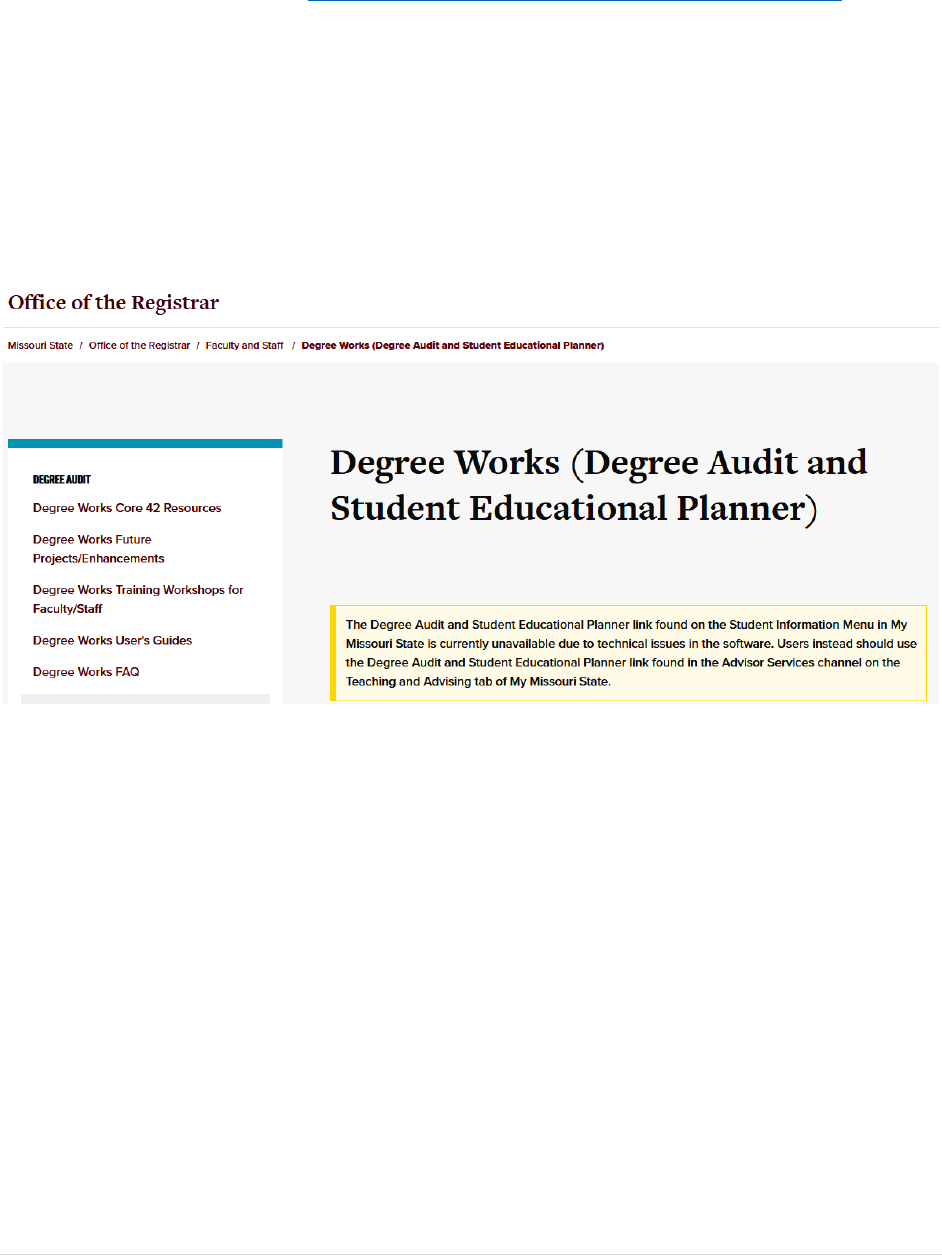
115 | P a g e
Degree Works Website
There is a Degree Works website (https://www.missouristate.edu/registrar/degreeworks.htm)
maintained by the Office of the Registrar to serve as a Degree Works resource to the campus
community. Items found on the site include the following:
• Degree Works Core 42 Resources
• Degree Works Future Projects/Enhancements
• Degree Works Training Workshops for Faculty/Staff
• Degree Works User’s Guides
• Degree Works FAQ
This can be accessed from the Links section in the Degree Works header row.
Administrative Audit
Purpose of the Administrative Audit
The Administrative Audit is a tool developed primarily for Office of the Registrar use to support
administrative needs that do not need to be tracked from a graduation perspective. Below is a
description of the various items found within the Administrative Audit. It is important to remember that
it does not related to a particular degree. For example, if there is a course that is not allowed to apply
towards a degree that such as restriction would not be enforced in an administrative audit. For example,
if course ABC 123 cannot apply towards a BFA degree, a BFA audit would not use the course towards the
120-hour count while an administrative audit would since it is not degree-specific.
120 Credit Count Review
Instead of being programmed to look for 120 credits, this is programmed to look for 1,120 credits so
that the section is never met. The purpose of this is to:
• Allow for advisors and OR staff to more easily see in-progress repeat situation.
• Allow for advisors to more easily determine if a current course is needed to reach 120 credits.
• Allow OR staff to determine course applicability for athletic compliance purposes.
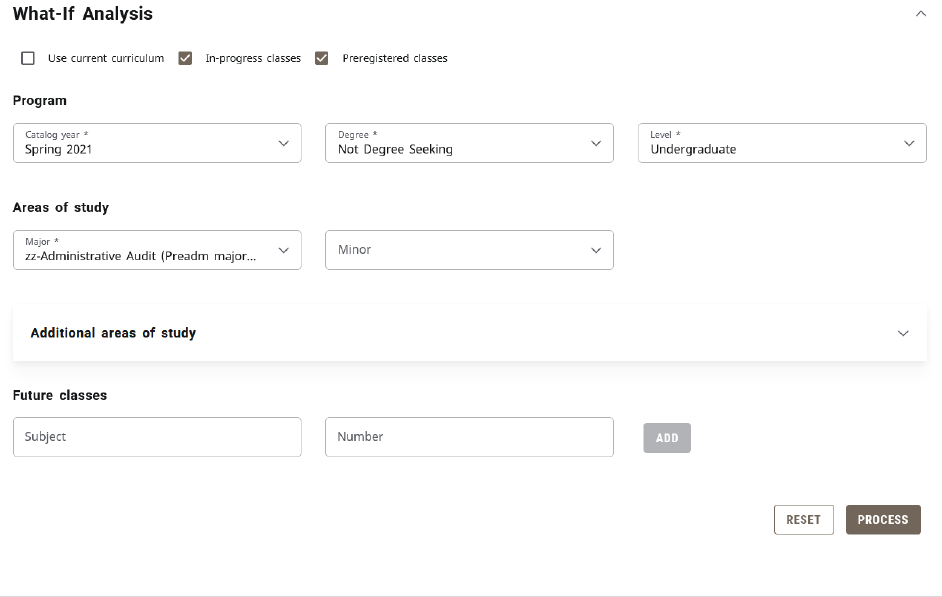
116 | P a g e
40 Hour Upper Division Review
Instead of being programmed to look for 40 upper-division (UD) credits, this is programmed to look for
540 credits so that the section is never met. The purpose of this is to:
• Allow for advisors and OR staff to more easily see in-progress repeat situation.
• Allow for advisors to more easily determine if a current course is needed to reach 40 UD credits.
• Allow OR staff to determine course applicability for athletic compliance purposes.
Core 42 Versus General Education Comparison
The final two sections show the Core 42 and general education blocks so that users can compare the
two to make more informed decisions about which set of requirements may be the most academically
beneficial to follow. Keep in mind that any degree-level or program-level sharing restrictions would not
be enforced on these audits since there is no specific program tied to the administrative audit.
How to Generate an Administrative Audit
• Log into the Degree Works degree audit through My Missouri State. Students will go directly to their
degree audit. Advisors will select the student they wish to review. Click on the “What If” link.
• Pick “Not Degree Seeking” in the Degree field and pick the current catalog term in the Catalog year
field. In the major box, pick the last selection option (zz-Administrative Audit (Preadm major WP).
Disregard the “Preadm major WP” part of the label.
• Pick the level of “Undergraduate” for the administrative audit since the requirements it is designed
to supply information for are undergraduate in nature.
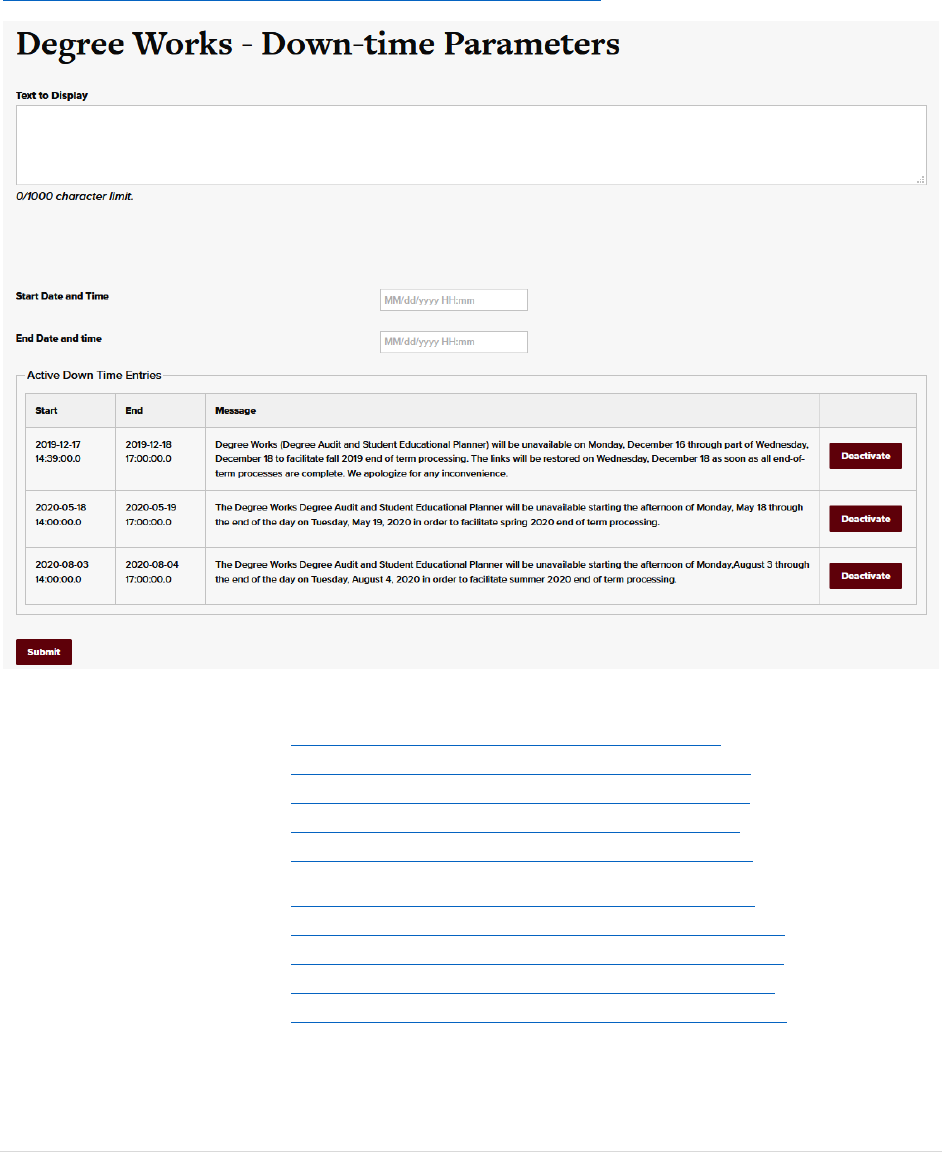
117 | P a g e
Degree Works Downtime Manager
For periods where the degree audit needs to be taken out of service temporarily, the Office of the
Registrar can manage this through the Downtime Manager. Built by MIS, this resource can but used to
place a temporary out of service message.
https://mis.missouristate.edu/University/degreeWorks/pageDown
Degree Works Direct Links
Degree Works PROD: https://degreeworks.missouristate.edu/mobile/
Degree Works Composer: https://degreeworks.missouristate.edu/Composer/
Degree Works Controller: https://degreeworks.missouristate.edu/Controller/
Degree Works Transit: https://degreeworks.missouristate.edu/TransitUI/
Degree Works Scribe: https://degreeworks.missouristate.edu/ScribeUI/#/
Degree Works TEST: https://degreeworkstest.missouristate.edu/mobile/
Degree Works TEST Composer: https://degreeworkstest.missouristate.edu/Composer/
Degree Works TEST Controller: https://degreeworkstest.missouristate.edu/Controller/
Degree Works TEST Transit: https://degreeworkstest.missouristate.edu/TransitUI/
Degree Works TEST Scribe: https://degreeworkstest.missouristate.edu/ScribeUI/#/
